
1. Introducción
This manual provides instructions for the installation, operation, and maintenance of your StarTech.com SLIMDVDRW8U2 External Slim USB 2.0 DVD+/-RW Dual Layer Drive. This device allows you to read and write data to DVD and CD media using a standard USB 2.0 connection, offering portability and convenience for laptops and desktop PCs without an internal optical drive.
2. Contenido del paquete
Verifique que su paquete contenga los siguientes elementos:
- 1x StarTech.com SLIMDVDRW8U2 External Slim USB 2.0 DVD+/-RW Drive
- 1 cable USB 2.0 A a B
- 1x Manual de instrucciones
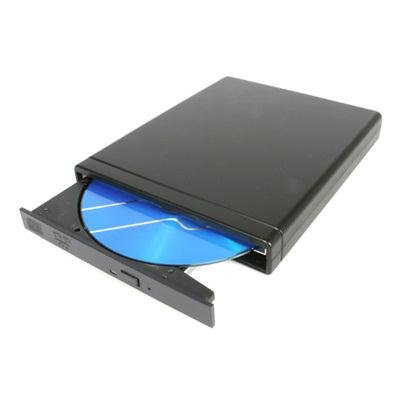
Image: The StarTech.com SLIMDVDRW8U2 external slim DVD+/-RW drive, shown with its sleek black casing and USB port.
3. Requisitos del sistema
Before installing the drive, ensure your system meets the following requirements:
- Available USB 2.0 port (or higher, compatible with USB 2.0)
- Operating System: Windows XP/Vista/7/8/10/11, macOS, or Linux (with USB mass storage device support)
- For DVD/CD burning, compatible burning software may be required (not included).
4. Configuración
Follow these steps to connect and prepare your external DVD drive for use:
- Conecte el cable USB: Plug the USB Type-B connector of the provided USB cable into the corresponding port on the external DVD drive.
- Conectar a la computadora: Plug the USB Type-A connector of the cable into an available USB 2.0 port on your computer (laptop or desktop PC).
- Instalación del controlador: The drive is plug-and-play. Your operating system should automatically detect and install the necessary drivers. This process may take a few moments.
- Verificación: Once drivers are installed, the drive will appear as an optical drive in "My Computer" (Windows) or "Finder" (macOS).
5. Instrucciones de funcionamiento
This section details how to use your external DVD drive for reading and writing optical media.
5.1. Inserción de un disco
- Ensure the drive is connected to your computer and powered on (indicated by an LED, if present).
- Press the eject button on the front of the drive. The disc tray will open.
- Carefully place a CD or DVD onto the tray, ensuring it is centered with the label side facing up.
- Gently push the tray back into the drive until it clicks shut. The drive will begin to read the disc.
5.2. Expulsar un disco
- Software Eject (Recommended): Right-click on the optical drive icon in "My Computer" (Windows) or drag the disc icon to the Trash (macOS) and select "Eject".
- Expulsión de hardware: Press the eject button on the front of the drive. If the disc is in use, the tray may not open. Ensure no applications are accessing the disc before using the hardware eject button.
5.3. Reading Data from a Disc
Once a disc is inserted and recognized by your operating system, you can access its contents. Double-click the drive icon to browse files, or use media player software to play audio CDs or video DVDs.
5.4. Writing Data to a Disc (Burning)
To write data to a blank CD-R/RW or DVD-R/RW disc, you will need compatible burning software. Many operating systems include basic burning capabilities, or you can use third-party software. Follow the instructions provided with your chosen burning software.
- Insert a blank, recordable disc (CD-R/RW, DVD-R/RW, DVD+R/RW, DVD+R DL).
- Open your burning software and select the type of project (data disc, audio CD, video DVD, etc.).
- Añade el files or media you wish to burn to the disc.
- Inicie el proceso de grabación. No desconecte la unidad ni interrumpa el proceso hasta que finalice.
6. Mantenimiento
Proper care ensures the longevity and optimal performance of your drive.
- Limpieza del exterior: Utilice un paño suave, seco y sin pelusa para limpiar el exterior de la unidad. Evite limpiadores abrasivos o disolventes.
- Limpieza de la lente: Do not attempt to clean the internal optical lens manually. Use a specialized CD/DVD lens cleaning disc if necessary.
- Manejo del disco: Always handle discs by their edges. Avoid touching the data surface. Store discs in protective cases when not in use.
- Almacenamiento: Store the drive in a cool, dry place away from direct sunlight and extreme temperatures.
- Evite el polvo: Keep the drive in a clean environment to prevent dust accumulation, which can affect performance.
7. Solución de problemas
If you encounter issues with your external DVD drive, refer to the following common problems and solutions:
7.1. Drive Not Recognized by Computer
- Comprobar conexiones: Asegúrese de que el cable USB esté conectado de forma segura tanto a la unidad como al puerto USB de su computadora.
- Pruebe con otro puerto USB: Conecte la unidad a un puerto USB diferente en su computadora.
- Reiniciar la computadora: A veces, un simple reinicio puede resolver los problemas de detección.
- Comprobar el Administrador de dispositivos (Windows): Open Device Manager and look for "DVD/CD-ROM drives." If there's an exclamation mark, try updating or reinstalling the driver.
- Check System Information (macOS): Go to Apple Menu > About This Mac > System Report > USB. Check if the drive is listed.
7.2. Disc Read Errors or Slow Performance
- Disco limpio: Inspect the disc for scratches, smudges, or dirt. Gently clean it with a soft, lint-free cloth from the center outwards.
- Try Another Disc: Test with a different, known-good disc to determine if the issue is with the drive or the disc itself.
- Limpieza de lentes: Use a specialized CD/DVD lens cleaning disc.
- Uso de recursos: Cierre otras aplicaciones exigentes que puedan estar consumiendo recursos del sistema.
7.3. Disc Tray Does Not Open/Close
- Comprobación de energía: Asegúrese de que la unidad esté conectada correctamente y recibiendo energía.
- Expulsión de software: Attempt to eject the disc through your operating system's software interface first.
- Expulsión manual: If the tray is stuck, locate the small emergency eject hole (often near the eject button). Insert a straightened paperclip into the hole and push gently to manually open the tray.
8. Especificaciones
| Característica | Especificación |
|---|---|
| Número de modelo | SLIMDVDRW8U2 |
| Interfaz de hardware | USB 2.0 |
| Velocidad de escritura en almacenamiento óptico | 8x (DVD), 24x (CD) |
| Velocidad de lectura del almacenamiento óptico | 8x (DVD), 24x (CD) |
| Plataforma de hardware | computadora portátil, computadora |
| Dispositivos compatibles | Most personal computers and laptops with a USB 2.0 port |
| Tecnología de conectividad | USB |
| Factor de forma | Slim External |
| Peso del artículo | 1.92 libras (aprox. 0.87 kg) |
| Fuente de poder | Powered USB |
9. Garantía y asistencia técnica
StarTech.com provides a comprehensive warranty for its products. For specific warranty details, please refer to the warranty information included with your product or visit the official StarTech.com websitio.
For technical support, troubleshooting assistance, or to download the latest drivers and manuals, please visit the StarTech.com support websitio o contacte con su departamento de atención al cliente. La información de contacto suele encontrarse en el empaque del producto o en la página oficial. websitio.
Websitio: www.startech.com/support