
KLH KL-300i
KLH AUDIO KL-300i Nostalgia 5-n-1 System
Model: KL-300i
Introducción
Gracias por la compraasing the KLH AUDIO KL-300i Nostalgia 5-n-1 System. This integrated audio system combines classic and modern audio playback capabilities, including a turntable, CD player, cassette player, AM/FM radio, and an iPod dock. This manual provides essential information for setting up, operating, and maintaining your system to ensure optimal performance and longevity.
Información de seguridad
Lea atentamente todas las instrucciones de seguridad antes de utilizar este producto. Conserve este manual para futuras consultas.
- Fuente de energía: Conecte la unidad únicamente a una toma de corriente CA del volumen especificado.tage.
- Ventilación: Asegúrese de que haya una ventilación adecuada. No bloquee las aberturas de ventilación.
- Agua y humedad: No exponga la unidad a la lluvia ni a la humedad. No coloque objetos con líquidos, como jarrones, sobre la unidad.
- Calor: No coloque la unidad cerca de fuentes de calor como radiadores, rejillas de calefacción, estufas u otros aparatos (incluidos ampificadores) que producen calor.
- Limpieza: Desconecte la unidad del tomacorriente antes de limpiarla. Utilice únicamente un paño seco.
- Servicio: No intente reparar este producto usted mismo. Refiera todo el servicio a personal de servicio calificado.
Contenido del paquete
Verifique que todos los elementos enumerados a continuación estén incluidos en el paquete:
- KLH AUDIO KL-300i Main Unit
- Mando a distancia
- Cable de entrada auxiliar
- AM/FM Antenna Wire
- Manual de instrucciones (este documento)
Producto terminadoview
Familiarize yourself with the various components and controls of your KLH AUDIO KL-300i system.
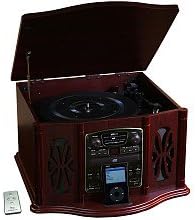
This image displays the KLH AUDIO KL-300i Nostalgia 5-n-1 System. The unit features a dark wood finish. The top lid is open, revealing a turntable. Below the turntable, the front panel includes controls for the CD player, AM/FM radio tuner, and an iPod dock. A small remote control is visible to the left of the main unit.
Controles del panel frontal:
- Botón de encendido: Enciende o apaga la unidad.
- Selector de funciones: Switches between Phono, CD, Radio, iPod, and Aux modes.
- Perilla de volumen: Ajusta el nivel del volumen principal.
- CD Player Controls: Reproducir/Pausa, Detener, Saltar hacia adelante/atrás.
- Sintonizador de radio: AM/FM band selector, Tuning knob.
- Base para iPod: Connector for iPod devices.
- Entrada auxiliar: Entrada de 3.5 mm para dispositivos de audio externos.
- Toma de auriculares: Salida de 3.5 mm para escucha privada.
Panel superior
- Plato giratorio: Para reproducir discos de vinilo.
- Tapa: Protects the turntable when not in use.
Panel lateral:
- Platina de casete: For playing audio cassette tapes.
Configuración
Follow these steps for initial setup of your audio system.
- Colocación: Place the unit on a stable, flat surface away from direct sunlight, heat sources, and excessive dust or moisture. Ensure there is adequate space around the unit for ventilation.
- Conectar la antena: For optimal AM/FM radio reception, connect the supplied antenna wire to the antenna terminal on the rear of the unit. Extend the wire fully for better reception.
- Conexión de energía: Enchufe el cable de alimentación de CA en un tomacorriente de pared estándar.
- Encendido inicial: Press the Power button on the front panel to turn on the unit.
Instrucciones de funcionamiento
Operación general:
- Encendido/apagado: Presione el botón de encendido para encender o apagar la unidad.
- Selección de función: Use the Function Selector knob or buttons to choose your desired audio source (Phono, CD, Radio, iPod, Aux).
- Ajuste de volumen: Gire la perilla de volumen para aumentar o disminuir el nivel de sonido.
Operación de la plataforma giratoria:
- Lift the lid of the unit.
- Coloque un disco de vinilo en el plato del tocadiscos.
- Select the appropriate speed (33 1/3, 45, or 78 RPM) using the speed selector switch. For 45 RPM records, place the included adapter on the spindle if needed.
- Gently lift the tonearm and position the stylus over the desired starting groove of the record.
- Baje lentamente el brazo sobre el disco. La reproducción comenzará automáticamente.
- To stop playback, gently lift the tonearm and return it to its rest.
Funcionamiento del reproductor de CD:
- Press the Function Selector to CD mode.
- Presione el botón de expulsión para abrir la bandeja del CD.
- Coloque un CD con la etiqueta hacia arriba en la bandeja.
- Press the Eject button again to close the tray. The CD will begin playing automatically or display the track count.
- Utilice los botones Reproducir/Pausa, Detener y Saltar para controlar la reproducción.
Funcionamiento del reproductor de casetes:
- Inserte una cinta de casete en la ranura para casete ubicada en el costado de la unidad.
- Presione el botón Reproducir para comenzar la reproducción.
- Use the Fast Forward (FF) button to advance the tape quickly.
- To stop playback, press the Stop/Eject button. Pressing it halfway will eject the tape.
Operación de radio AM/FM:
- Press the Function Selector to Radio mode.
- Select either AM or FM band using the band selector switch.
- Rotate the Tuning knob to search for radio stations.
- Adjust the antenna wire for best reception.
iPod Dock Operation:
- Press the Function Selector to iPod mode.
- Carefully place your compatible iPod device onto the iPod dock connector.
- Use your iPod's controls to select and play music. Audio will be routed through the KLH AUDIO system's speakers.
Aux-In Operation:
- Press the Function Selector to Aux mode.
- Connect an external audio device (e.g., MP3 player, smartphone) to the Aux-In jack on the front panel using the supplied 3.5mm auxiliary cable.
- Play audio from your external device. The sound will be played through the KLH AUDIO system's speakers.
Uso del control remoto:
The remote control primarily operates the CD player functions (Play, Pause, Stop, Skip). Note that the remote cannot turn the unit on or off.
Mantenimiento
El cuidado adecuado garantizará la longevidad de su sistema.
- Limpieza de la unidad: Limpie el exterior de la unidad con un paño suave y seco. No utilice limpiadores abrasivos, ceras ni disolventes.
- Cuidado del lápiz óptico: Handle the turntable stylus with extreme care. Clean the stylus periodically with a soft brush, brushing from back to front.
- Cuidado del CD/Casete: Keep CDs and cassette tapes clean and free of dust. Store them in their cases when not in use.
Solución de problemas
If you experience issues with your system, refer to the following common problems and solutions.
| Problema | Posible causa | Solución |
|---|---|---|
| Sin poder | El cable de alimentación no está enchufado de forma segura. | Verifique la conexión del cable de alimentación a la unidad y al tomacorriente de pared. |
| Sin sonido | Volumen demasiado bajo; Función incorrecta seleccionada; Auriculares conectados. | Increase volume; Select correct function; Disconnect headphones. |
| El plato giratorio no gira | Unit not powered on; Belt dislodged. | Ensure unit is on; Contact service if belt issue suspected. |
| Mala recepción de radio | Antena no extendida o posicionada correctamente. | Extend and adjust the antenna wire for better signal. |
| El CD no se reproduce | CD inserted incorrectly; CD is scratched or dirty. | Ensure CD is label-side up; Clean or replace CD. |
Presupuesto
| Característica | Especificación |
|---|---|
| Fuente de poder | CA 120V ~ 60Hz |
| Dimensiones (An x Pr x Al) | Aprox. 43.2 cm x 43.2 cm x 26.7 cm |
| Velocidades de la plataforma giratoria | 33 1/3, 45, 78 RPM |
| Rango de radiofrecuencia | AM: 530-1710 kHz, FM: 88-108 MHz |
| Compatibilidad con CD | CD, CD-R / RW |
| iPod Dock | Compatible with older generation iPods (30-pin connector) |
Garantía y soporte
This product is covered by a limited manufacturer's warranty. For specific warranty terms and conditions, please refer to the warranty card included with your purchase or contact KLH customer support. If you require technical assistance or have questions not covered in this manual, please contact KLH customer service through their official websitio o la información de contacto proporcionada con su producto.
Ask a question about this manual
Ask about setup, troubleshooting, compatibility, parts, safety, or missing instructions. Manuals+ will review the question and use this page’s manual context to help answer it.