
1. Introducción
This manual provides instructions for the safe and efficient operation of your Intermatic TN111CL Lamp & Appliance Timer. Please read these instructions thoroughly before using the device and retain them for future reference. The TN111CL timer is designed to automatically turn lamps and appliances ON and OFF at preset times, offering convenience and energy management.
2. Instrucciones de seguridad
- Uso exclusivo en interiores: This timer is intended for indoor use in dry locations. Do not expose to rain or moisture.
- Clasificación eléctrica: Do not exceed the electrical ratings of the timer. Refer to the 'Specifications' section for details. Overloading the timer can cause overheating and fire.
- Toma de tierra: Asegúrese de que el temporizador esté enchufado a un tomacorriente con conexión a tierra adecuada.
- Niños: Mantener fuera del alcance de los niños. Esto no es un juguete.
- Limpieza: Unplug the timer from the wall outlet before cleaning. Use a dry cloth; do not use liquid cleaners.
- Refacción: Do not attempt to repair or disassemble the timer. Refer all servicing to qualified service personnel.
3. Producto terminadoview
The Intermatic TN111CL is a mechanical timer featuring an easy-set dial for scheduling ON/OFF operations. It is designed for use with various lamps y pequeños electrodomésticos.
Características principales:
- 2 ON/OFF settings per 24-hour period.
- Dial Easy-Set para una programación sencilla.
- Minimum ON/OFF time: 1/2 hour.
- Maximum ON/OFF time: 23 1/2 hours.
Diagrama del producto:
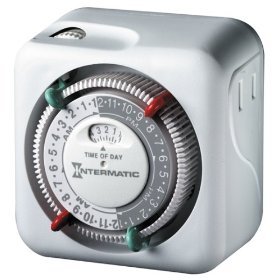
Figura 1: Frente view of the Intermatic TN111CL Lamp & Appliance Timer, showing the central dial and outlet.
4. Configuración
- Conecte el temporizador: Inserte el temporizador en un tomacorriente de pared CA estándar de 125 V.
- Establecer hora actual: Rotate the entire dial clockwise until the current time aligns with the arrow indicator on the timer's face. The dial is marked in 15-minute increments. Ensure you distinguish between AM and PM hours (e.g., 3 PM is 15:00 on a 24-hour clock).
- Plug In Appliance: Conecta el lamp or appliance you wish to control into the outlet on the side of the timer. Ensure the appliance's power switch is in the ON position.
5. Instrucciones de funcionamiento
The TN111CL timer uses a series of pins around the dial to set ON and OFF times.
- Identificar pines: The dial has segments that can be pushed inwards or pulled outwards. Each segment represents 15 minutes.
- Establecer hora de encendido: To set a period when the appliance should be ON, push the corresponding segments (pins) inwards. For example, if you want the appliance ON from 6:00 PM to 10:00 PM, push in all the pins between the 18:00 and 22:00 marks on the dial.
- Hora de apagado: To set a period when the appliance should be OFF, pull the corresponding segments (pins) outwards. These are the default positions for the pins.
- Anulación manual: The timer typically has a manual override switch (often a small slider or button) that allows you to turn the connected appliance ON or OFF independently of the timer settings. Refer to the markings on your specific unit for its location and function (e.g., 'Timer ON', 'Timer OFF', 'Always ON').
The timer will cycle through the programmed ON/OFF settings daily. The minimum ON or OFF duration is 30 minutes (two 15-minute segments).
6. Mantenimiento
- Limpieza: Para limpiar el temporizador, desconéctelo del tomacorriente. Limpie el exterior con un paño suave y seco. No utilice limpiadores abrasivos ni disolventes, ni sumerja la unidad en agua.
- Almacenamiento: Si va a guardar el temporizador durante un período prolongado, desconéctelo y guárdelo en un lugar fresco y seco, alejado de la luz solar directa y de temperaturas extremas.
- Inspección: Inspeccione periódicamente el temporizador y su cable para detectar cualquier signo de daño, como cables desgastados o grietas. Si encuentra algún daño, deje de usarlo y reemplace la unidad.
7. Solución de problemas
- El aparato no se enciende ni se apaga en los horarios programados:
- Ensure the timer is plugged firmly into a working outlet.
- Verify the appliance plugged into the timer is switched to the ON position.
- Check that the current time is correctly set on the dial.
- Confirm that the ON/OFF pins are correctly pushed in (ON) or pulled out (OFF) for the desired times.
- Check the manual override switch position.
- Timer makes a ticking sound:
- This is normal for mechanical timers and indicates the internal clock mechanism is operating.
- Appliance remains ON or OFF constantly:
- Check the manual override switch. It may be set to 'Always ON' or 'Always OFF'.
- Re-verify the pin settings for your desired ON/OFF schedule.
8. Especificaciones
| Especificación | Valor |
|---|---|
| Número de modelo | TN111CL |
| Volumentage | 125 Voltios AC |
| Frecuencia | 60 Hz |
| Resistive Load (R) | 15 Amps, 1750 vatios |
| Tungsten Load (T) | 1750 vatios |
| Inductive Load (H) | 1750 vatios |
| Motor Load (TV-5) | 1/3 cv |
| Número de configuraciones de encendido/apagado | 2 per 24-hour period |
| Tiempo mínimo de encendido/apagado | 1 / 2 Hora |
| Maximum ON/OFF Time | 23 1 / 2 Horas |
9. Garantía y soporte
Garantía:
This Intermatic TN111CL Lamp & Appliance Timer comes with a GARANTÍA DE POR VIDAConserve su comprobante de compra para reclamaciones de garantía.
Atención al cliente:
For technical assistance, troubleshooting beyond this manual, or warranty inquiries, please contact Intermatic customer support directly. Refer to the official Intermatic websitio o embalaje del producto para obtener la información de contacto más actualizada.