
1. Introducción
This manual provides instructions for the installation, operation, and maintenance of your Orbit 27954 Pocket Star 4-Station Plus Indoor Sprinkler Controller. This controller is designed to manage residential 24-volt sprinkler systems, offering dual programming capabilities and a rain delay feature.
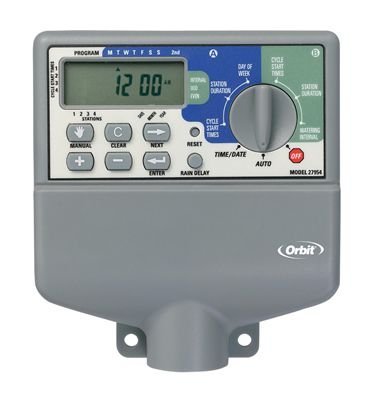
Image 1.1: The Orbit 27954 Pocket Star 4-Station Plus Indoor Sprinkler Controller. This image displays the front panel of the controller, featuring its digital display and control buttons.
2. Información de seguridad
Please read all instructions carefully before installation and operation. Failure to follow these instructions may result in property damage or personal injury.
- This controller is designed for indoor use only. Do not install outdoors or in areas exposed to water.
- Asegúrese de que la fuente de alimentación esté desconectada antes de realizar cualquier cableado o mantenimiento.
- All electrical wiring should comply with local codes and regulations. If you are unsure, consult a qualified electrician.
- No intente reparar la unidad usted mismo. Encargue cualquier servicio técnico a personal cualificado.
3. Configuración
3.1 Desembalaje
Carefully remove the controller from its packaging. Verify that all components are present. Retain packaging for future use or disposal.
3.2 Montaje del controlador
- Choose a suitable indoor location near a standard 120V AC outlet and away from direct sunlight or extreme temperatures.
- Use the provided mounting template (if applicable) or mark the desired screw locations on the wall.
- Install mounting screws into the wall, leaving the screw heads slightly extended.
- Hang the controller onto the screws using the keyhole slots on the back of the unit.
- Secure the controller by tightening the screws.
3.3 Cableado
Importante: Desconecte la energía antes de realizar el cableado.
- Conexión de energía: Plug the controller's power cord into a standard 120V AC outlet.
- Cableado de válvulas: Connect one wire from each sprinkler valve to a numbered terminal (1, 2, 3, 4) on the controller. Connect the common wire from all valves to the terminal labeled 'C' (Common).
- Sensor Wiring (Optional): If using a rain sensor, connect its wires to the designated sensor terminals. Refer to your sensor's manual for specific wiring instructions.
3.4 Encendido inicial
Once all wiring is complete and secure, connect the power cord to the electrical outlet. The controller display should illuminate, indicating it is powered on.
4. Instrucciones de funcionamiento
4.1 Comprensión de la pantalla y los botones
The controller features a digital display and several buttons for navigation and programming. Familiarize yourself with the 'Program', 'Set', 'Arrow' (up/down), and 'Rain Delay' buttons.
4.2 Configuración de la hora y fecha actuales
- Press the 'Set' button repeatedly until 'Set Time' appears on the display.
- Use the 'Arrow' buttons to adjust the hour, then press 'Set' to move to minutes.
- Repeat for minutes, AM/PM, year, month, and day.
4.3 Programación de horarios de riego
The controller supports dual programs (A and B) for flexible scheduling.
- Seleccionar programa: Press the 'Program' button to select Program A or B.
- Establecer horas de inicio: Press 'Set' until 'Start Time' appears. Use 'Arrow' buttons to set the desired start time for the first cycle. The controller supports multiple start times per program.
- Establecer tiempos de ejecución: Press 'Set' until 'Run Time' appears. Use 'Arrow' buttons to set the duration (in minutes) for each station (1-4).
- Establecer días de riego: Press 'Set' until 'Watering Days' appears. Use 'Arrow' buttons to select specific days of the week, odd/even days, or interval watering.
4.4 Operación manual
Para regar manualmente una estación o todas las estaciones:
- Press the 'Manual' button (if available, or follow specific manual run instructions in the display menu).
- Select the desired station or 'All Stations'.
- Set the run time using the 'Arrow' buttons.
- The selected station(s) will begin watering immediately.
4.5 Función de retraso por lluvia
The rain delay feature allows you to pause watering for a set period without losing your programmed schedule.
- Press the 'Rain Delay' button.
- Use the 'Arrow' buttons to select the delay duration (e.g., 24, 48, or 72 hours).
- The controller will pause watering for the selected period and resume the schedule automatically afterward.
5. Mantenimiento
5.1 Limpieza
Limpie el exterior del controlador con un paño suave.amp paño. No utilice limpiadores abrasivos ni disolventes, ya que pueden dañar la pantalla oasing.
5.2 Consideraciones estacionales
As an indoor controller, the unit is not directly exposed to outdoor elements. However, ensure the indoor environment remains within recommended operating temperatures to prolong its lifespan.
6. Solución de problemas
| Problema | Posible causa | Solución |
|---|---|---|
| La pantalla del controlador está en blanco. | Sin energía. | Check power outlet, ensure power cord is securely plugged in. Verify circuit breaker. |
| Sprinklers do not turn on. | Incorrect programming, wiring issue, or rain sensor activated. | Verify watering schedule. Check valve wiring connections. Ensure rain sensor is not active or bypassed. |
| Only some sprinklers turn on. | Faulty valve, wiring issue to specific station. | Check wiring for the non-working station. Test the valve manually. |
| Watering occurs at incorrect times. | Incorrect time/date setting or program schedule. | Verify current time and date. Review and adjust program start times and watering days. |
7. Especificaciones
- Modelo: Orbit 27954 Pocket Star 4-Station Plus Indoor Controller
- Marca: Órbita
- Número de pieza: 27954
- Número de estaciones: 4
- Volumentage: 24 voltios (CA)
- Entrada de interfaz humana: Botones
- Pilas necesarias: No
- Instalación: Interior
- Características: Dual program, Rain delay
- Dimensiones del paquete: 21.84 x 13.46 x 6.6 cm
- Peso: 226.8 gramos
8. Garantía y soporte
Para obtener información sobre la garantía o asistencia técnica, consulte el sitio web oficial de Orbit. webSitio web o contacte con el departamento de atención al cliente. Conserve su recibo de compra como comprobante.