1. Introducción
This manual provides essential instructions for the safe and efficient operation of your Sharp CD-DH950P 240W Mini-Component System. This system features a 5-disc CD changer, a cassette deck, an iPod/iPhone docking station, a USB host for digital audio playback, and an AM/FM tuner. Please read this manual thoroughly before using the system and retain it for future reference.
2. Información de seguridad
- Fuente de energía: Conecte la unidad únicamente a una toma de CA del volumen especificado.tage.
- Ventilación: Asegúrese de que haya una ventilación adecuada. No bloquee las aberturas de ventilación.
- Agua y humedad: No exponga la unidad a la lluvia, humedad o goteo o salpicaduras de líquidos.
- Calor: Mantenga la unidad alejada de fuentes de calor como radiadores, rejillas de calefacción, estufas u otros aparatos que produzcan calor.
- Limpieza: Desconecte la unidad del tomacorriente antes de limpiarla. Utilice un paño suave y seco.
- Servicio: No intente reparar este producto usted mismo. Refiera todo el servicio a personal de servicio calificado.
3. Contenido del paquete
Verifique que su paquete contenga los siguientes elementos:
- Main Unit (CD-DH950P)
- Orador izquierdo
- Altavoz derecho
- Control remoto con pilas
- Antena de cuadro AM
- Antena de alambre FM
- Cable de alimentación
4. Configuración
4.1 Conexión de los altavoces
Connect the speaker wires from the main unit to the corresponding terminals on the back of each speaker. Ensure correct polarity (red to red, black to black) for optimal sound quality. The left speaker connects to the left speaker output, and the right speaker to the right speaker output.
4.2 Conexión de las antenas
- Antena FM: Connect the supplied FM wire antenna to the FM antenna terminal on the rear of the main unit. Extend the wire for better reception.
- Antena AM: Connect the supplied AM loop antenna to the AM antenna terminals on the rear of the main unit. Position the antenna for best reception.
4.3 Conexión de alimentación
Plug the power cord into the AC IN jack on the rear of the main unit, then plug the other end into a standard AC wall outlet.
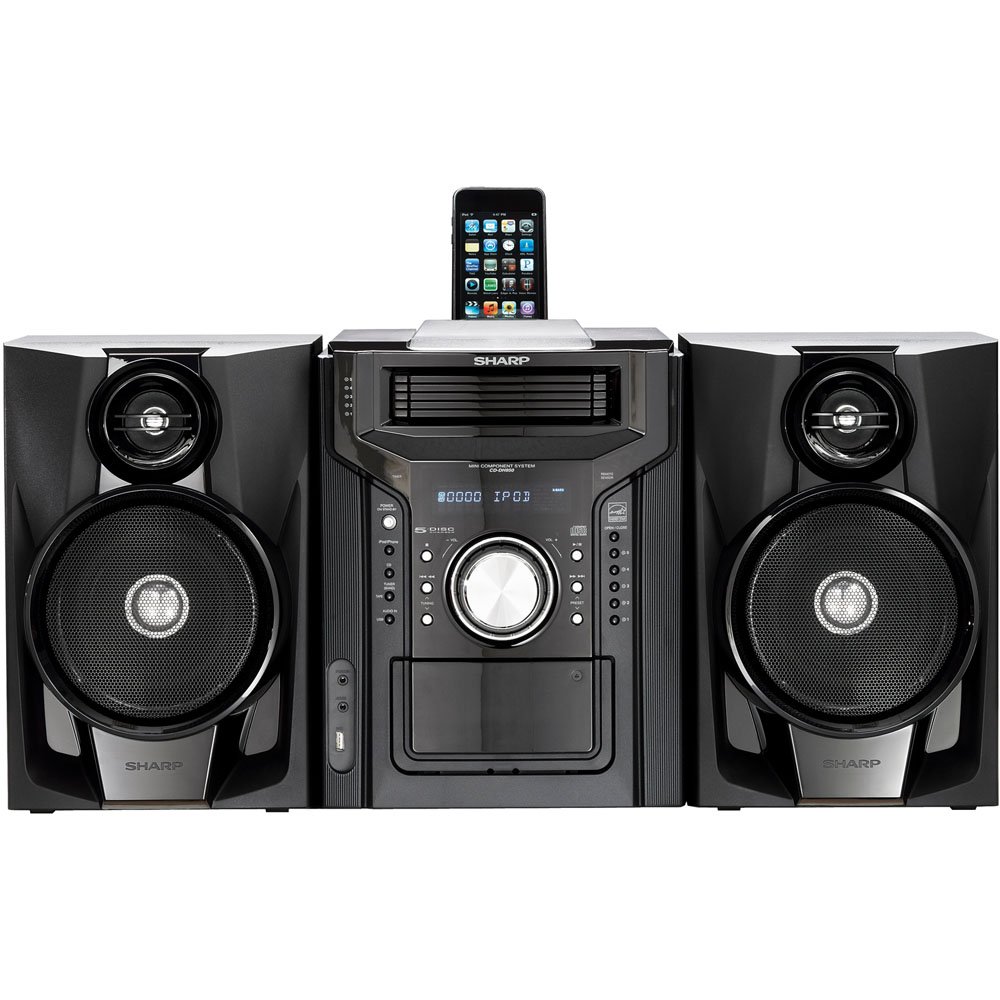
Figura 4.3.1: En general view of the Sharp CD-DH950P Mini-Component System, showing the main unit flanked by two speakers, with an iPhone docked on top of the main unit.
5. Instrucciones de funcionamiento
5.1 Encendido/apagado y control de volumen
- Presione el FUERZA Botón en el panel frontal o en el control remoto para encender o apagar la unidad.
- Girar el VOLUMEN perilla en el panel frontal o utilice el VOLUMEN +/- Botones en el control remoto para ajustar el nivel de sonido.
5.2 Reproducción de CD
This system features a 5-disc CD changer.
- Presione el ABRIR/CERRAR botón para abrir la bandeja de CD.
- Place up to five CDs on the disc trays, label side up.
- Prensa ABRIR/CERRAR de nuevo para cerrar la bandeja.
- Presione el CD Botón para seleccionar la función CD.
- Presione el REPRODUCIR/PAUSA para iniciar la reproducción.
- Utilice el SALTAR buttons to navigate between tracks or discs.
5.3 Funcionamiento de la pletina de casete
- Presione el TAPE OPEN/CLOSE Botón para abrir la platina de casete.
- Inserte una cinta de casete.
- Presione el CINTA Botón para seleccionar la función de casete.
- Prensa JUGAR para comenzar la reproducción.
- To record, ensure the source is selected (e.g., CD, Tuner) and press the REGISTRO button on the cassette deck.
5.4 Conexión para iPod/iPhone
The system includes a top-mounted docking slot for compatible iPod and iPhone devices (30-pin connector).
- Carefully place your iPod or iPhone into the docking slot.
- The system will automatically switch to iPod/iPhone mode or you may need to press the iPod / iPhone botón.
- Use the system's controls or your device's controls to play music. The device will also charge while docked.
5.5 USB Host Playback
Connect a USB storage device containing MP3 or WMA audio files to the USB port on the front panel.
- Inserte el dispositivo USB en el puerto USB.
- Presione el USB Botón para seleccionar la función USB.
- Use the playback controls to navigate and play files.
Sintonizador AM/FM 5.6
- Presione el SINTONIZADOR Botón para seleccionar radio AM o FM.
- Utilice el SINTONIZACIÓN +/- Botones para sintonizar manualmente una emisora.
- To auto-scan, press and hold the SINTONIZACIÓN +/- botones.
- To store a preset, tune to the desired station, then press MEMORIA followed by a preset number.
5.7 entrada de audio
Connect an external audio device (e.g., MP3 player, smartphone) to the AUDIO IN jack on the front panel using a 3.5mm stereo cable.
- Connect your device to the AUDIO IN jack.
- Presione el AUDIO EN button to select this source.
- Controle la reproducción desde su dispositivo conectado.
6. Mantenimiento
6.1 Limpieza de la unidad
Wipe the exterior of the unit with a soft, dry cloth. Do not use abrasive cleaners, waxes, or solvents. Ensure the unit is unplugged before cleaning.
6.2 Cuidado de CD y casetes
- Handle CDs by their edges to avoid fingerprints and scratches. Clean discs with a soft, lint-free cloth from the center outwards.
- Store cassette tapes away from strong magnetic fields and direct sunlight.
7. Solución de problemas
| Problema | Posible causa | Solución |
|---|---|---|
| Sin poder | Cable de alimentación no conectado; toma de corriente defectuosa | Asegúrese de que el cable de alimentación esté bien enchufado; pruebe con una toma de corriente diferente |
| Sin sonido | Volumen demasiado bajo; Altavoces no conectados; Fuente incorrecta seleccionada | Aumentar el volumen; Verificar las conexiones de los altavoces; Seleccionar la fuente de entrada correcta |
| El CD no se reproduce | Disc inserted incorrectly; Disc is dirty or scratched | Insert disc correctly (label side up); Clean or replace disc |
| Mala recepción de radio | Antenna not positioned correctly; Weak signal | Adjust position of AM/FM antennas; Try auto-tuning or manual fine-tuning |
| iPod/iPhone not charging/playing | Device not properly docked; Device not compatible (e.g., newer connector) | Re-dock the device; Note that this system uses a 30-pin connector, newer devices may require an adapter (not included) |
8. Especificaciones
- Marca: Afilado
- Modelo: CD-DH950P
- Potencia de salida total: 240 Watts RMS (85W/ch FTC)
- Configuración de altavoces: Canal 2.1
- Formatos de audio compatibles: CD, MP3, WMA
- Relación señal / ruido: 100 dB
- Dispositivos compatibles: MP3 Player, Smartphone (via 30-pin dock or USB/Audio In)
- Dimensiones (L x An x Al): 27.6 x 13.6 x 13.5 pulgadas
- Peso del artículo: 24.4 libras
- Código postal: 074000369863, 074000369290
9. Información de garantía
This product is covered by a 1-year limited warranty from the date of purchase. Please refer to the warranty card included with your product for full terms and conditions, or contact Sharp customer service for details.
10. Soporte
For further assistance, technical support, or service inquiries, please contact Sharp customer service. Contact information can typically be found on the Sharp official websitio o en la documentación proporcionada con su producto.