1. Introducción
Gracias por la compraasing the Caliber RMD 068-2 Car Radio USB/SD Player. This manual provides detailed instructions for the installation, operation, and maintenance of your new car radio. Please read this manual thoroughly before using the product to ensure proper functionality and safety. Keep this manual for future reference.
2. Información de seguridad
- Instalación: Ensure the unit is installed by a qualified technician to prevent damage to the vehicle's electrical system. Incorrect wiring can cause fire or electrical shock.
- Fuente de alimentación: Conecte la unidad únicamente a una batería de automóvil de 12 V CC con conexión a tierra negativa.
- Fusibles: Always replace fuses with new ones of the specified rating. Using an incorrect fuse can cause damage to the unit or vehicle.
- Nivel de volumen: Do not operate the unit at excessively high volume levels, as this may impair your ability to hear external traffic sounds and could be dangerous.
- Limpieza: Utilice un paño suave y seco para limpiar. No utilice limpiadores abrasivos ni disolventes.
- Humedad: No exponga la unidad a la humedad ni al agua.
3. Contenido del paquete
Por favor, compruebe que todos los elementos estén presentes:
- Caliber RMD 068-2 Car Radio Unit
- Panel frontal desmontable
- Arnés de cableado ISO
- Marco de montaje
- Llaves de desmontaje (2 uds.)
- Manual de usuario (este documento)
4. Producto terminadoview
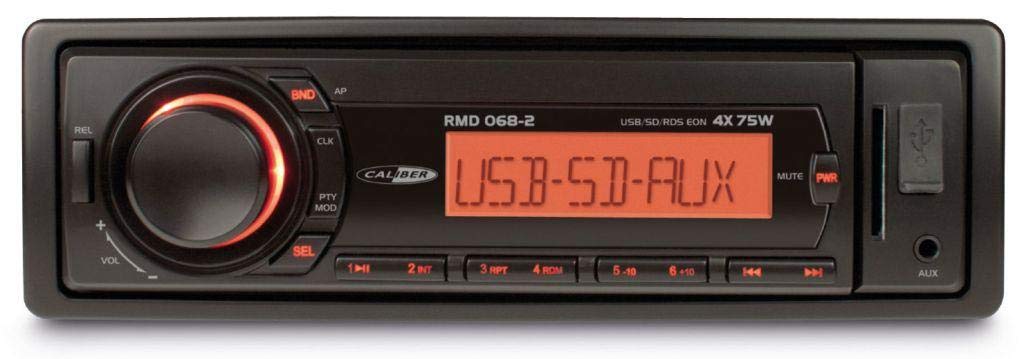
Figura 1: Frente view of the Caliber RMD 068-2 Car Radio. This image shows the main unit with its detachable front panel, including the display, control buttons, USB port, and SD card slot.
4.1 Controles del panel frontal
- POWER/MODE Button: Press to turn on/off. Short press to switch between Radio, USB, SD, AUX modes.
- Perilla de VOLUMEN: Gire para ajustar el volumen. Presione para acceder a la configuración de audio (Graves, Agudos, Balance, Fader).
- MONITOR: Shows current time, radio frequency, track information, etc.
- Puerto USB: Conecte unidades flash USB para reproducción multimedia.
- Ranura para tarjeta SD: Inserte tarjetas SD para reproducir medios.
- Entrada AUX (conector de 3.5 mm): Conecte dispositivos de audio externos.
- Botón BAND/AMS: En modo radio, pulse para seleccionar la banda de radio (FM1, FM2, FM3). Mantenga pulsado para guardar la memoria automáticamente.
- Botones PRESET (1-6): Store and recall radio stations. In USB/SD mode, use for direct track selection.
- Botón REPRODUCIR / PAUSA: Reproducir o pausar la reproducción multimedia.
- FORWARD/BACKWARD Buttons: Skip tracks or tune radio frequency.
- Botón EXPULSAR: Release the detachable front panel.
4.2 Conexiones traseras
The rear of the unit features standard ISO connectors for power and speakers, along with an antenna input.
- ISO Power Connector: For connecting to the vehicle's power supply (constant 12V, ignition 12V, ground).
- ISO Speaker Connector: For connecting to the vehicle's speakers (Front Left, Front Right, Rear Left, Rear Right).
- Entrada de antena: Para conectar la antena de radio del coche.
5. Configuración
5.1 Instalación
- Desconecte la batería: Before starting, disconnect the negative terminal of your car battery to prevent short circuits.
- Retire la unidad antigua: Retire con cuidado la radio actual del automóvil del tablero.
- Instalar el marco de montaje: Insert the supplied mounting frame into the dashboard opening and bend the tabs to secure it.
- Conectar el cableado: Refer to the wiring diagram in section 5.2. Connect the ISO wiring harness to the car's wiring and then to the Caliber RMD 068-2 unit. Connect the antenna cable.
- Slide Unit In: Carefully slide the Caliber RMD 068-2 unit into the mounting frame until it clicks into place.
- Vuelva a conectar la batería: Vuelva a conectar el terminal negativo de la batería de su automóvil.
- Fijar el panel frontal: Attach the detachable front panel to the main unit.
5.2 Diagrama de cableado
The Caliber RMD 068-2 uses standard ISO connectors. Ensure correct connections as shown below. If your vehicle does not have ISO connectors, an adapter may be required.
| Pin No. | Color del cable (típico) | Función |
|---|---|---|
| 4 | Amarillo | 12 V constantes (batería) |
| 7 | Rojo | 12V conmutado (encendido) |
| 8 | Negro | Suelo |
| 5 | Azul | Antenna Remote Out |
| Pin No. | Color del cable (típico) | Función |
|---|---|---|
| 1 | Púrpura | Trasero derecho (+) |
| 2 | Púrpura/negro | Abajo a la derecha (-) |
| 3 | Verde | Trasero Izquierdo (+) |
| 4 | Verde/negro | Trasera izquierda (-) |
| 5 | Gris | Delantero derecho (+) |
| 6 | Gris/negro | Frente derecho (-) |
| 7 | Blanco | Delantero Izquierdo (+) |
| 8 | Blanco/negro | Delantero Izquierdo (-) |
Note: Wire colors may vary depending on vehicle manufacturer. Always consult your vehicle's wiring diagram.
6. Instrucciones de funcionamiento
6.1 Funciones básicas
- Encendido/apagado: Presione el POTENCIA / MODO para encender o apagar la unidad.
- Control de volumen: Girar el VOLUMEN Perilla en sentido horario para aumentar el volumen, en sentido antihorario para disminuirlo.
- Selección de modo: Presione brevemente el POTENCIA / MODO button to cycle through available modes: Radio (FM), USB, SD, AUX.
- Configuración de audio: Presione el VOLUMEN knob to enter audio settings. Rotate the knob to select settings like BASS, TREBLE, BALANCE, FADER. Press the knob again to confirm or move to the next setting.
6.2 Funcionamiento de la radio
- Selección de banda: En el modo Radio, presione el botón BANDA / AMS Botón para cambiar entre las bandas FM1, FM2 y FM3.
- Sintonización manual: Presione brevemente el HACIA ADELANTE HACIA ATRÁS Botones para sintonizar la frecuencia.
- Búsqueda automática: Mantenga pulsado el HACIA ADELANTE HACIA ATRÁS Botones para buscar automáticamente la siguiente estación fuerte.
- Almacenar ajustes preestablecidos: Sintoniza la emisora que desees. Mantén pulsada una de las PREAJUSTE (1-6) buttons until you hear a beep. The station is now stored.
- Recuperar ajustes preestablecidos: Short press one of the PREAJUSTE (1-6) buttons to recall a stored station.
- Almacenamiento automático de memoria (AMS): Mantenga pulsado el BANDA / AMS Botón para escanear y almacenar automáticamente las estaciones más fuertes en los ajustes preestablecidos de la banda actual.
6.3 Reproducción USB/SD
- Insertar medios: Inserte una unidad flash USB en el puerto USB o una tarjeta SD en la ranura. La unidad cambiará automáticamente al modo USB/SD y comenzará la reproducción.
- Reproducir/Pausa: Presione el REPRODUCIR/PAUSA botón para pausar o reanudar la reproducción.
- Saltar pista: Presione brevemente el HACIA ADELANTE HACIA ATRÁS para saltar a la pista siguiente o anterior.
- Avance/rebobinado rápido: Mantenga pulsado el HACIA ADELANTE HACIA ATRÁS Botones para avanzar o retroceder rápidamente dentro de una pista.
- Navegación de carpetas: Utilice el PREAJUSTE 5 y PREAJUSTE 6 buttons to navigate between folders on your USB/SD media.
6.4 entrada auxiliar
- Conectar dispositivo: Conecte su dispositivo de audio externo (por ejemplo, teléfono inteligente, reproductor MP3) al conector de entrada AUX de 3.5 mm en el panel frontal mediante un cable de audio.
- Seleccionar modo AUX: Presione el POTENCIA / MODO Presione el botón repetidamente hasta que aparezca "AUX".
- Control de reproducción: Control playback (play, pause, skip) directly from your connected external device. The car radio will control the volume.
7. Mantenimiento
- Limpieza de la unidad: Use a soft, dry cloth to wipe the front panel and display. Do not use harsh chemicals, cleaning sprays, or abrasive cloths, as these can damage the surface.
- Panel frontal desmontable: When detaching the front panel, handle it carefully. Store it in a protective case (if supplied) to prevent scratches or damage.
- Puertos USB/SD: Keep the USB port and SD card slot free from dust and debris.
8. Solución de problemas
| Problema | Posible causa | Solución |
|---|---|---|
| Sin poder | Fusible quemado; Cableado incorrecto; Conexión suelta | Check and replace fuse; Verify wiring connections (Yellow to constant 12V, Red to ignition 12V, Black to ground); Ensure front panel is securely attached. |
| Sin sonido | Volume too low; Mute activated; Incorrect speaker wiring; Damaged speakers | Increase volume; Check if mute is active; Verify speaker connections; Test with known good speakers. |
| Mala recepción de radio | Antena no conectada; Antena dañada; Área de señal débil | Ensure antenna is securely connected; Check antenna for damage; Try tuning to a stronger station or move to a different location. |
| USB/SD no reproduce | Sin soporte file format; Corrupted media; Incorrectly inserted media; Max capacity exceeded | Asegurar files are MP3/WMA format; Try a different USB/SD card; Reinsert media correctly; Check media capacity (max 32GB recommended). |
| Front panel cannot be detached | Eject button not fully pressed; Mechanism jammed | Press the EJECT button firmly; Do not force the panel. |
If the problem persists after trying these solutions, please contact your dealer or a qualified service center.
9. Especificaciones
- Modelo: Caliber RMD 068-2
- Potencia de salida: 4 x 75 Watts Max
- Fuente de alimentación: 12V DC (10.8V-15.6V), Negative Ground
- Fusible: 10A
- Formatos de audio compatibles: MP3, WMA (via USB/SD)
- USB/SD Compatibility: Hasta 32 GB (formato FAT32)
- Sintonizador de FM: RDS, 18 Presets
- Entrada auxiliar: Conector estéreo de 3.5 mm
- Panel frontal desmontable: Sí
- Peso: Aproximadamente 0.95 kg (2.09 libras)
10. Garantía y soporte
This Caliber product is covered by a warranty in accordance with applicable European laws. For detailed warranty terms and conditions, please refer to the warranty card included with your product or visit the official Caliber website. For technical support, troubleshooting assistance, or service inquiries, please contact your authorized Caliber dealer or the customer service department in your region. Please have your product model number (RMD 068-2) and proof of purchase ready when contacting support.
Note: Specifications and design are subject to change without notice for improvement.