
1. Introducción
This manual provides detailed instructions for the installation, operation, and maintenance of your PHONOCAR VM016 DAB+ Bluetooth Car Radio. Please read this manual thoroughly before using the product to ensure correct operation and to prevent damage. Keep this manual for future reference.
2. Información de seguridad
- Ensure the vehicle's ignition is off and the negative battery terminal is disconnected before installation to prevent electrical shorts.
- Connect the unit only to a 12V or 24V DC power supply with a negative ground.
- No desmonte ni modifique la unidad. Esto podría causar descargas eléctricas, incendios u otras averías.
- Avoid installing the unit in locations where it would obstruct the driver's view o interferir con la operación del vehículo.
- Protect the unit from direct sunlight, excessive heat, humidity, and dust.
- Always use the correct fuse rating as specified.
3. Producto terminadoview
The PHONOCAR VM016 is a versatile car radio designed for 12V and 24V vehicles, offering a range of audio playback options including DAB+ digital radio, FM radio, Bluetooth connectivity, USB, SD card, and AUX-IN. It features a detachable front panel for security and an amplified output of 4x30 Watts.

Figura 3.1: Frente view of the PHONOCAR VM016 Car Radio.
Características principales:
- Receptor DAB+: Disfrute de transmisiones de radio digitales de alta calidad.
- Bluetooth A2DP: Transmisión de audio inalámbrica y llamadas manos libres.
- USB & SD/MMC Card Slot: Reproducir MP3 files from external storage (up to 16 GB for SD).
- ENTRADA AUXILIAR frontal: Conecte dispositivos de audio externos a través de un conector de 3.5 mm.
- Panel frontal desmontable: Función de seguridad mejorada.
- Encoder Volume Control: Intuitive volume adjustment.
- Automatic Memory Preset: Stores radio stations automatically.
- Sistema RDS: Radio Data System for FM broadcasts.
- 27 FM Preset Stations: Quick access to your favorite FM stations.
- Last Position Memory: Reanuda la reproducción desde donde la dejó.
- Amplified Output: 4 x 30 Watt for clear audio.
- 12V-24V Power: Compatible with both standard car and truck electrical systems.
- AmpAntena certificada: Included for improved reception.
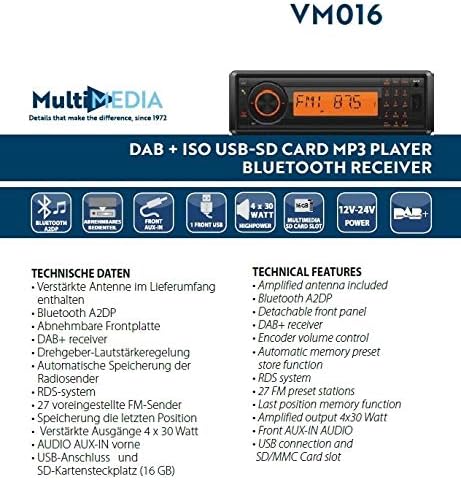
Figure 3.2: Diagram illustrating the technical features and connections of the PHONOCAR VM016.
4. Instalación
4.1 Comprobación previa a la instalación
- Verify that your vehicle's electrical system is 12V or 24V DC with a negative ground.
- Ensure you have all necessary tools and accessories for installation.
4.2 conexiones de cableado
The unit uses standard ISO connectors for power and speaker connections. Refer to your vehicle's wiring diagram for specific connections if not using standard ISO.
- Conexión de energía: Connect the yellow wire to the constant 12V/24V supply, the red wire to the accessory (switched) 12V/24V supply, and the black wire to a good chassis ground.
- Conexiones de altavoz: Connect the speaker wires according to their polarity (positive and negative) to the corresponding vehicle speakers. Ensure no speaker wires are shorted to each other or to the vehicle chassis.
- Conexión de antena: Conectar el amplified DAB+/FM antenna (included) to the antenna input on the rear of the unit. Ensure proper placement of the antenna for optimal reception.
4.3 Montaje
Insert the unit into the DIN-sized opening in your vehicle's dashboard. Secure it using the provided mounting sleeve and brackets. Ensure the unit is firmly seated to prevent movement during driving.
5. Instrucciones de funcionamiento
5.1 Controles básicos
- Encendido/apagado: Presione el FUERZA para encender o apagar la unidad.
- Control de volumen: Girar el PERILLA CODIFICADOR (main rotary knob) to adjust the volume level.
- Selección de modo: Presione el MODO button to cycle through available sources: DAB+, FM, Bluetooth, USB, SD, AUX-IN.
5.2 Funcionamiento de la radio (DAB+/FM)
- Selección de banda: En el modo de radio, presione el BANDA button to switch between DAB+ and FM bands.
- Escaneo automático: Mantenga pulsado el ESCANEAR Botón para buscar y almacenar automáticamente las estaciones disponibles.
- Sintonización manual: Utilice el SINTONIZACIÓN +/- Botones para ajuste manual de frecuencia.
- Estaciones preestablecidas: Use the numeric buttons (1-6) to select stored preset stations. To store a station, tune to the desired frequency, then press and hold a numeric button until you hear a confirmation beep.
- RDS System (FM): When available, the Radio Data System will display station information such as program type and station name.
5.3 Funcionamiento de Bluetooth
- Emparejamiento: Select Bluetooth mode. On your mobile device, search for Bluetooth devices and select "PHONOCAR VM016". Enter "0000" if a PIN is required. Once paired, the Bluetooth icon will illuminate.
- Transmisión de audio (A2DP): Play audio from your paired device. Use the unit's controls or your device to manage playback (play/pause, skip tracks).
- Llamadas manos libres: Cuando entra una llamada, la unidad mostrará el identificador de llamada. Presione el LLAMAR button to answer, and press it again to end the call.
5.4 Media Playback (USB, SD Card, AUX-IN)
- Tarjeta USB / SD: Insert a USB drive or SD card into the respective slot. The unit will automatically switch to USB/SD mode and begin playing compatible MP3 files. Utilizar el SALTAR botones para navegar por las pistas.
- ENTRADA AUXILIAR: Connect an external audio device (e.g., MP3 player, smartphone) to the front AUX-IN jack using a 3.5mm audio cable. Select AUX-IN mode to listen to audio from the connected device.
5.5 Panel frontal desmontable
To remove the front panel, press the LIBERAR button. Gently pull the panel away from the main unit. To reattach, align the panel with the main unit and push until it clicks into place.
6. Mantenimiento
- Limpieza: Utilice un paño suave y seco para limpiar la superficie de la unidad. Para la suciedad difícil, dampen the cloth with a small amount of mild detergent. Do not use abrasive cleaners or solvents.
- Front Panel Care: Handle the detachable front panel with care. Avoid touching the contacts on the back of the panel. Store it in the provided case when removed.
- Reemplazo de fusibles: If the unit does not power on, check the fuse. Replace it with a fuse of the same rating only.
7. Solución de problemas
- Sin energía: Check the power connections (yellow, red, black wires) and the fuse. Ensure the vehicle's ignition is on if connected to a switched power source.
- Sin sonido: Check speaker connections. Ensure the volume is not at minimum and the MUTE function is not active. Verify the correct audio source is selected.
- Mala recepción de radio: Check the antenna connection. Ensure the amplified antenna is properly installed and positioned. Try performing an automatic scan again.
- Problemas de conexión Bluetooth: Ensure Bluetooth is enabled on your mobile device and the unit is in Bluetooth mode. Delete previous pairings and try pairing again.
- Errores de reproducción USB/SD: Ensure the USB drive or SD card is formatted correctly (FAT32) and contains compatible MP3 files. Check for file corruption. The maximum supported SD card size is 16 GB.
8. Especificaciones
| Característica | Especificación |
|---|---|
| Número de modelo | VM016 |
| Fuente de alimentación | 12V - 24V DC (Negative Ground) |
| Potencia de salida de audio | 4 x 30 vatios |
| Conectividad | Bluetooth (A2DP), USB, SD/MMC Card, Front AUX-IN |
| Sintonizador de radio | DAB+, FM (con RDS) |
| Preajustes de FM | Estaciones 27 |
| Medios compatibles | MP3 (vía USB/SD) |
| Capacidad de la tarjeta SD | Hasta 16 GB |
| Características especiales | Detachable Front Panel, Last Position Memory, Amplified Antenna Included |
| Color | Negro |
9. Garantía y soporte
For warranty information and technical support, please refer to the documentation provided with your purchase or contact your authorized PHONOCAR dealer. Keep your proof of purchase for warranty claims.