
Introducción
Gracias por la compraasing the Edifier Tick Tock Retro Multifunctional Alarm Clock. This device combines a retro design with modern functionality, offering an alarm clock, FM radio, and media playback from SD cards, USB drives, and auxiliary input. This manual provides detailed instructions for setup, operation, and maintenance to ensure optimal performance and longevity of your device.
Características del producto
- SD card reader and USB input port for media playback.
- LCD display screen for time, date, alarm status, and input mode (SD/USB/FM/AUX).
- Alarm clock function with customizable audio sources: SD card, USB drive, FM radio, or Auxiliary input.
- Auxiliary 3.5mm input jack for connecting external audio devices.
- FM radio function with 24 preset channels for easy access to your favorite stations.
- Two 360° omni-directional full-range speakers for rich, multi-directional sound.
Controles y Puertos
Puertos del panel trasero
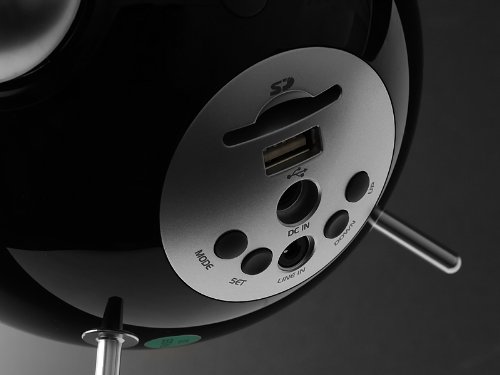
This image displays the rear panel of the Edifier Tick Tock alarm clock. Visible ports and buttons include:
- Ranura para tarjeta SD: Insert an SD card for music playback.
- Puerto USB: Conecte una unidad flash USB para reproducir música.
- DC EN: Entrada de alimentación para el adaptador de CA incluido.
- ENTRADA DE LÍNEA (AUX): Entrada de audio de 3.5 mm para dispositivos externos.
- Botón MODE: Cycles through input modes (SD, USB, FM, AUX).
- Botón de ajuste: Used for entering settings menus (e.g., time, alarm).
- Botones ARRIBA/ABAJO: Navigate menus, adjust volume, or change settings.
Controles del panel superior
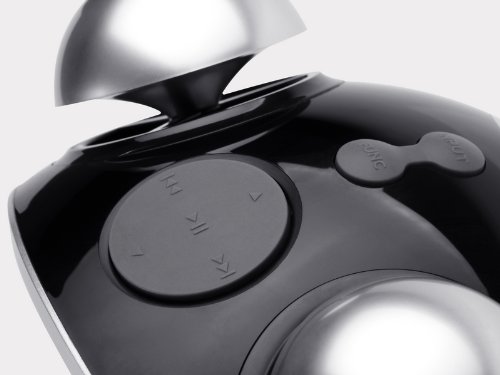
This image shows the top panel controls of the Edifier Tick Tock alarm clock. These include:
- Botón de reproducción/pausa: Inicia o pausa la reproducción multimedia.
- Botones de pista anterior/siguiente: Skips to the previous or next track during media playback. Also used for tuning FM radio.
- Botones para subir / bajar el volumen: Ajusta el volumen de salida de audio.
- Botón SNOOZE/LIGHT: Activa la función de repetición durante una alarma o ajusta el brillo de la pantalla.
Configuración
- Desembalaje: Carefully remove the alarm clock and all accessories from the packaging. Ensure all components are present: the alarm clock unit, AC power adapter, and this user manual.
- Conexión de energía: Connect the AC power adapter to the "DC IN" port on the rear of the alarm clock. Plug the adapter into a standard wall outlet. The display should illuminate.
- Encendido inicial: The unit should power on automatically. If not, press the power button (if available, otherwise it's always on when plugged in).
- Antenna (FM Radio): Extend the FM antenna located at the back of the unit for optimal radio reception.
Instrucciones de funcionamiento
Configuración de hora y fecha
- Mantenga pulsado el COLOCAR botón hasta que la pantalla de la hora comience a parpadear.
- Utilice el UP y ABAJO Botones para ajustar la hora. Presione COLOCAR para confirmar y pasar a minutos.
- Ajustar los minutos usando UP y ABAJO. Prensa COLOCAR Para confirmar.
- Continue this process to set the year, month, and day. Press COLOCAR para salir del modo de configuración de hora/fecha.
Configuración de la alarma
- Presione el COLOCAR Presione el botón una vez (sin mantenerlo presionado) para ingresar al modo de configuración de la alarma. La hora de la alarma parpadeará.
- Utilice el UP y ABAJO Botones para ajustar la hora de la alarma. Presione COLOCAR para confirmar y pasar a minutos.
- Ajustar los minutos usando UP y ABAJO. Prensa COLOCAR Para confirmar.
- Next, select the alarm source (FM, SD, USB, AUX). Use UP y ABAJO to cycle through options. Press COLOCAR Para confirmar.
- If FM is selected, use UP y ABAJO to select a preset FM station (P01-P24).
- If SD or USB is selected, ensure a card/drive with audio is inserted. The alarm will play the first track.
- If AUX is selected, ensure an external device is connected and playing audio.
- Prensa COLOCAR de nuevo para activar la alarma. Aparecerá un icono de alarma en la pantalla.
- Para desactivar la alarma, presione COLOCAR hasta que desaparezca el icono de alarma.
- Cuando suene la alarma, presione el DORMITOR / LUZ button to activate snooze (typically 9 minutes). To turn off the alarm completely, press any other button.
Funcionamiento de la radio FM
- Presione el MODO botón repetidamente hasta que aparezca "FM" en la pantalla.
- Auto Scan and Preset: Mantenga pulsado el REPRODUCIR/PAUSA button. The radio will automatically scan for available stations and save them to presets (P01-P24).
- Sintonización manual: Utilice el PISTA ANTERIOR / SIGUIENTE Botones para sintonizar la frecuencia.
- Seleccionar ajustes preestablecidos: En el modo FM, presione brevemente el botón PISTA ANTERIOR / SIGUIENTE Botones para recorrer las estaciones preestablecidas guardadas.
- Ajuste el volumen con el UP y ABAJO buttons on the rear panel.
SD Card / USB Playback
- Insert an SD card into the SD card slot or a USB flash drive into the USB port on the rear panel.
- Presione el MODO button repeatedly until "SD" or "USB" appears on the display. The device will automatically start playing audio files.
- Utilice el REPRODUCIR/PAUSA botón para pausar o reanudar la reproducción.
- Utilice el PISTA ANTERIOR / SIGUIENTE buttons on the top panel to skip tracks.
- Ajuste el volumen con el UP y ABAJO buttons on the rear panel.
Entrada auxiliar (LINE IN)
- Connect an external audio device (e.g., smartphone, MP3 player) to the "LINE IN" (3.5mm) port on the rear panel using an audio cable (not included).
- Presione el MODO botón repetidamente hasta que aparezca "AUX" en la pantalla.
- Inicie la reproducción en su dispositivo externo conectado.
- Ajuste el volumen con el UP y ABAJO buttons on the rear panel, and also control volume from your external device.
Brillo de la pantalla
Presione brevemente el DORMITOR / LUZ button on the top panel to cycle through different display brightness levels.
Mantenimiento
- Limpieza: Use a soft, dry cloth to clean the surface of the alarm clock. Do not use abrasive cleaners, waxes, or solvents.
- Colocación: Place the unit on a stable, flat surface. Avoid direct sunlight, high temperatures, humidity, or dusty environments.
- Fuerza: Desconecte el adaptador de corriente del tomacorriente de pared si la unidad no se utilizará durante un período prolongado.
Solución de problemas
| Problema | Posible causa / solución |
|---|---|
| Sin energía / Pantalla apagada |
|
| No hay sonido de los altavoces |
|
| Mala recepción de radio FM |
|
| Alarm does not sound or plays static |
|
| La pantalla es demasiado brillante por la noche |
|
Presupuesto
| Marca | Edificador |
| Número de modelo | MF240Reto |
| Tipo de pantalla | Pantalla LCD |
| Tecnología de conectividad | Auxiliar, USB |
| Características especiales | Alarm, Radio, SD Card Reader, USB Playback |
| Fuente de poder | Eléctrico con cable |
| Material | Plástico |
| Peso del artículo | 0.74 libras (aprox. 0.34 kg) |
| Fabricante | Edifier USA |
Garantía y soporte
This Edifier product comes with a Garantía del fabricante por 2 año. For warranty claims, technical support, or further assistance, please contact Edifier USA customer service. Please retain your proof of purchase for warranty validation.
For the most up-to-date support information, please visit the official Edifier websitio.