1. Introducción
The Nektar Panorama P6 is a 61-key USB MIDI Controller Keyboard designed for deep integration with various Digital Audio Workstations (DAWs). It offers extensive control over your music production environment with its comprehensive set of controls, including a motorized fader, velocity-sensitive keys, and aftertouch.
Características principales:
- 61 semi-weighted, full-size, velocity-sensitive keys with aftertouch.
- 100mm ALPS motorized touch-sensitive high-resolution fader.
- Deep DAW integration for Cubase, Logic, Studio One, Bitwig Studio, Nuendo, Mainstage, Reason, and Reaper.
- Comprehensive MIDI functionality, compatible with all MIDI music software applications.
- Mac and PC compatible.
- Includes PreSonus Studio One Artist DAW license.
2. ¿Qué hay en la caja?
Upon unpacking your Nektar Panorama P6, please ensure all the following items are present:
- Nektar Panorama P6 Keyboard
- Cable USB
- Manual de usuario (este documento)
- PreSonus Studio One Artist License
3. Configuración
3.1 Conexión del Panorama P6
The Panorama P6 connects to your computer via a standard USB cable. It can also utilize MIDI ports for external hardware. For optimal performance and to enable the motorized fader, an external power supply (not included) may be required, though the unit can be USB bus-powered for basic functionality.
- Conecte un extremo del cable USB suministrado al puerto USB del Panorama P6.
- Conecte el otro extremo del cable USB a un puerto USB disponible en su computadora.
- If using an external power supply for the motorized fader, connect it to the DC input on the Panorama P6 and then to a power outlet.
- For MIDI hardware connections, use standard MIDI cables to connect the MIDI OUT port on the Panorama P6 to the MIDI IN port of your external device.

Imagen: Frente view of the Nektar Panorama P6, showcasing the 61 keys, control surface, and display.
3.2 Driver Installation and DAW Integration
The Panorama P6 is class-compliant on most operating systems (Mac and PC), meaning no specific drivers are usually required for basic MIDI functionality. However, for deep DAW integration, you will need to download and install the appropriate integration files from the Nektar websitio.
- Visit the official Nektar Technology websitiowww.nektartech.es) and navigate to the support section for the Panorama P6.
- Download the latest DAW integration files specific to your operating system and preferred DAW (e.g., Cubase, Logic, Reason, Studio One).
- Follow the installation instructions provided with the downloaded files. These typically involve running an installer and then configuring your DAW to recognize the Panorama P6 as a control surface.
- Refer to your DAW's user manual for specific instructions on setting up MIDI controllers and control surfaces.
4. Operating the Panorama P6
4.1 Controles básicos
The Panorama P6 features a comprehensive control surface designed for intuitive interaction with your DAW and virtual instruments.
- Teclado: The 61 semi-weighted keys provide a responsive playing experience with velocity sensitivity and aftertouch for expressive control.
- almohadillas: The 12 velocity-sensitive pads are ideal for drumming, triggering samples, o clips de lanzamiento.
- Faders y perillas: A bank of faders and rotary knobs allows for precise control over mixer channels, instrument parameters, and effects. The 100mm motorized fader provides tactile feedback and automatically updates its position to match your DAW's mixer.
- Botones: Dedicated buttons for transport control (Play, Stop, Record, etc.), navigation, and various functions streamline your workflow.
- Mostrar: The integrated display provides visual feedback on parameters, settings, and DAW status.

Imagen: Primer plano view of the Nektar Panorama P6's control surface, highlighting the pads, rotary knobs, and faders for detailed parameter manipulation.
4.2 Integración con DAW
Once properly set up, the Panorama P6 offers deep integration with supported DAWs, allowing you to control various aspects of your software directly from the hardware.
- Control del mezclador: Adjust volume, pan, sends, and other mixer parameters. The motorized fader will reflect the selected track's volume.
- Control de instrumentos: Map controls to virtual instrument parameters for hands-on sound design and performance.
- Control de Transporte: Start, stop, record, fast forward, and rewind your projects without touching your mouse or keyboard.
- Navegación: Browse presets, tracks, and projects directly from the controller.
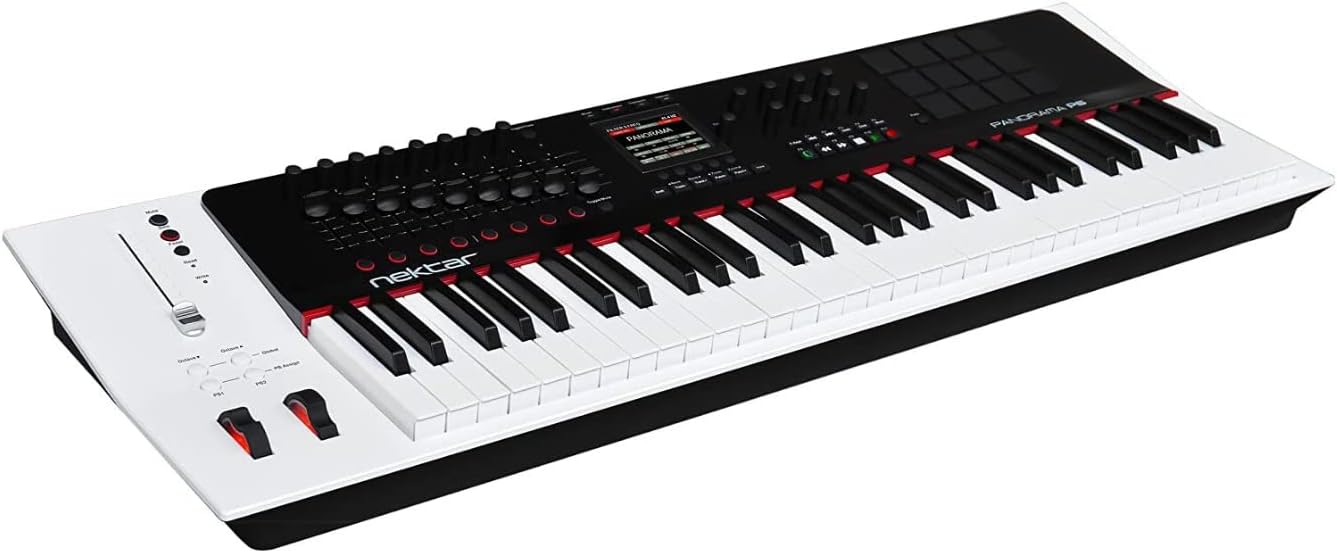
Imagen: En ángulo view of the Nektar Panorama P6, providing a perspective of the entire keyboard and its integrated control panel.
5. Mantenimiento
5.1 Limpieza
To maintain the appearance and functionality of your Panorama P6, follow these cleaning guidelines:
- Always disconnect the power and USB cable before cleaning.
- Utilice un paño suave, seco y sin pelusa para limpiar la superficie de la unidad.
- Para suciedad difícil, ligeramente dampEnjuague el paño con agua. Evite usar productos químicos agresivos, limpiadores abrasivos o disolventes, ya que pueden dañar el acabado y los componentes electrónicos.
- No permita que entren líquidos en ninguna abertura.
5.2 Almacenamiento
When not in use, store the Panorama P6 in a clean, dry environment away from direct sunlight, extreme temperatures, and excessive dust. Consider using a dust cover to protect the keys and control surface.
5.3 actualizaciones de firmware
Nektar periodically releases firmware updates to improve performance, add features, or address issues. Check the official Nektar Technology website regularly for the latest firmware and installation instructions.
6. Solución de problemas
If you encounter issues with your Nektar Panorama P6, try the following troubleshooting steps:
- Sin energía/La unidad no responde:
- Asegúrese de que el cable USB esté conectado de forma segura tanto al Panorama P6 como a su computadora.
- If using an external power supply, verify it is correctly connected and plugged into a working power outlet.
- Intente conectarse a un puerto USB diferente en su computadora.
- DAW Not Recognizing Panorama P6:
- Confirm that the correct DAW integration files have been installed from the Nektar websitio.
- Check your DAW's preferences or settings to ensure the Panorama P6 is selected as a MIDI input device and control surface.
- Restart your DAW and/or computer.
- Motorized Fader Not Moving:
- The motorized fader requires an external power supply for full functionality. Ensure an appropriate power supply is connected.
- Verify that the DAW integration is correctly configured and communicating with the Panorama P6.
- Teclas/almohadillas no responden:
- Check MIDI input settings in your DAW.
- Ensure the Panorama P6 is in the correct mode for sending MIDI notes (e.g., not in a control-only mode).
If these steps do not resolve your issue, please refer to the Nektar Technology support websitio o póngase en contacto con su servicio de atención al cliente para obtener más ayuda.
7. Especificaciones
| Característica | Especificación |
|---|---|
| Número de modelo | P6 |
| Peso del artículo | 17 libras |
| Dimensiones del producto | 39.76 x 12.99 x 3.78 pulgadas |
| Color | Blanco |
| Tipo de material | Metal |
| Número de teclas del teclado | 61 |
| Tipo de clave | Semi-weighted, Velocity Sensitive, Aftertouch |
| Tecnología de conectividad | MIDI, USB |
| Tipo de conector | USB |
| Interfaz de hardware | USB |
| Dispositivos compatibles | Devices with USB and MIDI ports |
| Software compatible | Cubase, Logic, Studio One, Bitwig Studio, Nuendo, Mainstage, Reason, Reaper |
| Característica especial | Keyboard Controller, Velocity Sensitive Key, Motorized Fader |
8. Garantía y soporte
8.1 Información de garantía
Nektar products are covered by a limited warranty against defects in materials and workmanship. The specific terms and duration of the warranty may vary by region and product. Please retain your proof of purchase. For detailed warranty information, including coverage and how to make a claim, visit the official Nektar Technology websitio.
8.2 Atención al cliente
For technical assistance, product inquiries, or support, please visit the Nektar Technology support page:
- Websitio: www.nektartech.com/soporte
El website provides FAQs, troubleshooting guides, driver downloads, and contact information for direct support.