
OEM ZB023
Manual del usuario del cable principal OEM Fotga NUEVO GM VETRONIX TECH 2 DLC
Modelo: ZB023
Producto terminadoview
This manual provides essential information for the proper use and maintenance of the OEM Fotga NEW GM VETRONIX TECH 2 DLC MAIN CABLE. This high-quality, super flexible cable is designed to connect your TECH2 Scanner to various vehicle types for diagnostic purposes.
It serves as a direct replacement for part numbers GM P/N: GM3000095 and VETRONIX PN: 02003214, ensuring compatibility and reliable performance with your Tech 2 diagnostic system.
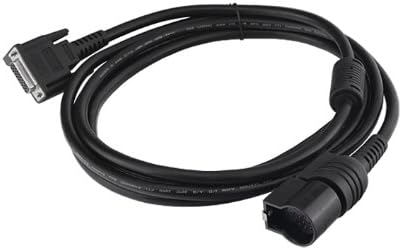
Figura 1: The OEM Fotga NEW GM VETRONIX TECH 2 DLC MAIN CABLE. This image displays the full length of the black diagnostic cable, coiled, with its distinct connectors visible at each end. One end features a multi-pin D-sub connector, while the other has a larger, automotive diagnostic link connector (DLC) designed for vehicle communication ports.
Configuración y conexión
Follow these steps to properly connect the DLC Main Cable to your TECH2 Scanner and the vehicle:
- Identificar conectores: Locate the two distinct ends of the cable. One end is designed to connect to the TECH2 Scanner, typically a multi-pin connector. The other end is the Diagnostic Link Connector (DLC), which plugs into the vehicle's OBD-II port.
- Connect to TECH2 Scanner: Carefully insert the appropriate end of the DLC Main Cable into the designated port on your TECH2 Scanner. Ensure a secure and firm connection.
- Locate Vehicle OBD-II Port: The vehicle's OBD-II port is usually located under the dashboard on the driver's side. Refer to your vehicle's owner's manual if you have difficulty locating it.
- Conectar al vehículo: Plug the DLC end of the cable into the vehicle's OBD-II port. Ensure it clicks into place, indicating a secure connection.
- Encendido: Once both ends are securely connected, power on your TECH2 Scanner according to its operating instructions.
Nota: Always ensure the TECH2 Scanner and vehicle are powered off before connecting or disconnecting the cable to prevent potential damage to either device.
Instrucciones de funcionamiento
This cable facilitates communication between your TECH2 Scanner and the vehicle's onboard diagnostic system. Once connected as described in the "Setup and Connection" section, operate your TECH2 Scanner as per its specific user manual to perform diagnostic functions.
- Diagnostic Communication: The cable enables the TECH2 Scanner to read diagnostic trouble codes (DTCs), view live data streams, perform bi-directional controls, and conduct various system tests on compatible vehicles.
- Interacción del software: All diagnostic operations are controlled through the TECH2 Scanner's software interface. Refer to your TECH2 Scanner's documentation for detailed instructions on navigating menus and executing diagnostic routines.
- Transferencia de datos: The cable ensures stable and reliable data transfer between the vehicle's Electronic Control Units (ECUs) and the TECH2 Scanner.
Importante: Do not bend or crimp the cable excessively during operation, as this may damage internal wiring and affect performance.
Mantenimiento y cuidado
Proper care extends the life of your DLC Main Cable:
- Limpieza: Wipe the cable and connectors with a soft, dry cloth. Avoid using harsh chemicals or abrasive cleaners.
- Almacenamiento: Store the cable in a cool, dry place, away from direct sunlight and extreme temperatures. Coil the cable loosely to prevent kinks and damage.
- Manejo: Always grasp the connectors when plugging or unplugging the cable. Avoid pulling on the cable itself, as this can strain the internal wires and connections.
- Inspección: Periodically inspect the cable for any signs of wear, cuts, or damage to the insulation or connectors. If damage is observed, discontinue use and replace the cable.
Solución de problemas
If you encounter issues with your DLC Main Cable, consider the following:
| Problema | Posible causa | Solución |
|---|---|---|
| No communication between TECH2 and vehicle. |
|
|
| Conexión intermitente. |
|
|
Presupuesto
| Atributo | Detalle |
|---|---|
| Marca | Fabricante de equipos originales (OEM) |
| Número de modelo | ZB023 |
| Dispositivos compatibles | TECH2 Scanner |
| Reemplaza números de pieza | GM P/N: GM3000095, VETRONIX PN: 02003214 |
| Peso del artículo | 0.32 onzas |
| Dimensiones del producto | 2.3 x 2.3 x 0.7 pulgadas (empaquetado) |
| Código Postal | 799975140766 |
Garantía y soporte
For warranty information or technical support regarding your OEM Fotga NEW GM VETRONIX TECH 2 DLC MAIN CABLE, please refer to the original purchase documentation or contact the seller directly. Specific warranty terms may vary depending on the retailer and region of purchase.
Ensure you have your product model number (ZB023) and purchase details available when seeking support.
Ask a question about this manual
Ask about setup, troubleshooting, compatibility, parts, safety, or missing instructions. Manuals+ will review the question and use this page’s manual context to help answer it.