
1. Introducción
Thank you for choosing the Fonestar AS-24U Hi-Fi USB/SD/MP3 AmpEste manual proporciona información esencial para el funcionamiento seguro y eficiente de su dispositivo. Léalo detenidamente antes de usarlo y consérvelo para futuras consultas.
2. Instrucciones de seguridad
- Fuente de alimentación: Asegúrese de que ampEl alificador está conectado a una fuente de alimentación que coincide con el volumen especificado.tage (230 V).
- Ventilación: No obstruya las aberturas de ventilación. Deje suficiente espacio alrededor de la unidad para una correcta circulación del aire y evitar el sobrecalentamiento.
- Humedad: Mantener el amplifier away from water, moisture, and high humidity environments. Do not expose it to dripping or splashing.
- Fuentes de calor: Evite colocar la unidad cerca de fuentes de calor como radiadores, rejillas de calefacción, estufas u otros aparatos que produzcan calor.
- Limpieza: Desconecte el cable de alimentación antes de limpiarlo. Utilice un paño seco y suave. No utilice limpiadores líquidos ni en aerosol.
- Servicio: No intente reparar este producto usted mismo. Refiera todo el servicio a personal de servicio calificado.
- Entrada de objeto/líquido: Nunca introduzca objetos de ningún tipo en este producto a través de las aberturas, ya que pueden tocar materiales peligrosos.tagpuntos o piezas en cortocircuito que podrían provocar un incendio o una descarga eléctrica.
3. Producto terminadoview
3.1 Panel frontal
The front panel features controls for power, input selection, volume adjustment, and USB/SD media playback. It also includes a display for media information.
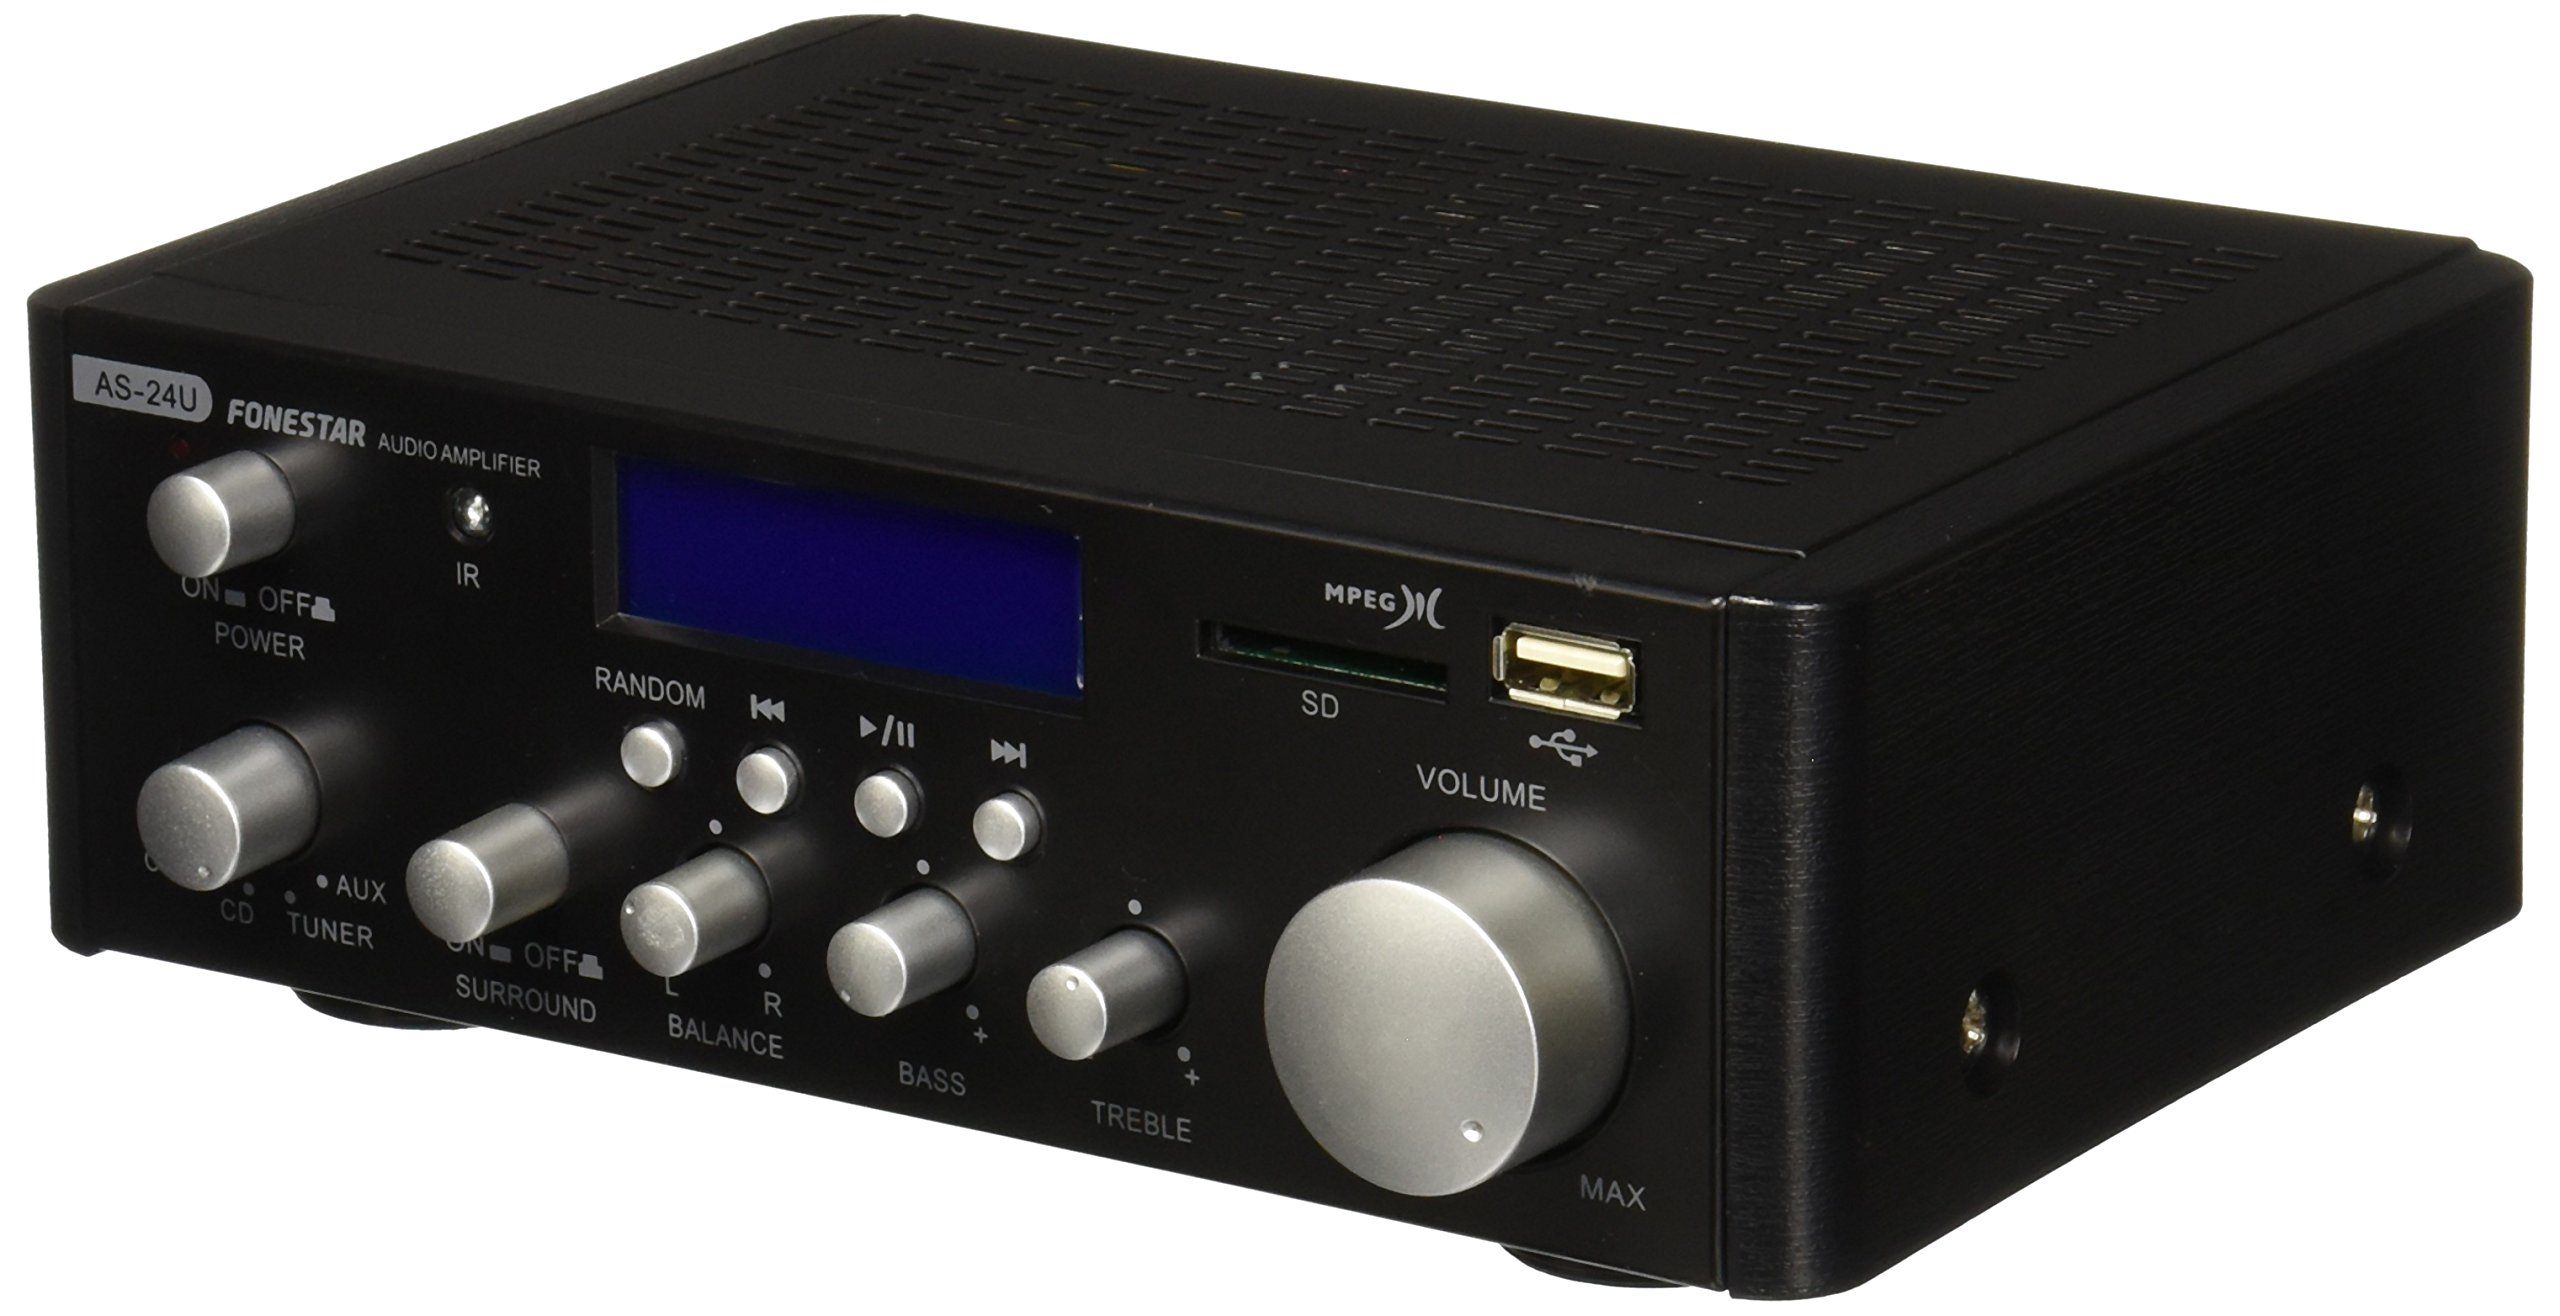
Imagen 1: Frente view of the Fonestar AS-24U amplifier, showing the main controls and display.
3.2 Panel trasero
The rear panel provides all necessary connections for audio input sources, speaker outputs, and power.

Imagen 2: Trasera view of the Fonestar AS-24U amplifier, detailing input/output ports and power connection.
- INPUT (AUX, TUNER, CD): RCA stereo inputs for connecting external audio sources.
- SPEAKER OUT (STEREO): Spring clip terminals for connecting passive speakers (4-8 Ω).
- SPEAKER OUT (SURROUND): Additional spring clip terminals for surround speakers (8 Ω).
- ENTRADA DE ALIMENTACIÓN: AC power input for the main power cable.
- VOLTAGSELECTOR E: Switch for selecting between 115V and 230V power input. Ensure this is set correctly for your region.
3.3 control remoto
El control remoto incluido permite un manejo cómodo del amplifier's media playback functions.
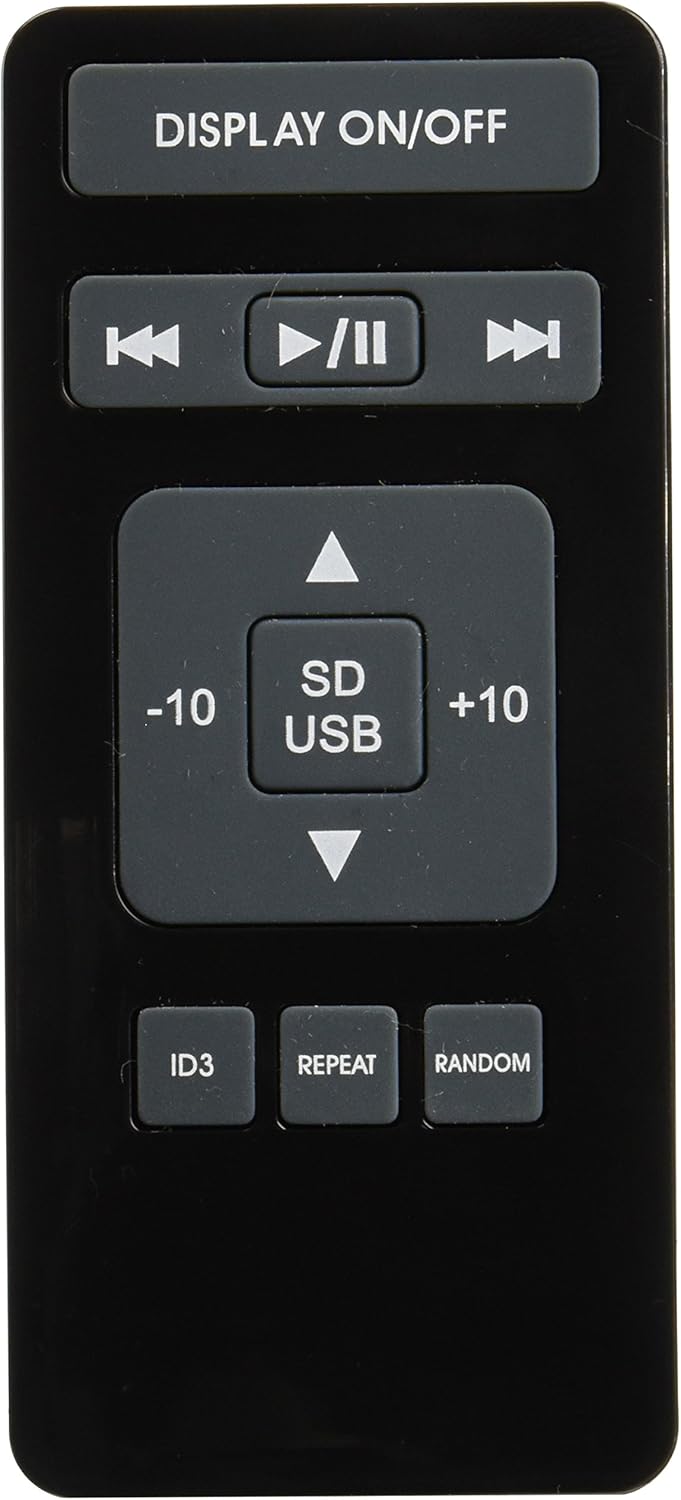
Image 3: Remote control for the Fonestar AS-24U amplifier, showing buttons for media playback and display control.
- PANTALLA ENCENDIDA / APAGADA: Toggles the front panel display.
- PLAY/PAUSE, PREVIOUS/NEXT: Controles para reproducción de medios.
- SD / USB: Selects between SD card and USB drive as the media source.
- -10/+10: Skips tracks by 10.
- ID3: Muestra ID3 tag información para MP3 files.
- REPETIR: Alterna los modos de repetición (por ejemplo, repetir uno, repetir todo).
- ALEATORIO: Toggles random playback.
4. Configuración
4.1 Conexión de altavoces
- Asegúrese de que ampEl elevador está apagado y desenchufado.
- Connect your passive speakers to the SPEAKER OUT terminals on the rear panel.
- Haga coincidir el terminal positivo (+) en el ampConecte el cable al terminal positivo (+) de su altavoz y el negativo (-) al negativo (-).
- For stereo speakers, use the 4-8 Ω terminals. For surround speakers, use the 8 Ω terminals. Ensure your speakers' impedance matches the ampespecificaciones del purificador.
4.2 Conexión de fuentes de audio
- Connect your audio devices (e.g., CD player, tuner, auxiliary device) to the corresponding RCA INPUT jacks (CD, TUNER, AUX) on the rear panel.
- Ensure left and right channels are correctly matched (red for right, white for left).
4.3 Conexión de alimentación
- Verificar el VOLTAGE SELECTOR switch on the rear panel is set to the correct voltage for your region (e.g., 230V).
- Connect the power cable to the POWER IN socket on the rear panel and then to a suitable wall outlet.
5. Instrucciones de funcionamiento
5.1 Encendido / Apagado
Presione el botón de encendido en el panel frontal para encenderlo. amplifier on or off. A soft start protection circuit is integrated.
5.2 Selección de la fuente de entrada
Use the input selector knob or buttons on the front panel to choose between CD, TUNER, AUX, USB, or SD inputs.
5.3 Ajuste del volumen
Rotate the main volume knob on the front panel to adjust the overall sound level. Start with a low volume and gradually increase it to a comfortable listening level.
5.4 Reproducción USB/SD
- Inserte una unidad flash USB o una tarjeta SD que contenga audio MP3 files en la ranura correspondiente en el panel frontal.
- Select the USB or SD input using the input selector.
- Use the playback controls (Play/Pause, Previous/Next) on the front panel or remote control to manage your music.
- The remote control allows for additional functions like skipping 10 tracks (+10/-10), displaying ID3 tags, repeating tracks, and random playback.
6. Mantenimiento
6.1 Limpieza
Para limpiar el amplifier, first unplug it from the power outlet. Use a soft, dry cloth to wipe down the exterior surfaces. Do not use abrasive cleaners, waxes, or solvents as they may damage the finish.
6.2 Almacenamiento
Si almacena el amplifier for an extended period, ensure it is unplugged, clean, and stored in a cool, dry place away from direct sunlight and extreme temperatures.
7. Solución de problemas
- Sin energía:
- Compruebe si el cable de alimentación está conectado de forma segura a ambos amplificador y la toma de pared.
- Asegúrese de que el tomacorriente de pared funcione.
- Verificar el VOLTAGE SELECTOR switch is set correctly.
- Sin sonido:
- Confirme que esté seleccionada la fuente de entrada correcta.
- Verifique que todas las conexiones de los altavoces tengan la polaridad correcta y un ajuste seguro.
- Asegúrese de que el volumen esté alto y no silenciado.
- Pruebe con una fuente de audio diferente.
- Sonido distorsionado:
- Reducir el volumen.
- Compruebe la compatibilidad de impedancia de los altavoces.
- Asegúrese de que los cables de audio no estén dañados y estén conectados de forma segura.
- Problemas de reproducción USB/SD:
- Asegúrese de que la unidad USB o la tarjeta SD estén formateadas con un formato compatible. file sistema (por ejemplo, FAT32).
- Verifique que el audio files están en formato MP3.
- Pruebe con una unidad USB o tarjeta SD diferente.
8. Especificaciones
| Marca | FONESTAR |
| Modelo | AS-24U |
| Stereo Power Output | 25 + 25 W max, 15 + 15 W RMS (4 Ω), 12 + 12 W RMS (8 Ω) |
| Surround Power Output | 10 + 10 W max, 6 + 6 W RMS (8 Ω) |
| Entradas | 3 stereo (CD, Tuner, AUX), 2 x RCA 400 mV |
| Protecciones | Arranque suave, cortocircuito, sobrecarga |
| Volumentage | 230 voltios |
| Dimensiones (L x An x Al) | 5 x 5 x 10 cm (aprox. 50 x 50 x 100 mm) |
| Peso | 1.9 kilogramos |
| Conectividad de altavoces | Cableado |
9. Garantía y soporte
This Fonestar AS-24U amplifier comes with a standard manufacturer's warranty. Please refer to the warranty card included with your purchase for specific terms and conditions. For technical support, service, or warranty claims, please contact your retailer or the official Fonestar customer service.