
1. Introducción
Gracias por la compraasing the Fonestar AS-170RU Hi-Fi Amplifier. This device is designed to provide high-fidelity stereo audio amplification, featuring a built-in USB/MP3 player, AM/FM digital tuner, and multiple audio inputs. This manual provides detailed instructions for safe installation, operation, and maintenance of your ampLea este manual detenidamente antes de usarlo y consérvelo para futuras consultas.
2. Instrucciones de seguridad
- Fuente de alimentación: Asegúrese de que amplifier is connected to a power supply matching the voltage specified on the unit. Disconnect the power cord from the outlet if the unit will not be used for an extended period.
- Ventilación: No obstruya las aberturas de ventilación. Asegúrese de que haya suficiente espacio alrededor de la unidad para una correcta circulación del aire y evitar el sobrecalentamiento.
- Agua y humedad: No exponga la unidad a la lluvia, la humedad ni a goteos o salpicaduras de líquidos. No coloque objetos con líquido, como jarrones, sobre la unidad.
- Fuentes de calor: Mantenga la unidad alejada de fuentes de calor como radiadores, rejillas de calefacción, estufas u otros aparatos (incluidos ampificadores) que producen calor.
- Limpieza: Limpie solamente con un paño seco. No usar limpiadores líquidos o en aerosol.
- Servicio: No intente reparar este producto usted mismo. Refiera todo el servicio a personal de servicio calificado.
- Colocación: Coloque la unidad sobre una superficie plana y estable. Evite exponerla a la luz solar directa o cerca de campos magnéticos fuertes.
3. Contenido del paquete
Por favor, compruebe que los siguientes artículos estén incluidos en su paquete:
- Fonestar AS-170RU Hi-Fi Ampmás vivaz
- Mando a distancia
- Antena AM
- Antena FM
- Manual de usuario (este documento)
4. Producto terminadoview
4.1 Panel frontal
The front panel provides access to essential controls and the display.
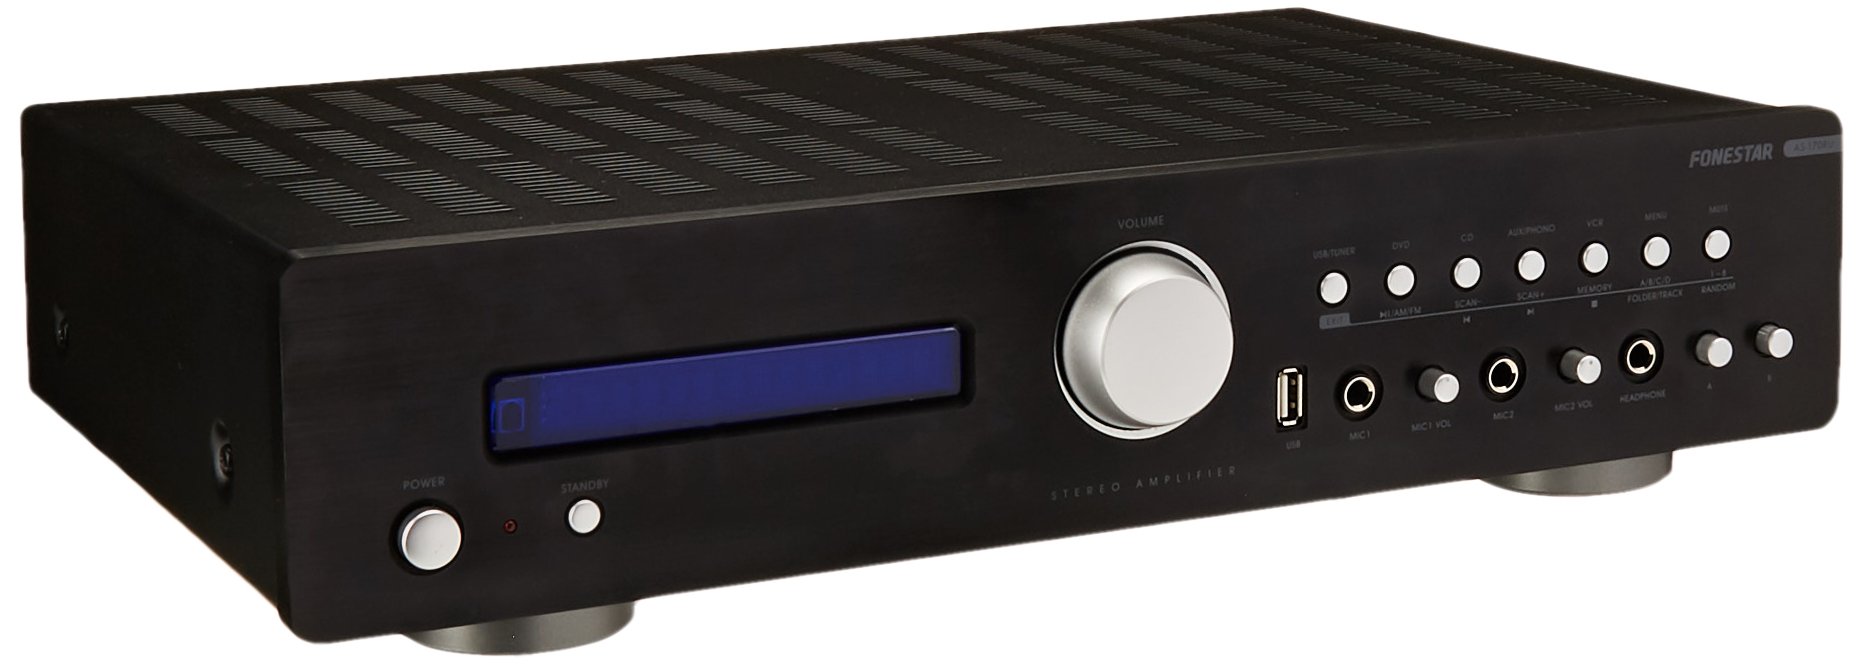
Image: Fonestar AS-170RU Front Panel. Esta imagen muestra el frente view del amplifier, showing the VFD display, USB port, headphone output, input selectors, volume knob, and other control buttons.
- Botón de encendido: Gira el ampmás vivaz encendido o apagado.
- Pantalla VFD: Shows current input, volume level, tuner information (frequency, RDS), and USB/MP3 track details (ID3 tag).
- Puerto USB: Para conectar dispositivos de almacenamiento USB para reproducir MP3 files.
- Salida de auriculares: Toma de 6.3 mm para conectar auriculares.
- Selectores de entrada: Buttons for choosing audio sources (CD, DVD, VCR, AUX/Phono, USB/Tuner).
- Control de volumen: Rotary knob to adjust the master volume level.
- Entradas de micrófono: Two 6.3mm microphone jacks with independent volume control.
- Controles de tono: Buttons or menu options for adjusting Bass, Treble, and Balance.
4.2 Panel trasero
The rear panel contains all the necessary connections for your audio sources, speakers, and antennas.

Image: Fonestar AS-170RU Rear Panel. This image illustrates the rear connections of the amplifier, including speaker terminals (A/B), various RCA input jacks (CD, DVD, VCR, AUX/Phono), REC OUT, PRE OUT, AMP IN, and antenna connections (FM COAX, AM LOOP ANT).
- Speaker Outputs (A/B): Terminals for connecting two pairs of speakers. Supports 4-16 ohms for A or B, or 8-16 ohms for A+B.
- Entradas de audio (RCA):
- Entrada de CD: Para conectar un reproductor de CD.
- Entrada de DVD: For connecting a DVD player or other audio source.
- VCR Input: For connecting a VCR or other audio source.
- AUX/PHONO Input: For connecting auxiliary devices or a turntable (Phono input may require a pre-amplifier if your turntable does not have one built-in).
- SALIDA DE GRABACIÓN: Salida RCA para conectar a un dispositivo de grabación.
- SALIDA PREVIA: RCA output for connecting to an external power ampmás duradero.
- AMP EN: RCA input for connecting an external pre-ampmás duradero.
- Conexiones de antena:
- FM COAX 75Ω: Para conectar una antena FM.
- AM LOOP ANT: For connecting the supplied AM loop antenna.
4.3 control remoto
The included remote control allows convenient operation of the amplificador desde la distancia.

Image: Fonestar AS-170RU Remote Control. This image shows the remote control unit with various buttons for power, input selection, volume, mute, tuner functions, USB playback controls, and tone adjustments.
- APOYAR: Encendido / apagado.
- Selectores de entrada: Buttons for CD, DVD, VCR, AUX/PHONO, USB/TUNER.
- Subir / bajar volumen (VOL +/-): Ajusta el volumen principal.
- MUDO: Silencia la salida de audio.
- AM / FM: Switches between AM and FM tuner modes.
- ESCANEAR: Busca estaciones de radio.
- MEMORIA: Almacena estaciones de radio preestablecidas.
- USB Playback Controls: Play/Pause, Stop, Skip Track, Folder/Track navigation.
- EQ OFF / BASS / TREBLE: Access tone controls.
- RDS / ID3: Displays RDS information for radio or ID3 tag para MP3 files.
5. Configuración
5.1 Conexión de altavoces
- Asegúrese de que ampEl alificador está apagado y desenchufado de la toma de corriente.
- Connect your speakers to the "SPEAKERS OUTPUT" terminals on the rear panel.
- Match the positive (+) terminal of the amplifier (red) to the positive (+) terminal of your speaker, and the negative (-) terminal (black) to the negative (-) terminal.
- The AS-170RU supports two groups of speakers (A and B). You can connect one pair to "SPEAKERS A" and another to "SPEAKERS B".
- Asegúrese de que la impedancia de sus altavoces coincida con la amplifier's specifications: 4-16 ohms for A or B, or 8-16 ohms for A+B.
5.2 Conexión de fuentes de audio
Use RCA cables to connect your audio components to the corresponding input jacks on the rear panel.
- Reproductor de CD: Connect to the "CD" input.
- Reproductor de DVD: Connect to the "DVD" input.
- vídeo: Connect to the "VCR" input.
- Auxiliary Device (e.g., smartphone, tablet): Connect to the "AUX/PHONO" input.
- Plato giratorio: Connect to the "AUX/PHONO" input. If your turntable does not have a built-in pre-amplifier, you may need an external phono pre-ampmás duradero.
5.3 Conexión de antenas
- Antena FM: Connect the supplied FM wire antenna to the "FM COAX 75Ω" terminal. Extend the wire for optimal reception.
- Antena AM: Connect the supplied AM loop antenna to the "AM LOOP ANT" terminals. Position the loop for best reception.
5.4 Conexión de alimentación
Una vez realizadas todas las conexiones de audio y altavoces, conecte el amplifier's power cord into a suitable AC power outlet.
6. Instrucciones de funcionamiento
6.1 Funcionamiento básico
- Encendido/apagado: Press the Power button on the front panel or the STANDBY button on the remote control to turn the ampmás vivaz encendido o apagado.
- Seleccionar fuente de entrada: Press the desired input selector button on the front panel (CD, DVD, VCR, AUX/PHONO) or the remote control (CD, DVD, VCR, AUX/PHONO, USB/TUNER).
- Ajustar el volumen: Rotate the Volume knob on the front panel or use the VOL +/- buttons on the remote control to adjust the sound level.
- Silenciar: Press the MUTE button on the remote control to temporarily silence the audio. Press it again to restore sound.
6.2 Reproducción USB/MP3
- Insert a USB storage device (flash drive) into the USB port on the front panel.
- Select "USB/TUNER" as the input source. The amplifier will automatically detect and begin playing MP3 files.
- Use the playback controls on the remote control (Play/Pause, Stop, Skip Track, Folder/Track) to navigate and control your music.
- The VFD display will show track information, including ID3 tags Si está disponible.
- El amplifier supports up to 65,000 indexable folders and files, with a maximum of 8 folder levels.
6.3 Funcionamiento del sintonizador AM/FM
- Select "USB/TUNER" as the input source, then press the AM/FM button on the remote control to switch between AM and FM bands.
- Escaneo automático: Press the SCAN button on the remote control to automatically search for and store available radio stations.
- Sintonización manual: Use the tuning buttons (usually arrow keys) on the remote control to manually adjust the frequency.
- Estaciones preestablecidas: El amplifier supports 64 presets. Use the MEMORY button to store and recall your favorite stations.
- Función RDS: If available, press the RDS button on the remote control to display Radio Data System information (e.g., station name, program type).
6.4 entradas de micrófono
- Connect microphones to the 6.3mm MIC 1 and MIC 2 jacks on the front panel.
- Adjust the independent volume controls for each microphone to achieve the desired level.
6.5 Tone and Balance Control
El amplifier allows adjustment of bass, treble, and balance through its menu system or dedicated buttons on the remote control. Refer to the remote control section for specific buttons like EQ OFF, BASS, TREBLE.
7. Mantenimiento
- Limpieza: Desconecte la alimentación antes de limpiar. Utilice un paño suave y seco para limpiar las superficies exteriores. No utilice limpiadores abrasivos, ceras ni disolventes.
- Ventilación: Compruebe periódicamente que las aberturas de ventilación estén libres de polvo y residuos.
- Almacenamiento: Si va a almacenar la unidad durante un período prolongado, desconéctela del tomacorriente y guárdela en un lugar fresco y seco, lejos de la luz solar directa y de temperaturas extremas.
8. Solución de problemas
If you encounter problems with your amplifier, refer to the following table for possible solutions.
| Problema | Posible causa | Solución |
|---|---|---|
| Sin poder | Cable de alimentación no conectado; Toma de corriente defectuosa; AmpElevador en modo de espera. | Ensure power cord is securely plugged in. Test the outlet with another device. Press the Power/STANDBY button. |
| Sin sonido | Entrada incorrecta seleccionada; Volumen demasiado bajo; Altavoces no conectados correctamente; Función de silencio activa. | Select the correct input source. Increase volume. Check speaker connections. Deactivate MUTE. |
| Mala recepción de radio | Antenna not connected or poorly positioned; Interference. | Connect and adjust the position of the AM/FM antennas. Move the ampManténgalo alejado de otros dispositivos electrónicos. |
| La reproducción USB no funciona | Dispositivo USB no insertado correctamente; Incompatible file formato; dispositivo USB defectuoso. | Asegúrese de que el dispositivo USB esté completamente insertado. Compruebe si files are MP3 format. Try a different USB device. |
| Amplifier turns off unexpectedly or cycles power | Overheating; Short circuit in speaker wiring; Internal fault. | Ensure adequate ventilation. Check speaker wires for frayed strands causing short circuits. If the problem persists, disconnect power and contact qualified service personnel. |
9. Especificaciones
- Modelo: AS-170RU
- Potencia de salida: 80 + 80 W RMS at 4 Ω
- Impedancia del altavoz: 4-16 Ω (A or B), 8-16 Ω (A+B)
- Protección: 3 circuits (short circuits, overload, overvoltage)
- Reproductor USB: MP3 file reproducción, ID3 tag support. Max 65,000 indexable folders/files, max 8 folder levels.
- Sintonizador: Digital AM/FM, 64 presets, RDS.
- Entradas: 2 x Microphone (6.3mm), 4 x RCA (CD, DVD, VCR, AUX/Phono), 1 x RCA (AMP EN).
- Salidas: 1 x RCA (REC OUT), 1 x RCA (PRE OUT), Headphone (6.3mm).
- Mostrar: Blue VFD.
- Control de tono: Bass, Treble, Balance (via menu/remote).
- Dimensiones: 40 x 40 x 60 cm (aprox. 15.7 x 15.7 x 23.6 pulgadas)
- Peso: 7.2 kg (aproximadamente 15.87 libras)
10. Garantía y soporte
For warranty information and technical support, please refer to the warranty card included with your product or contact your authorized Fonestar dealer. Do not attempt to repair the unit yourself, as this may void your warranty.