
1. Introducción
The Orbit 94886 Pocket Star Ultima is a digital irrigation controller designed for indoor use, capable of managing up to 6 watering stations. This manual provides comprehensive instructions for the installation, programming, and operation of your new irrigation timer, ensuring efficient and effective watering for your landscape. Its user-friendly interface, featuring a large LCD display and intuitive buttons, simplifies the programming process.
2. Información de seguridad
- This controller is designed for indoor use only. Do not install it outdoors or in areas exposed to direct weather conditions.
- Asegúrese de que la fuente de alimentación esté desconectada antes de realizar cualquier cableado o mantenimiento.
- Use only the specified 24V AC power adapter. Using an incorrect power supply can damage the unit and void the warranty.
- Keep the controller away from water sources and high humidity to prevent electrical hazards.
- Do not attempt to open or repair the controller yourself. Refer all servicing to qualified personnel.
3. Contenido del paquete
Your Orbit 94886 Pocket Star Ultima package should contain the following item:
- One (1) Orbit 94886 Pocket Star Ultima 6-Station Indoor Irrigation Controller.
4. Producto terminadoview
The Orbit Pocket Star Ultima controller features a clear LCD display, intuitive navigation buttons, and a rotary dial for easy program selection. The terminal block for wiring is located at the bottom of the unit, protected by a removable cover.

Figura 4.1: Frente view of the Orbit 94886 Pocket Star Ultima controller, showing the LCD screen, control buttons, and rotary dial.

Figure 4.2: The controller with its bottom cover attached, illustrating its compact design.
5. Configuración
5.1. Instalación
The Orbit 94886 controller is designed for indoor installation. Choose a clean, dry location away from direct sunlight and extreme temperatures. Mount the unit securely to a wall using appropriate screws and anchors.

Figura 5.1: Example installation diagram, showing the indoor controller connected to an outdoor irrigation valve.
5.2. cableado
Before wiring, ensure the power supply to the controller is disconnected. The terminal block is located at the bottom of the unit. Use simple tool-less "push-in" terminals for easy wire connections.
- Common Wire (COM): Connect the common wire from your irrigation valves to the terminal labeled "COM". This is typically a white wire.
- Station Wires (1-6): Connect each individual valve wire to its corresponding station terminal (1 through 6).
- Rain Sensor (SENSOR): If using a rain sensor (sold separately), connect its wires to the "SENSOR" terminals. The controller supports a normally closed rain sensor.
- Pump Start Relay (PUMP): If you have a pump start relay or master valve, connect its wires to the "PUMP" terminals.
- 24V AC Power (24VAC): Connect the 24V AC power adapter wires to the "24VAC" terminals.
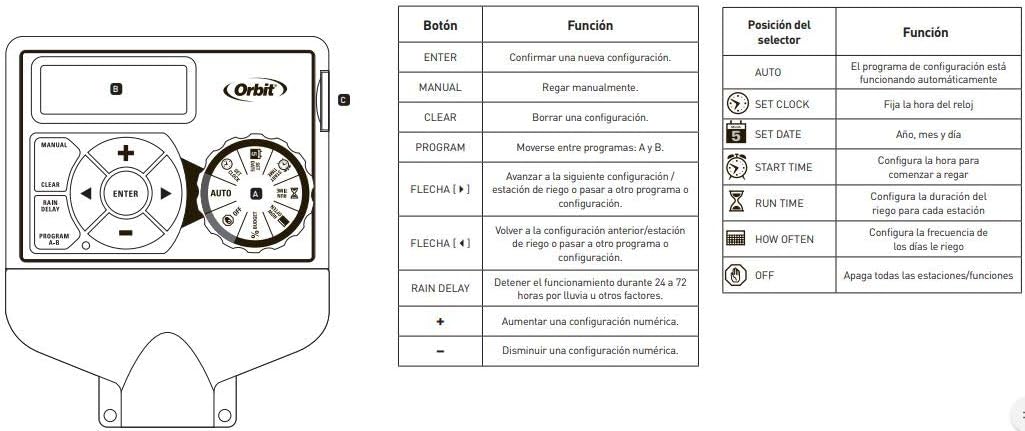
Figura 5.2: detallada view of the wiring terminal block, showing connections for 24VAC, SENSOR, COM, stations 1-6, and PUMP.
Important Power Limitation Warning:
The controller's power supply has specific current limitations. Each valve connected should not exceed 150mA (milliampere) at 24V. The total current drawn by all simultaneously active valves must not exceed 500mA. For example, if your valves draw 150mA each, you can operate a maximum of 3 valves simultaneously. If your valves draw 220mA each, you can operate a maximum of 2 valves simultaneously. Exceeding these limits can damage the controller.
6. Instrucciones de funcionamiento
The controller features a rotary dial to select different functions and buttons for navigation and setting values.

Figure 6.1: Controller interface with a guide to button and dial functions.
6.1. Funciones del dial giratorio
- AJUSTAR RELOJ: Se utiliza para establecer la hora y el día actuales.
- DEFINE LA FECHA: Used to set the current year, month, and day.
- HORA DE INICIO: Used to set the start times for your watering programs.
- TIEMPO DE EJECUCIÓN: Used to set the duration for each watering station (1 to 99 minutes).
- CON QUÉ FRECUENCIA: Used to set the watering frequency (e.g., specific days of the week, odd/even days).
- COCHE: The default operating mode where programmed schedules run automatically.
- OFF: Disables all watering programs and functions.
6.2. Funciones de los botones
- ENTRAR: Confirms a setting or moves to the next step.
- MANUAL: Initiates manual watering.
- CLARO: Clears a setting or program.
- RETRASO POR LA LLUVIA: Activates the rain delay function (24, 48, or 72 hours).
- PROGRAM A-B: Switches between independent programs (A, B, C). The controller supports 3 independent programs.
- Botones +/-: Adjust numerical values up or down.
- Botones de flecha (izquierda/derecha): Navigate through settings or stations.
6.3. Programming Your Controller
- Establecer fecha y hora actuales: Gire el dial a AJUSTAR RELOJ y DEFINE LA FECHA. Use the +/- buttons to adjust values and ENTER to confirm.
- Seleccionar programa: Presione el PROGRAMA AB button to select Program A, B, or C. Each program can have up to 4 start times.
- Establecer horas de inicio: Gire el dial a HORA DE INICIO. Use the +/- buttons to set up to four start times for the selected program. Press ENTER after each time.
- Establecer tiempos de ejecución: Gire el dial a TIEMPO DE FUNCIONAMIENTO. Use the arrow buttons to select each station (1-6) and the +/- buttons to set the watering duration (1-99 minutes) for that station. Press ENTER after each.
- Establecer frecuencia de riego: Gire el dial a CON QUÉ FRECUENCIA. Select specific days of the week, or choose odd/even day watering. Use the arrow and +/- buttons to make your selections.
- Activar programa: Gire el dial a AUTO to enable the programmed schedule.
6.4. Operación manual
To water manually, turn the dial to AUTO, luego presione el MANUAL button. Use the arrow buttons to select the desired station and the +/- buttons to set the run time. Press ENTER to start manual watering. The controller will return to automatic mode after the manual cycle is complete.
6.5. Función de retraso por lluvia
If rain is expected or has occurred, you can temporarily suspend watering. Turn the dial to AUTO, luego presione el RETRASO POR LLUVIA button. Use the +/- buttons to select a delay of 24, 48, or 72 hours. The controller will automatically resume the programmed schedule after the delay period.
7. Mantenimiento
- Mantenga el controlador limpio y libre de polvo y residuos. Utilice un paño suave y seco para limpiarlo.
- Ensure the installation area remains dry and protected from moisture.
- Revise periódicamente las conexiones del cableado para asegurarse de que sean seguras.
- During winter months in cold climates, it is recommended to disconnect the controller and store it indoors to prevent damage from freezing temperatures.
8. Solución de problemas
| Problema | Posible causa | Solución |
|---|---|---|
| La pantalla del controlador está en blanco. | No hay energía o el adaptador de corriente está defectuoso. | Check power outlet and power adapter connection. Ensure the 24VAC terminals are correctly wired. |
| Stations are not watering. | Controller is in OFF mode; incorrect programming; faulty wiring; rain sensor activated. | Turn dial to AUTO. Verify program settings (start times, run times, frequency). Check wiring to valves. Check if rain sensor is wet or activated. |
| Only some stations are watering. | Faulty valve; wiring issue to specific station; power limitation exceeded. | Check wiring for the non-watering stations. Test the valve manually. Ensure total current draw does not exceed 500mA (max 150mA per valve). |
| Controller resets or behaves erratically. | Power fluctuations; internal fault; excessive current draw. | Asegúrese de tener un suministro de energía estable. Verify that the total current draw from active valves does not exceed 500mA. If problems persist, contact support. |
9. Especificaciones
- Marca: Órbita
- Modelo: 94886
- Número de estaciones: 6
- Instalación: Interior
- Entrada de energía: 24 Volt AC
- Max Current per Valve: 150 mA (0.15 A)
- Max Total Current: 500 mA (0.5 A)
- Dimensiones del producto (largo x ancho x alto): 14.6 cm x 6.2 cm x 23.5 cm
- Material: Plástico
- Tipo de pantalla: Pantalla LCD
- Temperatura de funcionamiento: 10 Degrees Celsius (minimum, typical operating range is wider)
- Compatibilidad con hogares inteligentes: No compatible
- Código postal: 046878941267
10. Garantía
The Orbit 94886 Pocket Star Ultima 6-Station Indoor Irrigation Controller comes with a Garantía limitada de 3 año from the date of purchase. This warranty covers defects in materials and workmanship under normal use. Please retain your proof of purchase for warranty claims. The warranty does not cover damage caused by improper installation, misuse, accidents, unauthorized repairs, or exceeding the specified electrical current limits.
11. Soporte
For technical assistance, troubleshooting beyond this manual, or warranty inquiries, please contact Orbit customer support. You can typically find contact information on the Orbit websitio o en el embalaje del producto.
Orbit Worldwide Websitio: www.orbitonline.com