
1. Introducción
Gracias por la compraasing the Hotone Nano Legacy Purple Wind 5-Watt Compact Guitar Amp Head. This ultra-compact amplifier head is designed to deliver premium guitar tones, inspired by the legendary Marshall Plexi Super Lead 1959, in a portable format. This manual provides essential information for safe and effective use of your ampmás duradero.
2. Información de seguridad
- Fuente de energía: Use only the specified power adapter (18V DC, center negative).
- Ventilación: Asegúrese de que haya una ventilación adecuada para evitar el sobrecalentamiento. No bloquee las aberturas de ventilación.
- Humedad: No exponga la unidad a la lluvia, humedad o humedad excesiva.
- Manejo: Manéjelo con cuidado. Evite dejarlo caer o someterlo a impactos fuertes.
- Servicio: No intente reparar esta unidad usted mismo. Encargue cualquier reparación a personal cualificado.
- Conexión de altavoz: Siempre conecte el amplifier to a speaker cabinet with the correct impedance (4-16Ω) before powering on to prevent damage.
3. Producto terminadoview
The Hotone Nano Legacy Purple Wind is a compact 5-watt guitar amplifier head featuring a 3-band EQ and an FX loop. Its design is inspired by classic British rock tones.
Controles del panel frontal

- ENTRADA: 1/4" mono jack to plug in your guitar.
- BAJO: Controls the low frequency response.
- MEDIO: Controls the mid frequency response.
- TRIPLICAR: Controls the high frequency response.
- GANAR: Controls the gain level.
- VOLUMEN: Controla el volumen de salida.
- Interruptor encendido / apagado: Enciende o apaga la unidad.
Conexiones del panel trasero
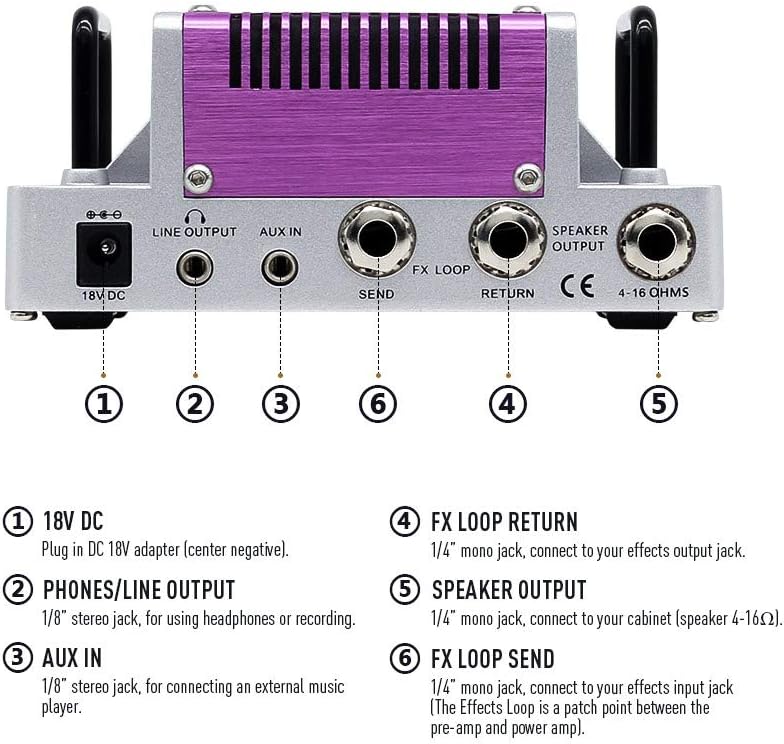
- 18 V CC: Plug in DC 18V adapter (center negative).
- SALIDA DE TELÉFONOS/LÍNEA: 1/8" stereo jack, for using headphones or recording.
- ENTRADA AUX: 1/8" stereo jack, for connecting an external music player.
- RETORNO DEL BUCLE FX: 1/4" mono jack, connect to your effects output jack.
- SALIDA DEL ALTAVOZ: 1/4" mono jack, connect to your cabinet (speaker 4-16Ω).
- ENVÍO DE BUCLE FX: 1/4" mono jack, connect to your effects input jack (The Effects Loop is a patch point between the pre-amp y poder amp).
4. Configuración
- Connect Speaker Cabinet: Before powering on, connect a speaker cabinet (4-16Ω impedance) to the SPEAKER OUTPUT jack on the rear panel using a 1/4" mono speaker cable. Failure to connect a speaker cabinet before powering on can damage the ampmás duradero.
- Conecte la electricidad: Plug the included 18V DC power adapter into the 18V DC input on the rear panel, then plug the adapter into a suitable power outlet.
- Conectar guitarra: Plug your guitar into the INPUT jack on the front panel using a 1/4" mono instrument cable.
- Ajustes iniciales: Turn the VOLUME and GAIN knobs to their minimum (counter-clockwise) positions before powering on.
- Encendido: Coloque el interruptor de encendido/apagado en la posición "ON". La luz indicadora se encenderá.
5. Instrucciones de funcionamiento
- Adjusting Tone: Use the BASS, MIDDLE, and TREBLE knobs to shape your desired tonal characteristics. Experiment with different settings to find your preferred sound.
- Ajuste de ganancia: The GAIN knob controls the amount of overdrive and distortion. Turn clockwise for more aggressive tones.
- Ajuste del volumen: The VOLUME knob controls the overall output level of the amplifier. Adjust to your desired listening level.
- Using the FX Loop: Connect external effects pedals between the FX LOOP SEND and FX LOOP RETURN jacks to integrate them into your signal chain after the preamp sección.
- Headphone/Line Out: For silent practice or direct recording, connect headphones or a line-level device to the PHONES/LINE OUTPUT. This output includes speaker cabinet simulation.
- ENTRADA AUX: Connect an external audio source (e.g., MP3 player, smartphone) to the AUX IN jack to play along with backing tracks.
6. Mantenimiento
- Limpieza: Utilice un paño suave y seco para limpiar el ampExterior del energizador. No utilice limpiadores líquidos ni disolventes.
- Almacenamiento: Almacenar el ampConservar en un lugar seco y fresco, alejado de la luz solar directa y de temperaturas extremas.
- Cuidado del tubo: As a hybrid amplificador, el preamp tube may eventually need replacement. If you notice a significant change in tone or performance, consult a qualified technician.
7. Solución de problemas
| Problema | Posible causa | Solución |
|---|---|---|
| Sin sonido | Power not connected, speaker not connected, volume/gain too low, faulty cable. | Check power connection, ensure speaker is connected, increase volume/gain, test with different cables. |
| Sonido débil o distorsionado | Faulty cable, incorrect impedance, worn preamp tubo. | Test cables, ensure correct speaker impedance, consult technician for tube replacement. |
| Excessive hum/noise | Bucle de tierra, fuente de alimentación defectuosa, interferencia de otros dispositivos electrónicos. | Try different power outlets, use a power conditioner, move away from other electronic devices. |
8. Especificaciones
- Salida Wattage: 5 vatios
- Fuente de energía: Eléctrico con cable (18 V CC, centro negativo)
- Peso del artículo: 15.5 onzas
- Dimensiones del producto: 2.34 x 5.03 x 2.95 pulgadas
- Dispositivos compatibles: Guitarra
- Tipo de conector: 6.35mm Jack (Input, Speaker Output, FX Loop Send/Return), 3.5mm Jack (Phones/Line Out, AUX IN)
- Impedancia del altavoz: 4-16 ohmios
- Número de modelo: TANLA2
9. Vídeos de productos
OriPure 5W Tube Guitar AmpCabeza elevadora
Descripción del vídeo: This video showcases the OriPure 5W Tube Guitar Amplifier Head, demonstrating its features and sound. It highlights the tube components and various controls, providing an overview of its performance capabilities.
The Joyo Jackman II Is Like A Tiny Marshall JCM 800.
Descripción del vídeo: Este vídeo proporciona una descripción detalladaview and demonstration of the Joyo Jackman II amplifier head, comparing its sound characteristics to a Marshall JCM 800. It covers clean and dirty tones, control adjustments, and overall performance.
OriPure 15W Tube Guitar Amplifier Head OA-H15
Descripción del vídeo: This video demonstrates the OriPure 15W Tube Guitar Amplifier Head (Model OA-H15), showcasing its sound quality and features. It includes various guitar riffs and tone adjustments to illustrate its versatility.
JOYO Meteor II BanTamp Serie XL Mini Amp Head 20 Watt
Descripción del vídeo: This video presents the JOYO Meteor II BanTamp Serie XL Mini Amp Head, a 20-watt hybrid tube amplifier. It demonstrates the amplifier's clean and overdrive channels, tone controls, and built-in Bluetooth functionality for playing backing tracks.
Valeton Guitar Amplifier Head TAR-20G Amp Pedal Platform Studio Desktop with CAB SIM
Descripción del vídeo: This video showcases the Valeton Guitar Amplifier Head TAR-20G, highlighting its features as an amp pedal platform and desktop studio amplifier with built-in cab simulation. It demonstrates various tones and connectivity options.
JOYO 20W Amplifier Head BanTamP Series ATOMIC
Descripción del vídeo: This video features the JOYO 20W Amplifier Head from the BanTamP Series, specifically the ATOMIC model. It demonstrates the amplifier's sound characteristics and features, designed for AC lovers.
10. Garantía y soporte
For warranty information and technical support, please refer to the official Hotone webSitio web o contacte a su distribuidor autorizado. Conserve el recibo de compra como comprobante.