1. Introducción
Thank you for choosing the Microlife BP A80 Semi-automatic Upper Arm Blood Pressure Monitor. This device is designed for accurate and reliable measurement of blood pressure in adults. Please read this instruction manual thoroughly before using the device to ensure safe and correct operation. Keep this manual for future reference.
2. Información importante de seguridad
- Consulte a su médico antes de utilizar este dispositivo si tiene alguna condición médica.
- Do not self-diagnose or self-medicate based on blood pressure measurements. Always consult a healthcare professional.
- This device is not suitable for use on infants, children, or pregnant women without medical advice.
- No utilice el dispositivo en un vehículo en movimiento ni en un avión.
- Mantenga el dispositivo y sus componentes fuera del alcance de los niños.
- Use only Microlife-approved cuffs and accessories.
- Avoid strong electromagnetic fields, such as those near mobile phones or microwave ovens, during use.
3. Producto terminadoview
Familiarize yourself with the components of your Microlife BP A80 blood pressure monitor:

Figura 1: Microlife BP A80 Blood Pressure Monitor showing the main unit, display, power button, cuff, and inflation bulb.
- Unidad principal: Contains the electronics and display.
- Mostrar: Shows blood pressure readings (systolic, diastolic, pulse) and other indicators.
- Botón de encendido: Se utiliza para encender y apagar el dispositivo.
- Bofetada: Applied to the upper arm for measurement.
- Pera de inflado: Used to manually inflate the cuff.
- Conector de manguito: Port on the main unit for connecting the cuff tube.
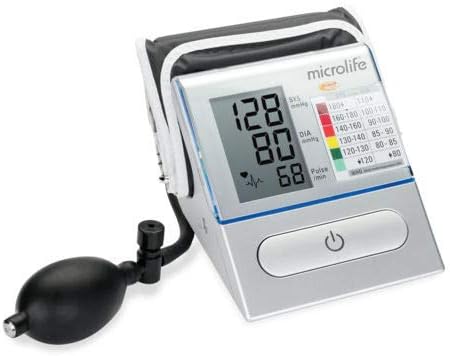
Figura 2: Detallado view of the Microlife BP A80 display, highlighting the blood pressure values (systolic, diastolic, pulse) and the integrated WHO blood pressure classification indicator.
4. Configuración
4.1. Instalación de la batería
- Open the battery compartment cover located on the bottom or back of the device.
- Insert four 1.5V AA batteries, ensuring correct polarity (+/-) as indicated inside the compartment.
- Cierre bien la tapa del compartimento de la batería.
- Si aparece el símbolo de la batería en la pantalla, reemplace todas las baterías.
4.2. Conexión del manguito
- Insert the air tube connector of the cuff firmly into the cuff socket on the left side of the monitor.
- Asegúrese de que la conexión sea segura para evitar fugas de aire durante la medición.
5. Instrucciones de funcionamiento
5.1. Antes de la medición
- Evite comer, fumar o hacer ejercicio durante al menos 30 minutos antes de la medición.
- Descanse durante 5 a 10 minutos en un entorno tranquilo antes de tomar la medición.
- Siéntese cómodamente con la espalda apoyada y los pies apoyados en el suelo. No cruce las piernas.
- Coloque el brazo sobre una superficie plana de modo que el brazalete quede a la altura del corazón.
- Quítese la ropa ajustada de la parte superior del brazo.
5.2. Colocación del brazalete
- Coloque el brazalete sobre el brazo desnudo, aproximadamente 2-3 cm por encima de la articulación del codo.
- Ensure the artery mark on the cuff aligns with your brachial artery (on the inside of your arm).
- Envuelva el brazalete cómodamente alrededor de su brazo, pero sin apretarlo demasiado. Debe poder insertar dos dedos entre el brazalete y el brazo.
5.3. Tomando una medida
- Presione el ENCENDIDO/APAGADO button to turn on the monitor. The display will show all segments briefly.
- Once the display shows "0", begin inflating the cuff by repeatedly squeezing the inflation bulb.
- Inflate the cuff until the pressure displayed is about 30 mmHg higher than your usual systolic pressure. If you don't know your usual pressure, inflate to 180-200 mmHg.
- Stop inflating. The device will automatically deflate the cuff slowly and measure your blood pressure.
- Una vez completada la medición, se mostrarán su presión sistólica, su presión diastólica y su frecuencia del pulso.
- Presione el ENCENDIDO/APAGADO button to turn off the device. If you forget, it will automatically shut off after approximately 1 minute.
6. Comprender sus lecturas
Your blood pressure monitor displays three values:
- Presión sistólica (SYS): The top number, indicating the pressure when your heart beats.
- Presión diastólica (DIA): The bottom number, indicating the pressure when your heart rests between beats.
- La frecuencia del pulso: Tu frecuencia cardíaca por minuto.
The Microlife BP A80 also features a WHO (World Health Organization) blood pressure classification indicator on the display, which uses a color scale to help you interpret your readings:
| Categoría | Sistólica (mmHg) | Diastólica (mmHg) | Color del indicador |
|---|---|---|---|
| Óptimo | < 120 | < 80 | Verde |
| Normal | 120-129 | 80-84 | Verde claro |
| Alto Normal | 130-139 | 85-89 | Amarillo |
| Hipertensión de grado 1 | 140-159 | 90-99 | Naranja |
| Hipertensión de grado 2 | 160-179 | 100-109 | Rojo |
| Hipertensión de grado 3 | ≥ 180 | ≥ 110 | Rojo oscuro |
Note: This classification is a general guideline. Always consult your doctor for interpretation of your blood pressure readings.
7. Mantenimiento
7.1. Limpieza
- Clean the monitor and cuff gently with a soft, dry cloth.
- Si es necesario, utilice un paño ligeramente seco.ampLimpie con agua o un detergente suave. No utilice limpiadores abrasivos ni disolventes.
- No sumerja el dispositivo ni el brazalete en agua.
7.2. Almacenamiento
- Store the device and cuff in a clean, dry place, away from direct sunlight and extreme temperatures.
- Si el dispositivo no se utilizará durante un período prolongado, retire las baterías para evitar fugas.
- Evite dejar caer o someter el dispositivo a impactos fuertes.
8. Solución de problemas
If you encounter any issues with your Microlife BP A80, please refer to the following table:
| Problema | Posible causa | Solución |
|---|---|---|
| El dispositivo no se enciende. | Las baterías están agotadas o insertadas incorrectamente. | Reemplace las baterías por otras nuevas, asegurándose de la polaridad correcta. |
| "E1" or "Error" displayed. | El manguito no está conectado correctamente o hay fuga de aire. | Check cuff connection. Re-apply cuff snugly. |
| "E2" displayed. | Movement during measurement or irregular pulse. | Remain still and quiet during measurement. Repeat measurement after a few minutes. |
| Lecturas inconsistentes. | Improper cuff placement, incorrect body position, or external factors. | Ensure correct cuff placement and body posture. Avoid talking or moving. Take multiple readings at different times. |
If the problem persists, contact Microlife customer support.
9. Especificaciones
- Modelo: PA A80
- Método de medición: Oscilométrico
- Rango de medición:
- Blood Pressure: 20-280 mmHg
- Pulso: 40-200 latidos por minuto
- Exactitud:
- Presión arterial: ±3 mmHg
- Pulso: ± 5% de lectura
- Fuente de energía: 4 pilas AA de 1.5 V
- Tipo de pantalla: Pantalla LCD
- Dimensiones: Approximately 16.5 x 16 x 10 cm (as per package dimensions, actual device may vary slightly)
- Peso: Approximately 600 grams (including batteries, as per package weight)
- Condiciones de funcionamiento: 10-40 °C (50-104 °F), 15-95% relative humidity non-condensing
- Condiciones de almacenamiento: -20-55 °C (-4-131 °F), 15-95% relative humidity non-condensing
- Código de artículo internacional (EAN): 04719003310080
10. Garantía y soporte
Microlife products are manufactured to the highest quality standards. For detailed warranty information specific to your region, please refer to the warranty card included with your product or visit the official Microlife websitio.
For technical support, troubleshooting assistance, or to inquire about replacement parts, please contact Microlife customer service. Contact details can typically be found on the Microlife websitio o en el embalaje del producto.
Websitio: www.microlife.es