1. Introducción
The LAUNCH CNC602A Injector Cleaner and Tester is a professional automotive tool designed for comprehensive maintenance of fuel injectors. It performs simultaneous cleaning and testing of multiple injectors, ensuring optimal engine performance and fuel efficiency. This manual provides detailed instructions for safe and effective operation of the device.
2. Información de seguridad
- Utilice siempre la unidad en un área bien ventilada.
- Do not smoke or use open flames near the cleaning or testing fluids.
- Use equipo de protección personal adecuado, incluidas gafas de seguridad y guantes.
- Ensure the unit is properly grounded before operation.
- Utilice únicamente líquidos de limpieza y prueba recomendados.
- Do not place anything on the control panel that could interfere with operation or cause damage.
- In case of a damaged power supply or short circuit, discontinue use immediately.
3. Componentes del producto y contenido del paquete
The LAUNCH CNC602A comes with a comprehensive set of accessories to facilitate various cleaning and testing procedures.

Imagen: Various accessories and cables included with the LAUNCH CNC602A Injector Cleaner and Tester.
Lista de paquetes:
- 105020217 CNC pulse signal connection cable 1, T=0.5
- 105020218 CNC pulse signal connection cable 2, T=0.8
- 103260037 Ultrasonic cleaner assembly 100W
- 106030038 On-vehicle adaptor package (tool kits)
- 107010428 CNC-602A user manual (En&Ch)
- 103250013 Top-supply connector 1
- 103250015 Swiss thread adaptor for fuel top-supply injector
- 103250016 Coarse thread adaptor for fuel top-supply injector
- 103250018 CNC-601/801 Hexangular stopper
- 104990012 CNC-801 BUICK injector adaptor
- 199010019 Injector testing liquid (pick out)
- 307030024 Injector detergent (pick out)
4. Configuración
Before operating the unit, ensure it is placed on a stable, level surface and connected to a suitable power supply (AC110V±10%, 50/60Hz).
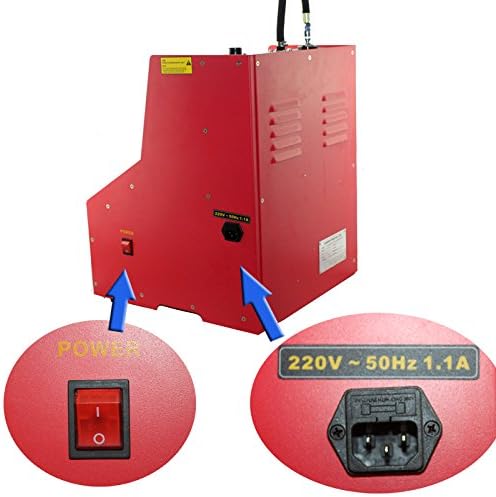
Imagen: Power switch and socket for connecting the unit to a 110V AC power supply.
Pasos iniciales:
- Conecte la electricidad: Plug the unit into a grounded AC110V power outlet.
- Install Drain Valve: Attach the cleaning/testing agent discharge valve to the designated port.
- Prepare Ultrasonic Bath: Place the ultrasonic cleaning assembly into its designated slot.
- Install Signal Wires: Connect the pulse signal connection cables to the unit.
5. Instrucciones de funcionamiento
The CNC602A offers both ultrasonic cleaning and various testing functions for fuel injectors.

Imagen: The control panel with function selection, pulse width adjustment, and pressure controls.
5.1. Procedimiento de limpieza ultrasónica
- Pre-clean Injectors: Clean the injector's exterior with gasoline or a suitable cleaning liquid before placing them in the unit.
- Colocar inyectores: Position the injectors in the ultrasonic bathtub.
- Añadir líquido de limpieza: Pour cleaning fluid into the ultrasonic bathtub, ensuring injectors are submerged.
- Connect Pulse Signals: Attach the pulse signal cables to the injectors.
- Activate Ultrasonic System: Turn on the ultrasonic system. The pulsed energy, combined with the cleaning fluid, will dislodge carbon and impurities from inside the injectors.
- Heat Mode (Optional): If desired, activate the heating mode for enhanced cleaning.

Imagen: Injectors undergoing ultrasonic cleaning in the dedicated bath.
5.2. Procedimiento de prueba del inyector de combustible
- Inyectores de montaje: Secure the cleaned injectors onto the main machine's test bench.
- Añadir líquido de prueba: Pour the dedicated testing fluid into the fuel tank (4700ml capacity). Ensure the fluid level is within the specified range.
- Connect Power and Signal: Ensure all injectors are correctly connected for power and pulse signals.
- Seleccionar función de prueba: Use the control panel to select the desired test function (e.g., Idle Speed Test, Leakage Test, Sprayability Test).
- Ajustar parámetros: Set simulated RPM, time, and pulse width as required for the selected test.
- Iniciar prueba: Initiate the test and observe injector performance in the graduated cylinders.
- Ajustar la presión: Use the pressure adjustment knob to modify system pressure during testing as needed.
Video: Demonstration of cleaning and testing 6 injectors simultaneously using a similar machine. This video illustrates the general process of injector cleaning and testing.
Available Testing Functions:
- Limpieza ultrasónica: Removes carbon deposits and impurities using ultrasonic vibration.
- Prueba de velocidad de ralentí (0-20 ms): Simulates engine idling speed to test injector state.
- Prueba de velocidad media (0-7.5 ms): Simulates medium engine speed to test injector state.
- Prueba de alta velocidad (0-4 ms): Simulates high engine speed to test injector state.
- Prueba de aceleración: Simulates vehicle acceleration to test injector performance.
- Prueba de velocidad de cambio: Simulates vehicle shifting state to test injector working performance.
- Prueba de fugas: Checks the sealing condition of the fuel injector.
- Prueba de pulverizabilidad en ralentí: Tests spray performance at engine idling state.
- Prueba de pulverizabilidad a velocidad media: Tests spray performance at medium engine speed.
- Prueba de pulverizabilidad a alta velocidad: Tests spray performance at high engine speed.
- Descarga inversa: Cleans injectors by flowing test liquid from outlet to inlet, removing internal dirt or strainers (for top fuel supply injectors).
- Limpieza sin desmontaje: Direct cleaning without disassembling injectors (requires special adapters).
6. Mantenimiento
Regular maintenance ensures the longevity and accuracy of your LAUNCH CNC602A unit.
- Gestión de fluidos: After each use, drain all cleaning and testing fluids from the unit. Store fluids properly according to their safety data sheets.
- Unidad limpia: Limpie el exterior de la máquina con un paño suave.amp cloth. Avoid using harsh chemicals that may damage the surface or internal components.
- Inspeccionar componentes: Regularly check all hoses, connections, and adapters for wear, damage, or leaks. Replace any damaged parts immediately.
- Almacenamiento: Guarde la unidad en un entorno limpio y seco, alejado de la luz solar directa y de temperaturas extremas.

Imagen: Fuel intake port and warning label, emphasizing proper fluid handling.
7. Solución de problemas
Esta sección aborda problemas comunes que puede encontrar durante la operación.
- La unidad no se enciende: Verifique la conexión del cable de alimentación y asegúrese de que el interruptor de encendido esté en la posición de encendido. Verifique que la toma de corriente funcione.
- Sin acción de limpieza ultrasónica: Ensure the ultrasonic cleaning function is selected and the cleaning fluid level is adequate. Check connections to injectors.
- Inconsistent spray pattern/flow: Verify that injectors are clean and free of blockages. Check for proper seating of injectors and adapters. Ensure correct pressure settings.
- Fuga de fluido: Inspect all connections, hoses, and O-rings for proper sealing. Tighten any loose fittings.
- Pressure gauge not responding: Check the oil supply hose connection and ensure the pressure adjustment knob is functioning correctly.
8. Especificaciones
| Característica | Especificación |
|---|---|
| Fuente de alimentación | AC220V±10%, 50/60Hz; AC110V±10%, 50/60Hz |
| Potencia de entrada | 250 W |
| Potencia del limpiador ultrasónico | 100 W |
| Rango de RPM simulado | 10-9990rpm; step: 10rpm |
| Intervalo de tiempo | 1-9999 |
| Ancho de pulso | 0.5-25ms; step 0.1ms |
| Capacidad del tanque de combustible | 4700 ml |
| Dimensiones | 385 mm × 410 mm × 500 mm |
| Peso | Alrededor de 35 kg |
9. Garantía y soporte
The LAUNCH CNC602A Injector Cleaner and Tester comes with a GARANTÍA DE 1 AÑOS for damages caused by non-human factors. For any needs or support, please contact customer service. We aim to respond within 24 hours.