

1. Introducción
1.1 producto másview
The Schunk Intermediate Sleeve is designed to enhance the versatility of toolholders by allowing for a wide range of clamping diameters. This sleeve enables clamping of tools from 3mm to 25mm, optimizing the use of a single toolholder for various applications.
Available in coolant-proof versions with innovative peripheral coolant channels, these sleeves integrate seamlessly with TEDNO, TRIBOS, SINO-R, and other commercially available hydraulic expansion toolholder systems, providing robust and efficient performance.

Figure 1.1: The Schunk Intermediate Sleeve, a precision component designed for expanding clamping diameter capabilities in toolholders.
2. Características del producto
- Cl versátilampen: Allows for clamping diameters ranging from 3mm to 25mm with a single toolholder.
- Internal Coolant Supply: Designed for efficient internal coolant supply, ensuring optimal cooling during operation.
- Coolant Proof: Robust construction ensures coolant proof performance up to a maximum of 80 bar.
- Closed Collar Design: Features a closed collar for secure and stable tool clampEn.
- Amplia compatibilidad: Compatible with TEDNO, TRIBOS, SINO-R, and other standard hydraulic expansion toolholders.
- Ingeniería alemana: Manufactured in Germany, ensuring high quality and precision.
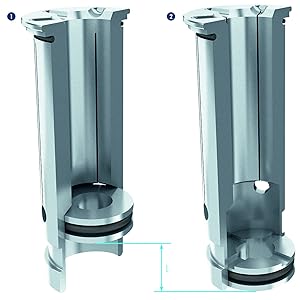
Figura 2.1: Sección transversal view illustrating the internal structure of the intermediate sleeve, highlighting its design for various clamping diameters.

Figure 2.2: Diagram showing the path of internal coolant supply through the intermediate sleeve, ensuring effective cooling during operation.
3. Configuración e instalación
The Schunk Intermediate Sleeve is designed for straightforward integration into compatible toolholder systems. Proper installation ensures optimal performance and tool life.
3.1 Directrices generales de instalación
- Preparación: Ensure both the intermediate sleeve and the toolholder are clean and free from debris, chips, or contaminants. Use a lint-free cloth for cleaning.
- Lubricación (si corresponde): Consult your specific toolholder's manual for any lubrication requirements for the clamping mechanism or sleeve interface.
- Inserción: Carefully insert the intermediate sleeve into the toolholder. Ensure it seats fully and correctly. Do not force the sleeve into position.
- Inserción de herramientas: Once the intermediate sleeve is in place, insert the cutting tool into the sleeve. Ensure the tool's shank diameter matches the sleeve's clamping diameter.
- Clampen: Activate the toolholder's clamping mechanism according to its manufacturer's instructions. Verify that the tool is securely clamped within the intermediate sleeve.
- Coolant Connection (if applicable): If utilizing the internal coolant supply feature, ensure all coolant lines are properly connected and sealed to the toolholder system.
Nota: Always refer to the specific instructions provided with your primary toolholder system for detailed installation procedures and safety precautions. Incorrect installation can lead to reduced performance or damage.
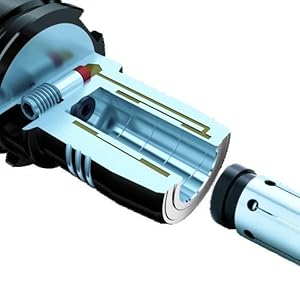
Figure 3.1: Illustration depicting the intermediate sleeve being inserted into a compatible toolholder, demonstrating the integration process.
4. Instrucciones de funcionamiento
The intermediate sleeve itself does not require specific operational steps beyond its proper installation and the standard operation of the toolholder system it is integrated with. Its function is to enable the use of a wider range of tool diameters.
4.1 General Operation Considerations
- Selección de herramientas: Always select a cutting tool with a shank diameter that precisely matches the internal diameter of the intermediate sleeve being used.
- Cl seguroampen: Before initiating any machining operation, always verify that the cutting tool is securely clamped within the intermediate sleeve and that the sleeve is firmly seated in the toolholder.
- Flujo de refrigerante: If using the internal coolant supply feature, ensure that coolant flow is adequate and unobstructed during operation to prevent overheating and extend tool life.
- Monitoreo de vibraciones: Monitor for unusual vibrations or noises during operation, which could indicate improper clamping, tool wear, or other issues.
Precauciones de seguridad: Always wear appropriate personal protective equipment (PPE) when operating machinery. Refer to your machine's and toolholder's safety manuals for comprehensive safety guidelines.
5. Mantenimiento
Regular maintenance of the intermediate sleeve ensures its longevity and consistent performance. Proper care prevents premature wear and maintains precision.
5.1 Limpieza y almacenamiento
- Después del uso: After each use, remove the intermediate sleeve from the toolholder and clean it thoroughly to remove any chips, coolant residue, or other contaminants. Use a soft cloth and a suitable cleaning agent if necessary.
- Inspección: Periodically inspect the sleeve for any signs of wear, damage, or deformation, especially around the clamping surfaces and coolant channels.
- Lubricación: If the sleeve has moving parts or seals, apply a thin layer of appropriate lubricant as recommended by Schunk or your toolholder manufacturer.
- Almacenamiento: Store the intermediate sleeve in a clean, dry environment, preferably in its original packaging or a protective case, to prevent corrosion and physical damage.
Importante: Do not use abrasive materials or harsh chemicals for cleaning, as these can damage the sleeve's precision surfaces or coatings.
6. Solución de problemas
This section provides guidance for common issues that may arise during the use of the intermediate sleeve. For complex problems, contact Schunk technical support.
| Problema | Posible causa | Solución |
|---|---|---|
| Tool not clamping con seguridad | Incorrect tool shank diameter; Sleeve not fully seated; Toolholder clamping mechanism issue; Debris in sleeve/toolholder. | Verify tool and sleeve diameters match. Re-seat sleeve. Inspect toolholder. Clean sleeve and toolholder thoroughly. |
| Coolant leakage or insufficient flow | Improper coolant line connection; Damaged O-rings/seals; Blocked coolant channels. | Check and tighten coolant connections. Inspect and replace damaged seals. Clean coolant channels. |
| Vibración excesiva durante el funcionamiento | Tool not properly clamped; Worn tool; Unbalanced setup; Sleeve not fully seated. | Ensure secure clamping. Replace worn tool. Check overall setup balance. Re-seat sleeve. |
7. Especificaciones
| Atributo | Detalle |
|---|---|
| Número de modelo | 0207910 |
| Dimensiones del producto | 6 x 3 x 3 pulgadas |
| Peso del artículo | 5 libras |
| Clamping Diameter Range | 3mm to 25mm (with appropriate toolholder) |
| Coolant Pressure Rating | Up to 80 bar (coolant proof) |
| Componentes incluidos | 1 x Intermediate Sleeve (Part No. 207910) |
| Fabricante | Schunk |
| País natal | Alemania |
| Fecha de primera disponibilidad | 11 de agosto de 2015 |
8. Garantía y soporte
8.1 Información de garantía
Schunk products are manufactured to high-quality standards. For specific warranty terms and conditions applicable to your Intermediate Sleeve (Model 0207910), please refer to the warranty documentation provided at the time of purchase or visit the official Schunk webSitio. La cobertura de la garantía generalmente cubre defectos de fabricación en condiciones normales de uso.
8.2 Soporte técnico
Should you require technical assistance, have questions regarding installation, operation, or maintenance, or encounter issues not covered in this manual, please contact Schunk customer support.
For the most current contact information, please visit the official Schunk websitio:
When contacting support, please have your product model number (0207910) and purchase details readily available to facilitate faster service.