
1. Introducción
This manual provides detailed instructions for the installation, operation, and maintenance of your CenturyLink Technicolor C2100T 802.11AC Modem Router. The C2100T is designed to provide high-speed internet access via DSL or fiber connections, featuring dual-band Wi-Fi (2.4GHz and 5GHz) and Gigabit Ethernet ports for robust home networking.
Please read this manual thoroughly before setting up your device to ensure proper functionality and optimal performance.
2. Contenido del paquete
Verifique que todos los artículos estén presentes en su paquete:
- CenturyLink Technicolor C2100T Modem Router
- Original Power Supply Adapter
- Yellow Ethernet Cable
- Green Telephone Cord (for DSL connection)
3. Physical Features and Indicators
3.1. Front Panel Indicators
The front panel of the C2100T features several LED indicators that provide status information about the device's operation.

Figura 1: Frontal y lateral View of the C2100T Modem Router. This image displays the sleek black casing and the vertical arrangement of LED indicators on the front panel.
- Fuerza: Indica el estado de energía.
- DSL 1 / DSL 2: Indicates DSL line synchronization status.
- Internet: Indicates active internet connection.
- PÁLIDO/LAN: Indica actividad WAN o LAN.
- Ethernet: Indica actividad en los puertos Ethernet.
- HPNA: Indicates HomePNA network activity.
- USB: Indica actividad del puerto USB.
- Wi-Fi 2.4GHz / Wi-Fi 5GHz: Indicates activity for respective Wi-Fi bands.
- VoIP 1 / VoIP 2: Indicates Voice over IP service status.
- WPS: Indica el estado de configuración protegida de Wi-Fi.
3.2. Puertos del panel trasero
The rear panel provides all the necessary ports for connecting the modem router to your internet service and local network devices.

Figure 2: Rear Panel Diagram of the C2100T. This diagram illustrates the layout of all ports and buttons on the back of the device, including DSL, VoIP, HPNA, Ethernet, WAN/LAN, USB, Reset, and Power.
- 12VDC 2A Power Input: Se conecta al adaptador de corriente proporcionado.
- Botón de encendido/apagado: Enciende o apaga el dispositivo.
- Botón de reinicio: Recessed button to restore factory default settings (use a paperclip).
- Puerto USB: Para conectar dispositivos USB (por ejemplo, almacenamiento).
- Puerto LAN/WAN: Can function as either a LAN port or a WAN port for fiber connections.
- Puertos Ethernet (1-4): Puertos Gigabit Ethernet para dispositivos de red cableados.
- HPNA Port: For HomePNA network connections.
- VoIP Ports (1-2): For Voice over IP telephone connections.
- DSL Ports (1-2): For connecting to DSL telephone lines.
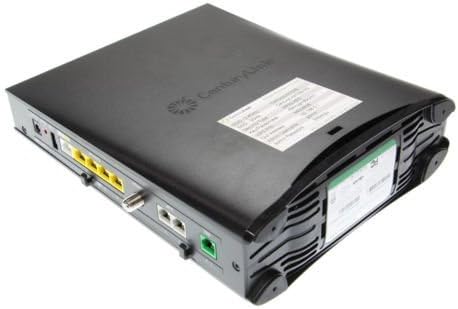
Figura 3: Parte superior y trasera View of the C2100T. This image provides an angled view showing the top ventilation and the arrangement of ports on the rear panel.
4. Instrucciones de configuración
4.1. Conexión inicial
- Conexión de energía: Connect the provided power adapter to the 12VDC 2A power input on the rear panel and plug it into an electrical outlet. Press the On/Off button. The Power LED on the front panel should illuminate.
- Internet Connection (DSL): If you have DSL service, connect one end of the green telephone cord to the DSL port on the modem router and the other end to your wall's DSL jack. Wait for the DSL 1 (and DSL 2 if applicable) LEDs to become solid, indicating synchronization.
- Internet Connection (Fiber/Ethernet WAN): If you have fiber internet service, connect an Ethernet cable from your Optical Network Terminal (ONT) or fiber modem to the LAN/WAN port on the C2100T.
- Conexión de dispositivo con cable: For wired devices (e.g., computer, gaming console), connect an Ethernet cable from one of the yellow Ethernet ports (1-4) on the C2100T to the Ethernet port on your device.
4.2. Configuración básica
After physical connections are made, you may need to configure the modem router via its web interfaz.
- Accediendo a la Web Interfaz: Abrir una web browser on a device connected to the C2100T (either wired or via Wi-Fi). In the address bar, type 192.168.0.1 y presione Enter.
- Credenciales de inicio de sesión: You will be prompted for a username and password. The default credentials are often found on a sticker on the device itself. Common defaults are:
- Nombre de usuario: administración
- Contraseña: (Refer to the sticker on your device, e.g., Hadsee7j as shown in Figure 2's detail)
- Asistente de configuración inicial: Follow the on-screen instructions of the setup wizard to configure your internet service provider (ISP) settings, Wi-Fi network name (SSID), and password.
Note: Your CenturyLink service may require specific VPI/VCI settings or PPPoE credentials. Consult your CenturyLink documentation or contact their support if you encounter issues during configuration. This device is compatible with CenturyLink VDSL/ADSL2+ services. It is not compatible with all fiber connections or AT&T services.
5. Instrucciones de funcionamiento
5.1. Conexión a la red Wi-Fi
The C2100T broadcasts two Wi-Fi networks: 2.4GHz and 5GHz. These are typically labeled with distinct SSIDs (e.g., "CenturyLink0204" and "CenturyLink0204-5G").
- Locate Network Name (SSID): On your wireless device (smartphone, laptop, tablet), search for available Wi-Fi networks. The SSIDs are usually printed on a sticker on the modem router.
- Enter Password (Passphrase): Select your desired network (2.4GHz or 5GHz) and enter the Wi-Fi password (passphrase) found on the same sticker.
- Conectar: Your device should now connect to the Wi-Fi network.
The 2.4GHz band offers wider coverage, while the 5GHz band provides faster speeds over shorter distances and is less prone to interference.
5.2. Uso de WPS (Configuración Wi-Fi protegida)
WPS allows for easy connection of WPS-compatible devices without manually entering the Wi-Fi password.
- Press the WPS button on the front panel of the C2100T. The WPS LED will start blinking.
- Within two minutes, activate WPS on your wireless device.
- The device should automatically connect to the Wi-Fi network.
6. Mantenimiento
- Colocación: Place the modem router in an open, central location to maximize Wi-Fi coverage. Avoid placing it near large metal objects, concrete walls, or other electronic devices that may cause interference.
- Ventilación: Ensure the device has adequate ventilation. Do not cover the ventilation holes.
- Limpieza: Limpie el dispositivo con un paño suave y seco. No utilice limpiadores líquidos ni en aerosol.
- Actualizaciones de firmware: Periodically check the CenturyLink support webSitio para actualizaciones de firmware. Mantener el firmware actualizado garantiza un rendimiento y una seguridad óptimos.
- Reiniciando: If you experience network issues, try restarting the modem router by unplugging the power adapter for 30 seconds and then plugging it back in.
7. Solución de problemas
7.1. No hay conexión a Internet
- Comprobar los LED: Ensure the Power, DSL (if applicable), and Internet LEDs are solid green. If any are off or blinking, check connections.
- Conexiones de cable: Verify all cables (power, DSL/WAN, Ethernet) are securely connected.
- Reiniciar el dispositivo: Power cycle the modem router by unplugging it for 30 seconds and plugging it back in.
- Configuración del ISP: Confirm that your ISP settings (e.g., VPI/VCI, PPPoE username/password) are correctly configured in the web interfaz.
- Contactar con el ISP: If issues persist, contact CenturyLink support to verify service status in your area.
7.2. Wi-Fi Not Working or Slow
- LED de Wi-Fi: Ensure the Wi-Fi 2.4GHz and Wi-Fi 5GHz LEDs are illuminated.
- Contraseña: Double-check that you are entering the correct Wi-Fi password (passphrase).
- Intensidad de la señal: Move closer to the modem router to check if signal strength improves. Obstacles like walls and floors can degrade Wi-Fi performance.
- Interferencia: Other electronic devices (cordless phones, microwaves) can interfere with Wi-Fi signals. Try changing the Wi-Fi channel in the modem router's web interfaz.
- Doble banda: Try connecting to the other Wi-Fi band (2.4GHz or 5GHz) to see if performance improves.
7.3. No se puede acceder Web Interfaz (192.168.0.1)
- Conexión por cable: Ensure your device is connected directly to the modem router via an Ethernet cable.
- Dirección IP: Verifique que la dirección IP de su computadora esté en la misma subred que el enrutador (por ejemplo, 192.168.0.x).
- Caché del navegador: Limpia tu web caché y cookies de su navegador, o pruebe con un navegador diferente.
- Cortafuegos/Antivirus: Deshabilite temporalmente cualquier firewall o software antivirus que pueda estar bloqueando el acceso.
- Reset: As a last resort, perform a factory reset by pressing and holding the recessed Reset button for 10-15 seconds with a paperclip. This will erase all custom settings.
8. Especificaciones
| Nombre del modelo | C2100T |
| Marca | CenturyLink (Manufactured by Technicolor) |
| Estándar inalámbrico | 802.11ac |
| Clase de banda de frecuencia | Doble banda (2.4 GHz y 5 GHz) |
| Tecnología de conectividad | Wi-Fi, Ethernet, DSL, HPNA, USB, VoIP |
| Servicios compatibles | CenturyLink VDSL/ADSL2+ Services (Not compatible with all fiber connections or AT&T) |
| Puertos Ethernet | Gigabit Ethernet (4x LAN, 1x LAN/WAN) |
| Característica especial | WPS (configuración protegida de Wi-Fi) |
| Dimensiones (L x An x Al) | 10.6 x 10.6 x 2.6 pulgadas |
| Peso del artículo | 2 libras |
| Sistema operativo | ZyNOS |
| Usos recomendados | Hogar |
9. Garantía y soporte
For warranty information, technical support, or further assistance, please refer to the documentation provided with your purchase or visit the official CenturyLink support webSitio. Los recursos de soporte suelen incluir preguntas frecuentes, guías de solución de problemas e información de contacto para atención al cliente.
It is recommended to register your product with CenturyLink, if applicable, to receive updates and support notifications.