
1. Introducción
The LaiPuDuo RGBW Wall-Mounted Touch Panel Dimmer Switch is designed for controlling various LED light sources, including point light sources, flexible light strips, and wall washer lamps. It features a glass panel design and a high-precision capacitance touch control chip for enhanced touch sensitivity and reduced false triggers. This controller allows for various lighting effects such as jump change, gradual change, and strobe, based on application requirements.
2. Contenido del paquete
Por favor verifique que todos los artículos estén presentes en el paquete:
- 1 x RGBW Full Color Touch Panel Controller
- 1 x Manual de usuario

Image: The LaiPuDuo RGBW Touch Panel Controller shown next to its product packaging box.
3. Especificaciones técnicas
- Temperatura de trabajo: -20°C a 60°C
- Vol de suministrotage: DC-12 24V
- Canales de salida: 4 canales
- Modo de conexión: Ánodo común
- Dimensiones externas: L86 × W86 × H37mm (3.39 x 3.39 x 1.46 inches)
- Peso neto: 128 gramos
- Consumo de energía estática: <1 W
- Corriente de salida: <4A (each channel)
- Potencia de salida: 12V: <192W, 24V: <384W
- Material: Glass (panel), Metal (contact)
- Método de control: Tocar
- Tipo de montaje: Montaje en pared
- Protocolo de conectividad: Wi-Fi (as per specifications, though primary control is touch)
- Clasificación de protección internacional: IP54
4. Instalación
Follow these steps for proper installation of the RGBW Touch Panel Dimmer Switch:
- Preparar el cableado: Ensure the power supply is disconnected before beginning installation. Identify the input (DC12-24V) and output (RGBW) terminals on the back of the controller.
- Conectar la tira de LED: Connect the corresponding wires from your RGBW LED light strip to the output terminals (R, G, B, W, and + for common anode) on the controller.
- Conecte la fuente de alimentación: Connect the DC12-24V power supply wires to the input terminals (+ and -) on the controller.
- Controlador de montura: Securely mount the controller to the wall using appropriate mounting hardware (not included).
- Conecte el adaptador de corriente: Once all connections are secure, connect the power adapter to the power source.

Image: The rear of the controller displaying the input and output wiring terminals for power and LED strip connections.
Guía de video de instalación
Video: This video demonstrates the wiring process for connecting the RGBW controller to an LED strip and power supply, followed by a demonstration of its basic operation.
5. Instrucciones de funcionamiento
The touch panel provides intuitive control over your LED lighting. Refer to the image below for button layout and functions.
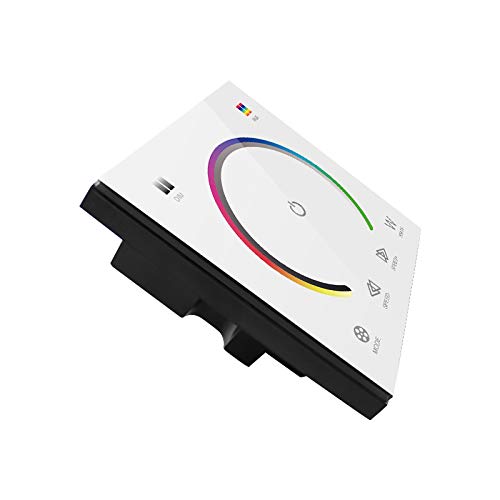
Image: The front of the touch panel controller, showing the color wheel, power button, mode, speed, and white light controls.
- Power Button (Center Circle): Touch to turn the LED lights on or off.
- Rueda de color: Slide your finger around the color wheel to select a desired RGB color. The LED strip will change to the selected color.
- White Light (W Button): Touch the 'W' button to activate or adjust the dedicated white light channel.
- Botón de modo: Recorre varios modos de iluminación dinámicos preprogramados.
- Speed Buttons (Left/Right Arrows): Ajuste la velocidad de los modos de iluminación dinámica.
Guía de vídeo de funcionamiento
Video: This video demonstrates the functionality of the touch panel, including color selection via the color wheel, switching between RGB and white light, and adjusting modes and speeds.
6. Mantenimiento
To ensure the longevity and proper functioning of your touch panel dimmer switch:
- Limpieza: The glass panel can be cleaned with a soft, dry cloth. Avoid abrasive cleaners or harsh chemicals that may damage the surface.
- Ambiente: Operate the device within the specified working temperature range (-20°C to 60°C). Avoid exposure to extreme moisture or direct sunlight.
- Fuerza: Always disconnect power before performing any maintenance or wiring adjustments.
7. Solución de problemas
If you encounter issues with your RGBW Touch Panel Dimmer Switch, refer to the following common problems and solutions:
- Las luces no se encienden:
- Check if the power supply is correctly connected and providing the specified DC12-24V.
- Verify that the LED strip is properly connected to the output terminals.
- Ensure the power button on the touch panel is activated.
- Incorrect colors or incomplete color display:
- Confirm that the RGBW wires from the LED strip are connected to the correct corresponding terminals on the controller (R to R, G to G, B to B, W to W).
- Ensure the common anode (+) wire is correctly connected.
- Check if the LED strip itself is functioning correctly by testing it with another controller if possible.
- El panel táctil no responde:
- Ensure the panel is clean and dry. Moisture or dirt can affect touch sensitivity.
- Temporarily disconnect and reconnect the power supply to reset the controller.
- White light or RGB colors do not operate simultaneously:
- This controller is designed to switch between RGB colors and the dedicated white channel. Simultaneous operation of RGB and the separate white channel is not supported. You must select either an RGB color or the white light function.
8. Garantía y soporte
Para obtener información sobre la garantía o asistencia técnica, contacte directamente con el vendedor o el fabricante. Conserve el recibo de compra como comprobante.