
1. Introducción
The COMPUTHERM Q7RF wireless room thermostat is designed for precise control of heating and air conditioning systems. This programmable device allows you to set individual temperature schedules for each day of the week, optimizing comfort and energy efficiency in your home or office. Its wireless design offers flexible placement of the thermostat unit, while the receiver unit connects directly to your boiler or air conditioning system, compatible with both 24V and 230V control circuits.
2. Contenido del paquete
Verifique que todos los componentes estén presentes en su paquete:
- 4 x COMPUTHERM Q7RF Room Thermostat (Transmitter Unit)
- 4 x COMPUTHERM Q7RF Receiver Unit
- Manual de usuario (este documento)
- Tornillos de montaje y tacos de pared
3. Producto terminadoview
The COMPUTHERM Q7RF system consists of two main components: the thermostat unit (transmitter) and the receiver unit. The thermostat unit measures the room temperature and allows you to set desired temperatures and programs. The receiver unit connects to your heating or cooling system and switches it on or off based on signals from the thermostat unit.

Figura 1: Sobreview of the COMPUTHERM Q7RF 4-piece set, showing multiple thermostat and receiver units.
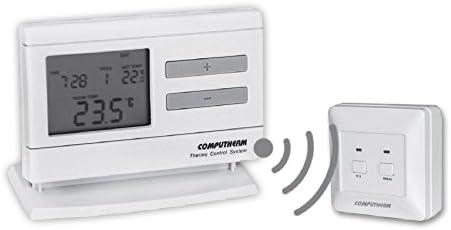
Figure 2: A single COMPUTHERM Q7RF thermostat unit communicating wirelessly with its receiver unit.
3.1 Thermostat Unit (Transmitter)
- Pantalla LCD: Shows current temperature, set temperature, time, day, and program status.
- Botones de control: For setting temperature, time, and programming schedules.
- Compartimento de la batería: Para fuente de alimentación.
3.2 Unidad receptora
- Terminales de cableado: For connection to the heating/cooling system.
- Indicadores de estado: LEDs to show power and relay status.
- Manual Override Buttons: For temporary manual control.
4. Especificaciones
| Característica | Especificación |
|---|---|
| Marca | COMPUTADORA |
| Modelo | Q7RF |
| Vol. De conmutacióntage | 24V AC/DC, ... 250V AC, 50Hz |
| Consumo de energía | 6W |
| Rango de medición de temperatura | 3 – 45°C (in 0.1°C increments) |
| Rango de temperatura ajustable | 5 – 40°C (in 0.5°C increments) |
| Precisión de la medición de temperatura | ±0.5 °C |
| Tipo de controlador | Pulsador |
| Tecnología de conectividad | Inalámbrico (radiofrecuencia) |
| Características especiales | Programmable, Compatible with various system voltages |
5. Configuración e instalación
5.1 Thermostat Unit Placement and Battery Installation
- Elija una ubicación: Place the thermostat unit in a central area of the room where it can accurately measure the ambient temperature, away from direct sunlight, drafts, or heat sources.
- Instale las baterías: Open the battery compartment on the back of the thermostat unit. Insert the required batteries (typically AA or AAA, refer to the unit's markings) ensuring correct polarity. Close the compartment.
- Encendido: The display should light up, indicating the unit is powered.
5.2 Receiver Unit Wiring
WARNING: Electrical installation should only be performed by a qualified electrician. Disconnect power to the heating/cooling system before proceeding.
- Monte el receptor: Secure the receiver unit near your boiler or air conditioning system using the provided screws and wall plugs.
- Access Wiring Terminals: Open the cover of the receiver unit to expose the wiring terminals.
- Conectarse al sistema: Connect the receiver unit to the two-wire room thermostat connection point of your boiler or AC system. Ensure connections are secure and follow the wiring diagram provided with your heating/cooling system and the receiver unit. The COMPUTHERM Q7RF is compatible with both 24V and 230V control circuits.
- Restaurar energía: Once wiring is complete and verified, close the receiver unit cover and restore power to your heating/cooling system.
5.3 Pairing the Units (If not pre-paired)
Refer to the specific instructions provided with your Q7RF set for pairing procedures. Typically, this involves pressing a pairing button on the receiver unit and then initiating a pairing sequence on the thermostat unit within a short timeframe. A successful pairing will usually be indicated by an LED on the receiver or a message on the thermostat display.
6. Instrucciones de funcionamiento
6.1 Comprensión de la pantalla LCD
The LCD display provides all necessary information about the thermostat's current status and settings.

Figura 3: detallada view of the COMPUTHERM Q7RF LCD display, illustrating various indicators such as program number, manual modification symbol, weekdays, time, set temperature, actual room temperature, low battery symbol, boiler ON state, and timed control symbol.
- Días laborables: Indica el día actual de la semana.
- Exact Time / Time Left: Displays the current time or time remaining for a manual modification.
- Número de programa: Shows the active program segment.
- Temperatura establecida: The desired temperature set by the user.
- Actual Room Temperature: The current temperature measured by the thermostat.
- Symbol for Manual Modification: Indicates that the thermostat is currently operating under a temporary manual override.
- Temp. Modified until next manual intervention: Shows the duration of a temporary temperature change.
- Symbol for Low Battery Voltage: Aparece cuando es necesario reemplazar las baterías.
- Symbol for Boiler ON State: Indica cuando el sistema de calefacción/refrigeración está activo.
- Symbol for Timed Control: Indicates that a programmed schedule is active.
6.2 Configuración de la hora y el día actuales
- Presione el TIEMPO botón.
- Utilice el + or - botones para ajustar la hora, luego presione TIEMPO De nuevo para confirmar.
- Repita para los minutos y el día de la semana.
6.3 Ajuste manual de temperatura
- En el modo de funcionamiento normal, presione el botón + or - botones para ajustar la temperatura deseada.
- The new temperature will be maintained until the next programmed time slot or until manually overridden again.
6.4 Programming Daily/Weekly Schedules
The Q7RF allows for independent programming for each day of the week. You can typically set multiple time periods with different temperatures for each day.
- Presione el PROG para ingresar al modo de programación.
- Utilice el DÍA button to select the day you wish to program (e.g., MON, TUE, etc.).
- Utilice el TIEMPO y +/- buttons to set the start time for the first program period.
- Utilice el AJUSTAR TEMPERATURA y +/- buttons to set the desired temperature for this period.
- Prensa PROG again to move to the next program period for the same day, or use DÍA para pasar al día siguiente.
- Repeat until all desired periods and days are programmed.
- Presione el CORRER or SALIR button to save and exit programming mode.
7. Mantenimiento
7.1 Reemplazo de batería
When the low battery symbol appears on the LCD display, replace the batteries immediately to ensure continuous operation. Use new, high-quality alkaline batteries of the specified type.
- Abra la tapa del compartimiento de la batería en la parte posterior de la unidad del termostato.
- Retire las baterías viejas.
- Insert new batteries, observing correct polarity (+/-).
- Cierre la tapa del compartimento de la batería.
7.2 Limpieza
Clean the thermostat and receiver units with a soft, dry cloth. Do not use abrasive cleaners, solvents, or spray directly onto the units, as this may damage the electronics or finish.
8. Solución de problemas
| Problema | Posible causa | Solución |
|---|---|---|
| La pantalla del termostato está en blanco | Baterías agotadas | Reemplace las baterías por otras nuevas. |
| El sistema de calefacción/refrigeración no responde | 1. Receiver unit not powered 2. Units not paired 3. Wiring issue 4. Fuera de rango | 1. Check power supply to receiver. 2. Perform pairing procedure (Section 5.3). 3. Verify wiring connections (Section 5.2). 4. Move thermostat closer to receiver or check for obstructions. |
| Lectura de temperatura incorrecta | Thermostat placed in unsuitable location (direct sun, draft) | Reubique el termostato en un área con temperatura más central y estable. |
| Programmed schedule not active | Thermostat in manual override mode | Exit manual override mode (e.g., press RUN/AUTO button) to resume programmed operation. |
9. Garantía y soporte
COMPUTHERM products are manufactured to high-quality standards. For warranty information, please refer to the warranty card included with your product or contact your retailer. For technical support, please reach out to the COMPUTHERM customer service or your local distributor. Keep your purchase receipt as proof of purchase.