1. Introducción
The AUTOOL BT360 is a 12V battery load tester designed to analyze the health status of automotive batteries. It performs battery tests, cranking tests, and charging system tests, providing accurate results for various battery types including regular flooded, AGM flat plate, AGM spiral, and Gel batteries. This manual provides detailed instructions for the proper use and maintenance of your BT360 tester.
2. Información de seguridad
Always observe the following safety precautions when using the AUTOOL BT360 battery tester:
- Use protección ocular y ropa protectora adecuadas cuando trabaje cerca de baterías.
- Asegúrese de que el vehículo esté en un área bien ventilada.
- Avoid sparks, flames, and smoking near the battery, as batteries can produce explosive gases.
- Do not touch hot engine parts or moving components.
- Keep the tester and cables away from water, oil, and grease.
- Asegúrese de que la batería clampLos cables están conectados de forma segura a los terminales correctos (rojo a positivo, negro a negativo).
- Si el ácido de la batería entra en contacto con la piel o los ojos, lávelos inmediatamente con abundante agua y busque atención médica.
3. Producto terminadoview
3.1 Componentes
The AUTOOL BT360 package typically includes:
- AUTOOL BT360 Main Unit
- Integrated Testing Cables with Alligator Clamps (Rojo para positivo, negro para negativo)
- Manual de usuario (este documento)
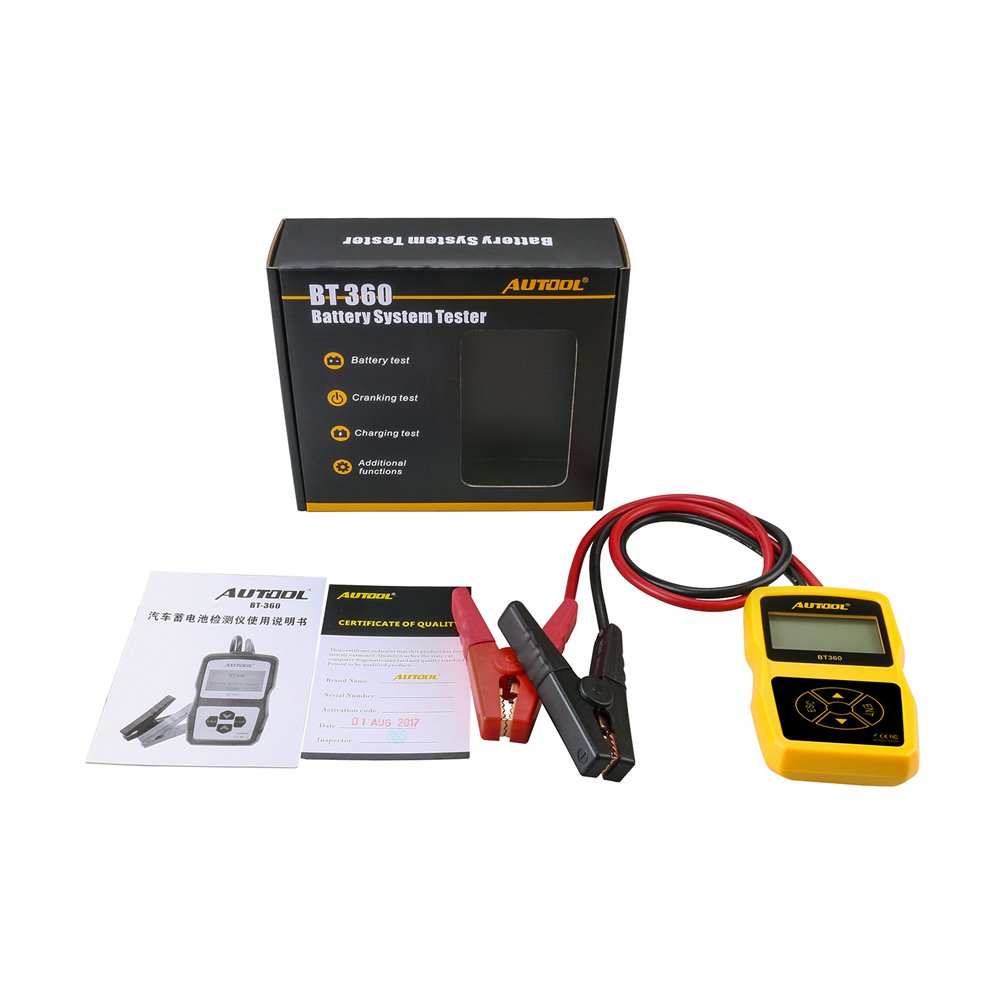
Image 3.1: AUTOOL BT360 Battery Tester and its included accessories.
3.2 Tester Unit
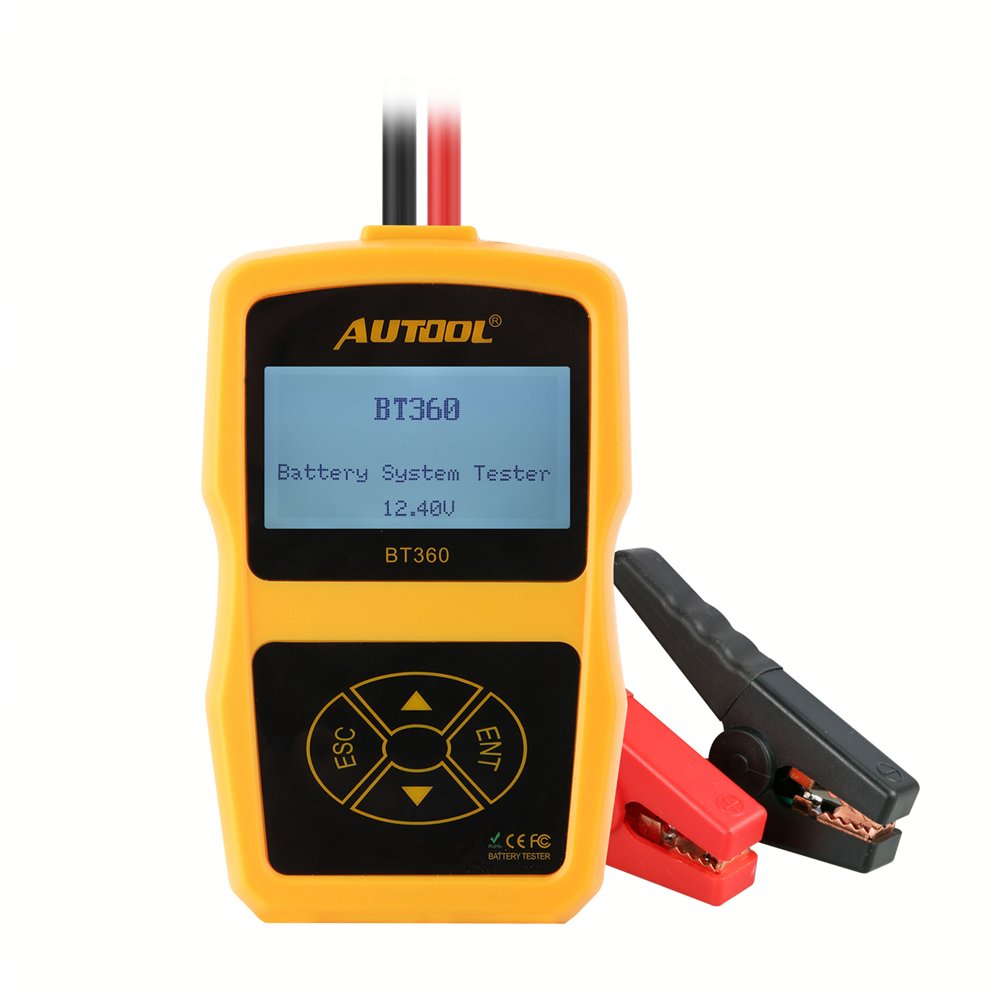
Imagen 3.2: Frente view of the AUTOOL BT360 Battery Tester, showing the display and control buttons.
The main unit features an LCD display and four control buttons:
- ESCAPE: Botón Escape/Atrás.
- ENT: Botón Enter/Confirmar.
- Flechas arriba/abajo: Navigation buttons for menu selection.
3.3 Características principales
- Realiza pruebas de batería, pruebas de arranque y pruebas de carga.
- Supports multiple battery types: Regular Flooded, AGM Flat Plate, AGM Spiral, and Gel.
- Wide CCA testing range: 100-2400 CCA.
- Soporte multi-idioma para interfaz de usuario.

Image 3.3: The AUTOOL BT360 supports multiple languages for its user interface.
4. Especificaciones

Image 4.1: Physical dimensions of the AUTOOL BT360 Battery Tester.
| Parámetro | Valor |
|---|---|
| Modelo | BT360 |
| Vol del sistematage | 12 voltios |
| Vol de entradatage Rango | 9V ~ 15V |
| Gama CCA | 100-2400 ACC |
| Temperatura de funcionamiento | -20°C a 50°C |
| Tipos de batería compatibles | Inundado regular, placa plana AGM, espiral AGM, gel |
| Dimensiones (L x An x Al) | 18.8 x 16.76 x 5.84 cm |
| Peso | 320 gramos |
| Código Postal | 602860607704 |
4.1 Supported Starting Power Supply Standards

Image 4.2: Table showing various starting power supply standards supported by the BT360.
| Estándar | Rango |
|---|---|
| CCA | 100-2400 |
| JIS | 26A17-245H52 |
| ESTRUENDO | 100-2200 |
| CEI | 100-2200 |
| EN | 100-1400 |
| SAE | 100-2400 |
| GB | 30-220 Ah |
| ICC | 100-2400 |
| MCA | 100-2400 |
| CA | 100-2400 |
5. Configuración
5.1 Desembalaje
Carefully remove the AUTOOL BT360 tester and all accessories from the packaging. Inspect for any signs of damage. If any components are missing or damaged, contact customer support.
5.2 Conexión del comprobador
The BT360 is powered directly by the vehicle's 12V battery. Follow these steps to connect the tester:
- Asegúrese de que el encendido del vehículo esté apagado y todos los accesorios apagados.
- Conectar el rojo positivo (+) clamp al terminal positivo (+) de la batería de 12 V.
- Conectar el negro negativo (-) clamp al terminal negativo (-) de la batería de 12 V.
- Once connected, the tester will power on automatically.

Image 5.1: The AUTOOL BT360 tester with its integrated testing cables and clamps.

Image 5.2: The BT360 tester connected to a vehicle battery for testing.
6. Instrucciones de funcionamiento
After connecting the tester, the main menu will appear. Use the Up/Down arrow buttons to navigate through options and the ENT button to confirm selections. Use the ESC button to go back to the previous screen.

Image 6.1: Various display screens of the AUTOOL BT360, illustrating menu navigation and test result displays.
6.1 Prueba de batería
This function evaluates the overall health of the battery.
- Desde el menú principal, seleccione Prueba de batería and press ENT.
- Seleccionar Ubicación de la batería: Choose 'In-Vehicle' if the battery is installed in the car, or 'Out-of-Vehicle' if it's removed. Press ENT.
- Seleccionar Tipo de batería: Choose the type that matches your battery (e.g., Regular Flooded, AGM Flat Plate, AGM Spiral, Gel). Press ENT.
- Seleccionar Estándar de prueba: Choose the standard specified on your battery (e.g., CCA, JIS, DIN). Press ENT.
- Colocar Clasificación de la batería: Input the CCA value (or equivalent rating) as indicated on your battery label. Use arrow buttons to adjust the value and ENT to confirm.
- The tester will perform the analysis and display results such as State of Health (SOH), State of Charge (SOC), voltage, internal resistance, and a recommendation (e.g., 'Good Battery', 'Charge', 'Replace').
6.2 Prueba de arranque
Esta prueba analiza el sistema de arranque del vehículo, incluido el motor de arranque.
- Desde el menú principal, seleccione Prueba de arranque and press ENT.
- Follow the on-screen prompts to start the vehicle. The tester will monitor the battery voltage durante el arranque.
- Once the test is complete, the display will show cranking voltage, cranking time, and a diagnosis of the starting system's performance.
6.3 Prueba de carga
Esta prueba evalúa el sistema de carga del vehículo, incluido el alternador y el regulador.
- Desde el menú principal, seleccione Prueba de carga and press ENT.
- Follow the on-screen prompts to rev the engine to a specified RPM (e.g., 2500 RPM for 5 seconds).
- El comprobador medirá el volumen de carga.tage under load and no-load conditions.
- The results will indicate the charging system's output, ripple voltage, and overall health (e.g., 'Good', 'Low Output', 'High Output').
7. Mantenimiento
To ensure the longevity and accuracy of your AUTOOL BT360 tester:
- Limpie el comprobador con un paño suave y seco. No utilice limpiadores abrasivos ni disolventes.
- Mantenga la batería limpiaamps limpio y libre de corrosión.
- Guarde el probador en un lugar seco y fresco, alejado de la luz solar directa y de temperaturas extremas.
- Evite dejar caer el dispositivo o someterlo a fuertes impactos.
8. Solución de problemas
Si tiene problemas con su AUTOOL BT360, consulte los siguientes problemas y soluciones comunes:
| Problema | Posible causa | Solución |
|---|---|---|
| El probador no se enciende. | Loose connection; Battery voltage too low; Faulty cables. | Asegúrese de clampLos cables están bien conectados. Compruebe el volumen de la batería.tage (debe ser superior a 9 V). Inspeccione los cables para detectar daños. |
| Lecturas inexactas. | Incorrect battery type/standard/rating selected; Corroded battery terminals. | Verify selected parameters match the battery. Clean battery terminals. |
| Se muestra un mensaje de error. | Condición de error específica. | Refer to the specific error code (if any) or re-run the test ensuring all steps are followed correctly. |
| La pantalla está en blanco o congelada. | Fallo de software; interrupción de energía. | Disconnect and reconnect the tester to reset. If problem persists, contact support. |
9. Garantía y soporte
For warranty information and technical support, please refer to the documentation provided with your purchase or visit the official AUTOOL webSitio. Conserve su recibo de compra como comprobante para reclamaciones de garantía.
Fabricante: AUTOOL
Fecha de primera disponibilidad: 27 de octubre de 2017