
1. Introducción
This manual provides detailed instructions for the installation, operation, maintenance, and troubleshooting of your FSP 400W Micro ATX Power Supply (Model FSP400-60GHS(85)-R1). This power supply unit is designed for compact small form factor PC systems, offering 400 watts of power output with 80 Plus Bronze certification for high efficiency. It is compatible with Intel and AMD CPU systems and standard PC configurations.
Please read this manual thoroughly before installation and operation to ensure proper usage and to prevent damage to the unit or other components.
2. Información de seguridad
ADVERTENCIA: Power supplies contain high voltagComponentes electrónicos. No abra la fuente de alimentación.asing. No hay piezas que el usuario pueda reparar en el interior. Abrir la casing will void the warranty and poses a risk of electric shock.
- Asegúrese de que la fuente de alimentación esté desconectada de la toma de corriente CA antes de realizar la instalación o el mantenimiento.
- Instale la fuente de alimentación en un área bien ventilada.
- No opere la fuente de alimentación en entornos con alta humedad o temperaturas extremas.
- Utilice únicamente los cables suministrados con la fuente de alimentación.
- Asegúrese de que todos los cables estén conectados de forma segura antes de encender el sistema.
- This product is designed for use in personal computers. Do not use it for any other purpose.
3. Contenido del paquete
Verifique que todos los artículos que se enumeran a continuación estén presentes en su paquete:
- FSP 400W Micro ATX Power Supply (FSP400-60GHS(85)-R1)
- Cable de alimentación de CA
- SFX to PS2 Bracket
- Manual de usuario
- Mounting Screws (typically included with PC cases, but sometimes with PSUs)

Figure 3.1: Package Contents. Shows the power supply unit, user manual, various power cables, an AC power cord, and an SFX to PS2 adapter bracket.
4. Producto terminadoview
The FSP400-60GHS(85)-R1 is a compact power supply designed for small form factor systems. Key features include an 80mm cooling fan with thermal sensing technology and an energy-saving 1-watt standby mode.
4.1 Disposición física

Figura 4.1: Angulado view of the FSP 400W Micro ATX Power Supply, highlighting the fan grille, power switch, and AC power input.

Figura 4.2: Posterior view of the power supply, detailing the main power switch and the AC power input socket.

Figura 4.3: Arriba view of the power supply, showing the protective grille over the 80mm cooling fan.
4.2 Conectores de salida
The power supply includes various connectors to power your system components:
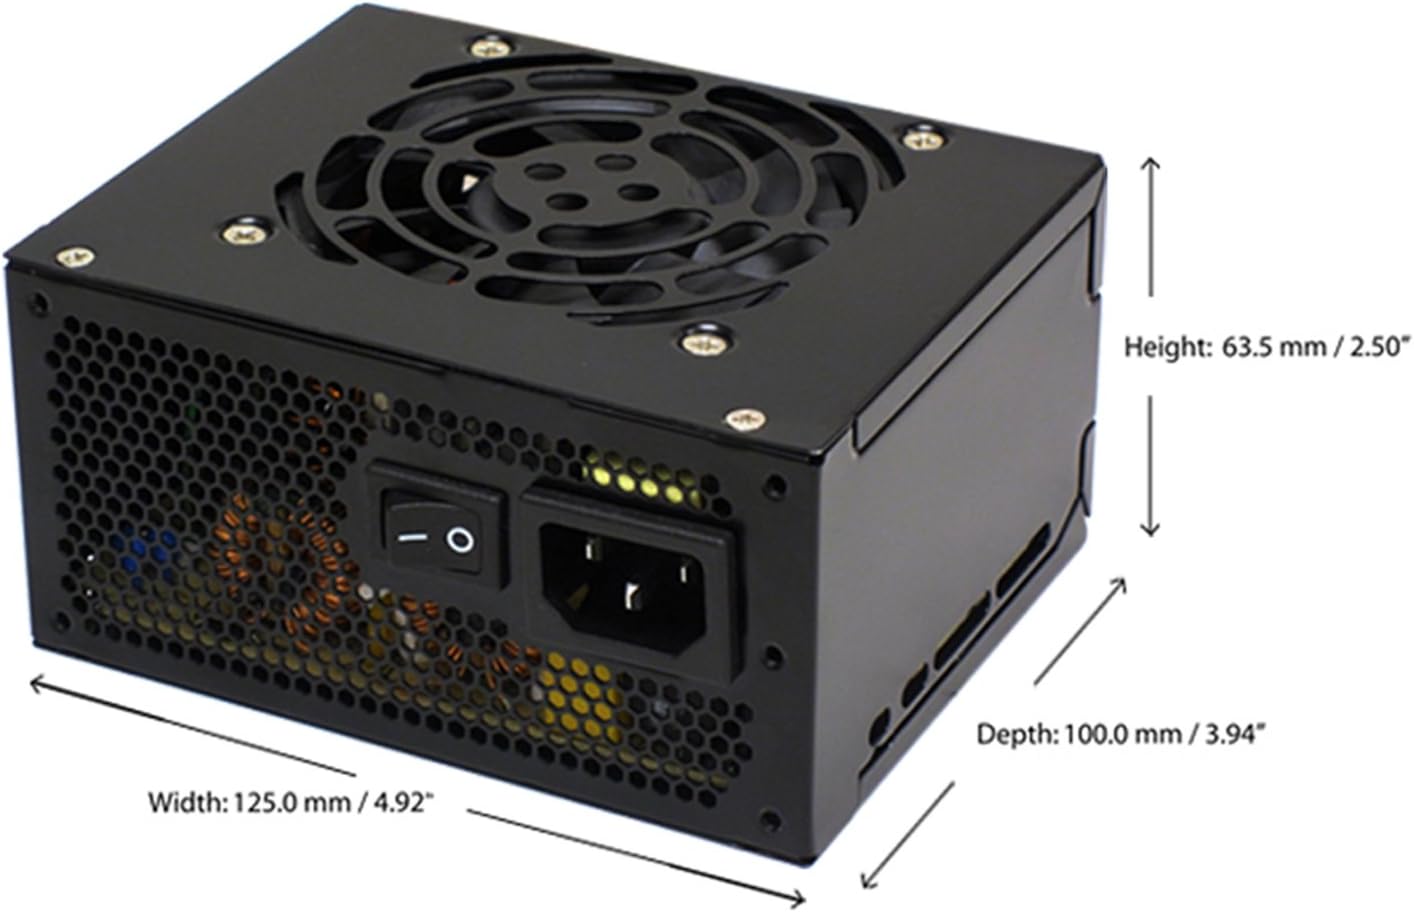
Figure 4.4: Diagram illustrating the types and quantities of output connectors available on the FSP400-60GHS(85)-R1 power supply.
- Main 24 Pin (1): For motherboard power.
- P4 | EPS 4+4 Pin (1): For CPU power.
- PCI-E 8 Pin (6+2) (1): Para tarjetas gráficas.
- Molex 4 Pin (3): For older peripherals and fans.
- Serial ATA 15 Pin (3): For SATA hard drives and SSDs.
- FDD 4 Pin (1): For floppy disk drives or other legacy devices.
5. Configuración e instalación
Before beginning installation, ensure your computer system is powered off and disconnected from the AC power outlet. It is recommended to wear an anti-static wrist strap to prevent electrostatic discharge (ESD) damage to components.
5.1 Instalación de la fuente de alimentación
- Preparar el caso: Open your computer case. Identify the power supply mounting area.
- Montaje de la fuente de alimentación:
- For SFX cases: Insert the FSP400-60GHS(85)-R1 directly into the SFX power supply bay and secure it with screws.
- For standard ATX cases: Attach the included SFX to PS2 bracket to the power supply. Then, mount the power supply with the bracket into the ATX power supply bay and secure it with screws.

Figure 5.1: The FSP 400W Micro ATX Power Supply shown with the SFX to PS2 adapter bracket installed, ready for mounting in a standard ATX case.

Figure 5.2: Illustration demonstrating how the SFX power supply fits into a PS2 (ATX) case using the provided adapter bracket.
5.2 Cables de conexión
Connect the appropriate cables to your motherboard and components. Refer to your motherboard and component manuals for specific connection points.
- Alimentación de la placa base: Connect the 24-pin ATX connector to the corresponding socket on your motherboard.
- Potencia de la CPU: Connect the 4+4-pin EPS/ATX 12V connector to the CPU power socket on your motherboard.
- Potencia de la tarjeta gráfica: If your graphics card requires external power, connect the 6+2-pin PCI-E connector(s) to the graphics card.
- Dispositivos de almacenamiento: Connect SATA power connectors to your SATA hard drives, SSDs, and optical drives.
- Periféricos: Use Molex 4-pin connectors for case fans or other legacy peripherals as needed.
- Sistema de organización de cables: Coloque los cables de forma ordenada para garantizar un flujo de aire adecuado dentro del gabinete.
Una vez realizadas todas las conexiones internas, cierre la carcasa del ordenador.
5.3 Conexión externa
- Connect the AC power cord to the power supply's AC inlet.
- Conecte el otro extremo del cable de alimentación de CA a un tomacorriente de pared con conexión a tierra o a un protector contra sobretensiones.
- Ensure the power switch on the back of the power supply is in the "OFF" (O) position before plugging it in.
6. Instrucciones de funcionamiento
6.1 Encender el sistema
- After all connections are secure, flip the power switch on the back of the power supply to the "ON" (I) position.
- Presione el botón de encendido en la carcasa de su computadora para iniciar el sistema.
6.2 Thermal Control System
The FSP400-60GHS(85)-R1 features an 80mm cooling fan with thermal sensing technology. This system automatically adjusts the fan speed based on the internal temperature of the power supply, optimizing cooling performance while minimizing noise.
6.3 Energy Saver Standby Mode
This power supply is designed with an energy-saving 1-watt standby mode, reducing power consumption when the system is in a low-power state or turned off but still connected to AC power.
7. Mantenimiento
Un mantenimiento adecuado garantiza la longevidad y el rendimiento óptimo de su fuente de alimentación.
- Limpieza: Periodically clean the exterior of the power supply and its fan grille to prevent dust buildup. Use a soft, dry cloth or compressed air. Ensure the power supply is disconnected from AC power before cleaning.
- Ventilación: Ensure that the power supply's fan and ventilation openings are not obstructed. Good airflow is crucial for cooling.
- Integridad del cable: Revise periódicamente todos los cables de alimentación para detectar signos de desgaste, deshilachado o daños. Reemplace los cables dañados inmediatamente.
Do not attempt to open the power supply unit for internal cleaning or repair. This will void the warranty and can be dangerous.
8. Solución de problemas
Si tiene problemas con su fuente de alimentación, consulte los siguientes problemas y soluciones comunes:
8.1 No hay energía en el sistema
- Check AC Power: Asegúrese de que el cable de alimentación de CA esté enchufado de forma segura tanto a la fuente de alimentación como a un tomacorriente de pared que funcione.
- Interruptor de alimentación: Verify that the power switch on the back of the power supply is in the "ON" (I) position.
- Conexiones internas: Confirm that the 24-pin ATX and 4+4-pin EPS/ATX 12V connectors are firmly seated in the motherboard.
- Cortocircuito: Disconnect all peripheral power cables (SATA, Molex, PCI-E) and attempt to power on. If the system powers on, a short circuit may exist in one of the connected components or cables. Reconnect them one by one to identify the faulty component.
8.2 System Instability or Random Shutdowns
- Sobrecarga: Asegúrese de que los requisitos de energía de su sistema no excedan la capacidad de 400 W de la fuente de alimentación.
- Ventilación: Check for proper airflow within the case and ensure the power supply's fan is not obstructed. Overheating can cause instability.
- Conexiones de cable: Re-check all power connections to ensure they are secure. Loose connections can lead to intermittent power delivery.
8.3 Ruido excesivo del ventilador
- Acumulación de polvo: Clean the fan grille and fan blades with compressed air.
- Obstrucción: Ensure no cables or foreign objects are interfering with the fan's rotation.
- Entorno operativo: High ambient temperatures can cause the thermal control system to increase fan speed. Ensure adequate room ventilation.
If troubleshooting steps do not resolve the issue, contact FSP customer support or your retailer for assistance.
9. Especificaciones
Detailed technical specifications for the FSP400-60GHS(85)-R1 power supply:
| Nombre del modelo | FSP 400W Micro ATX Power Supply |
| Número de modelo | FSP400-60GHS(85)-R1 |
| Marca | FSP |
| Salida Wattage | 400 vatios |
| Certificación 80 Plus | 80 Plus Bronce |
| Factor de forma | Micro ATX (SFX with PS2 bracket) |
| Método de enfriamiento | Air (80mm fan with thermal control) |
| Diseño de fuente de alimentación | No modular |
| Vol de entradatage | 100 - 265 Volts (AC) |
| Dimensiones (L x An x Al) | 4.9 x 3.9 x 2.5 pulgadas (125.0 x 100.0 x 63.5 mm) |
| Peso del artículo | 2.31 libras |
| Dispositivos compatibles | Personal Computer (AMD/Intel CPU systems) |
| Conectores | Main 24 Pin (1), P4 | EPS 4+4 Pin (1), PCI-E 8 Pin (6+2) (1), Molex 4 Pin (3), Serial ATA 15 Pin (3), FDD 4 Pin (1) |
| Cumplimiento ambiental | RoHS, Lead-Free, Green Product (G.P) |

Figure 9.1: Physical dimensions of the FSP 400W Micro ATX Power Supply.

Figure 9.2: Illustrative diagram showing typical cable lengths for the power supply connectors.
10. Información de garantía
The FSP 400W Micro ATX Power Supply (FSP400-60GHS(85)-R1) is covered by a Garantía del fabricante de 3 años. This warranty guarantees the quality and performance of the product for the specified period from the date of purchase.
The warranty covers defects in materials and workmanship under normal use. It does not cover damage resulting from improper installation, accidents, misuse, abuse, natural disasters, or unauthorized modifications or repairs. Opening the power supply casing anulará la garantía.
For warranty claims or service, please retain your proof of purchase and contact FSP customer support.
11. Atención al cliente
If you require further assistance, have questions, or need to report an issue that cannot be resolved using the troubleshooting guide, please contact FSP customer support.
- FSP Websitio: Visit the official FSP webSitio para obtener información sobre productos, preguntas frecuentes y recursos de soporte.
- Información del contacto: Refer to the FSP website or your product packaging for the most current customer service contact details (phone, email, or support portal).
When contacting support, please have your product model number (FSP400-60GHS(85)-R1) and proof of purchase readily available.