Introducción
This manual provides detailed instructions for the setup, operation, and maintenance of your Digoo DG-C3 Wireless Weather Station. This device integrates a hygrometer, thermometer, weather forecast station, and alarm clock functions, offering comprehensive environmental monitoring and timekeeping capabilities. Please read this manual thoroughly before using the product to ensure correct operation and to maximize its features.
Contenido del paquete
- Digoo DG-C3 Wireless Weather Station Unit
- Cable de alimentación USB
- Manual de usuario (este documento)
Nota: Las pilas (3x AAA) no están incluidas y deben comprarse por separado.
Producto terminadoview
Familiarize yourself with the various components of your Digoo DG-C3 weather station.
Pantalla frontal
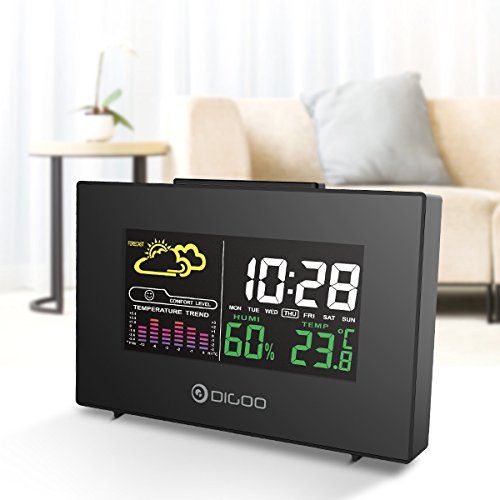
The front display features a color backlit screen showing the current time, day of the week, indoor humidity, indoor temperature, and a weather forecast icon. It also includes a comfort level indicator and a temperature trend graph.
- Hora Fecha: Digital display of current time and day.
- Pronóstico del tiempo: Iconos que indican las condiciones meteorológicas previstas (por ejemplo, soleado, nublado, lluvioso).
- Nivel de comodidad: Indica la comodidad interior en función de la temperatura y la humedad.
- Tendencia de la temperatura: Bar graph showing recent temperature changes.
- Humedad: Porcentajetage display of indoor humidity.
- Temperatura: Digital display of indoor temperature (Celsius or Fahrenheit).
Panel Posterior
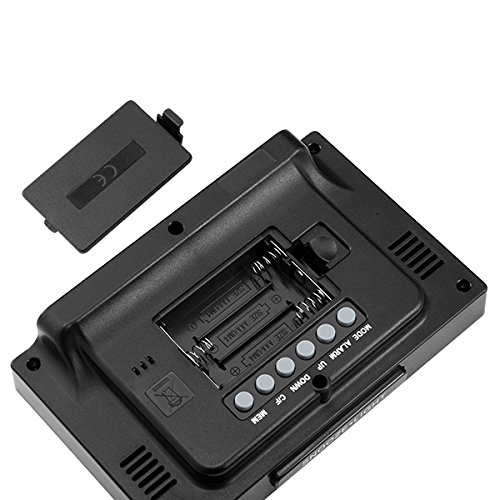
The back of the unit houses the battery compartment and various control buttons for setting the device.
- Compartimento de la batería: Holds 3x AAA batteries for power backup.
- Botón MODE: Used to switch between display modes and enter setting mode.
- Botón de alarma: Se utiliza para configurar y activar/desactivar la alarma.
- Botón de arriba: Used to increase values during settings or view maximum records.
- Botón ABAJO: Used to decrease values during settings or view minimum records.
- Botón °C/°F: Alterna entre unidades de temperatura Celsius y Fahrenheit.
- Botón MEM: Solía hacerlo view memory records for temperature and humidity.
Panel superior
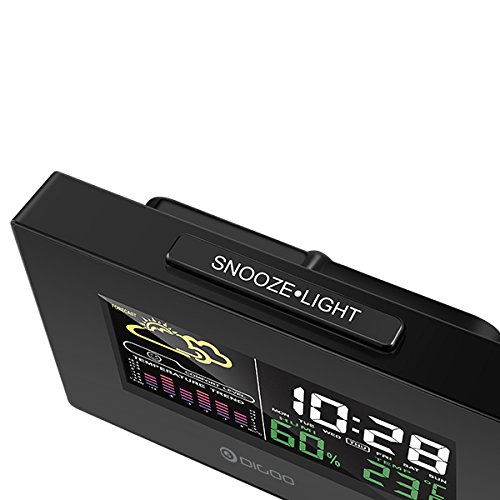
The top of the unit features a single button for snooze and backlight functions.
- SNOOZE·LIGHT Button: Press to activate the backlight or snooze the alarm.
Configuración
1. Encendido
- Instalación de la batería: Open the battery compartment cover on the back of the unit. Insert 3x AAA batteries, ensuring correct polarity (+/-). Close the cover. Batteries provide backup power and allow for portability.
- Conexión de alimentación USB: For continuous power and backlight, connect the provided USB cable to the USB port on the unit and to a compatible USB power adapter (not included) or a computer USB port.
- The display will light up and show default settings.
2. Initial Settings (Time, Date, Unit)
- Ajuste de hora:
- Mantenga pulsado el MODO Mantenga pulsado el botón durante aproximadamente 3 segundos para acceder al modo de ajuste de la hora. El dígito de la hora parpadeará.
- Utilice el UP or ABAJO Botones para ajustar la hora.
- Prensa MODO De nuevo para confirmar la hora y pasar al ajuste de minutos. El dígito de los minutos parpadeará.
- Utilice el UP or ABAJO Botones para ajustar los minutos.
- Prensa MODO again to confirm and move to 12/24 hour format selection.
- Utilice el UP or ABAJO buttons to select 12-hour or 24-hour format.
- Prensa MODO para confirmar y salir de la configuración de la hora.
- Ajuste de la fecha:
- Después de configurar la hora, presione MODO again to enter date setting mode. The year will flash.
- Utilice el UP or ABAJO Botones para ajustar el año.
- Prensa MODO to confirm and move to month setting.
- Utilice el UP or ABAJO Botones para ajustar el mes.
- Prensa MODO to confirm and move to day setting.
- Utilice el UP or ABAJO Botones para ajustar el día.
- Prensa MODO para confirmar y salir de la configuración de fecha.
- Selección de la unidad de temperatura:
- Presione el ° C / ° F button on the back of the unit to switch between Celsius (°C) and Fahrenheit (°F) temperature display.
Instrucciones de funcionamiento
1. Función de despertador
- Configuración de la alarma:
- Presione el ALARMA Presione el botón una vez para mostrar la hora de alarma actual.
- Mantenga pulsado el ALARMA button for approximately 3 seconds. The hour digit will flash.
- Utilice el UP or ABAJO Botones para ajustar la hora de la alarma.
- Prensa ALARMA De nuevo para confirmar la hora y pasar al ajuste de minutos. El dígito de los minutos parpadeará.
- Utilice el UP or ABAJO Botones para ajustar los minutos de la alarma.
- Prensa ALARMA para confirmar y salir de la configuración de alarma.
- Activar/Desactivar la Alarma:
- Mientras esté en el modo de visualización de hora normal, presione el botón ALARMA button repeatedly to toggle the alarm ON or OFF. An alarm icon will appear on the display when the alarm is active.
- Función de repetición:
- Cuando suene la alarma, presione el DORMIR·LUZ button on the top of the unit to activate the snooze function. The alarm will temporarily stop and sound again after a few minutes (typically 5-10 minutes).
- To stop the alarm completely, press any other button on the back panel.
2. Pronóstico del tiempo
The weather station provides a weather forecast based on internal atmospheric pressure changes. The forecast icons (e.g., sunny, cloudy, rainy) are predictions for the next 12-24 hours and may not always match local weather services, which use more comprehensive data.
- The forecast icon is displayed on the upper left of the screen.
- The device requires a period of stable operation (typically 24 hours) to calibrate and provide accurate forecasts.
3. Visualización de temperatura y humedad
- The current indoor temperature and humidity are continuously displayed on the screen.
- Viewing Min/Max Records:
- Presione el MIEMBRO Presione el botón una vez para mostrar la temperatura y la humedad máximas registradas.
- Prensa MIEMBRO again to display the minimum recorded temperature and humidity.
- Prensa MIEMBRO a third time to return to current readings.
- To clear the min/max records, press and hold the MIEMBRO botón durante 3 segundos mientras viewing los registros.
4. Control de luz de fondo
- When powered by USB, the backlight will remain on.
- Cuando funcione solo con pilas, presione el botón DORMIR·LUZ button to temporarily activate the backlight for a few seconds.
Mantenimiento
- Limpieza: Wipe the unit with a soft, dry cloth. Do not use abrasive cleaners or solvents. Avoid getting moisture into the unit.
- Reemplazo de batería: When the display becomes dim or functions irregularly, replace the 3x AAA batteries in the back compartment. Ensure correct polarity.
- Almacenamiento: If not using the device for an extended period, remove the batteries to prevent leakage. Store in a cool, dry place.
Solución de problemas
| Problema | Posible causa | Solución |
|---|---|---|
| La pantalla está en blanco o tenue. | Baterías bajas o sin conexión eléctrica. | Replace batteries or connect the USB power cable. |
| Hora/fecha incorrecta. | Time/date not set correctly after power loss or initial setup. | Follow the "Initial Settings" section to reset time and date. |
| El pronóstico del tiempo parece inexacto. | Device needs calibration time; local conditions may differ from pressure-based forecast. | Allow 24 hours for calibration. Understand that the forecast is based on internal pressure changes. |
| La alarma no suena. | La alarma no está activada o el volumen es demasiado bajo (si es ajustable). | Asegúrese de que se muestre el icono de la alarma. Compruebe la configuración de la alarma. |
Presupuesto
| Modelo: | DG-C3 |
| Conectividad: | USB (para alimentación) |
| Fuente de energía: | 3x AAA Batteries (not included) or USB Power |
| Características especiales: | Hygrometer, Thermometer, Weather Forecast, Alarm Clock, Color Backlight, Portable |
| Mostrar: | Color Backlit LCD |
| Unidad de temperatura: | °C / °F seleccionable |
Garantía y soporte
Para obtener información sobre la garantía o asistencia técnica, consulte la documentación proporcionada al momento de la compra o póngase en contacto con su vendedor. Conserve el recibo de compra como comprobante.


