Youshiko YC8061-B
Youshiko YC8061-B Jumbo Radio Controlled Wall Clock
Manual de instrucciones de usuario
1. Introducción
Thank you for choosing the Youshiko YC8061-B Jumbo Radio Controlled Wall Clock. This clock is designed to provide precise timekeeping, automatically synchronizing with the MSF radio signal for the UK and Ireland. It features a large, clear LCD display that shows time, date, day of the week, indoor temperature, and humidity. This manual will guide you through the setup, operation, and maintenance of your new clock.
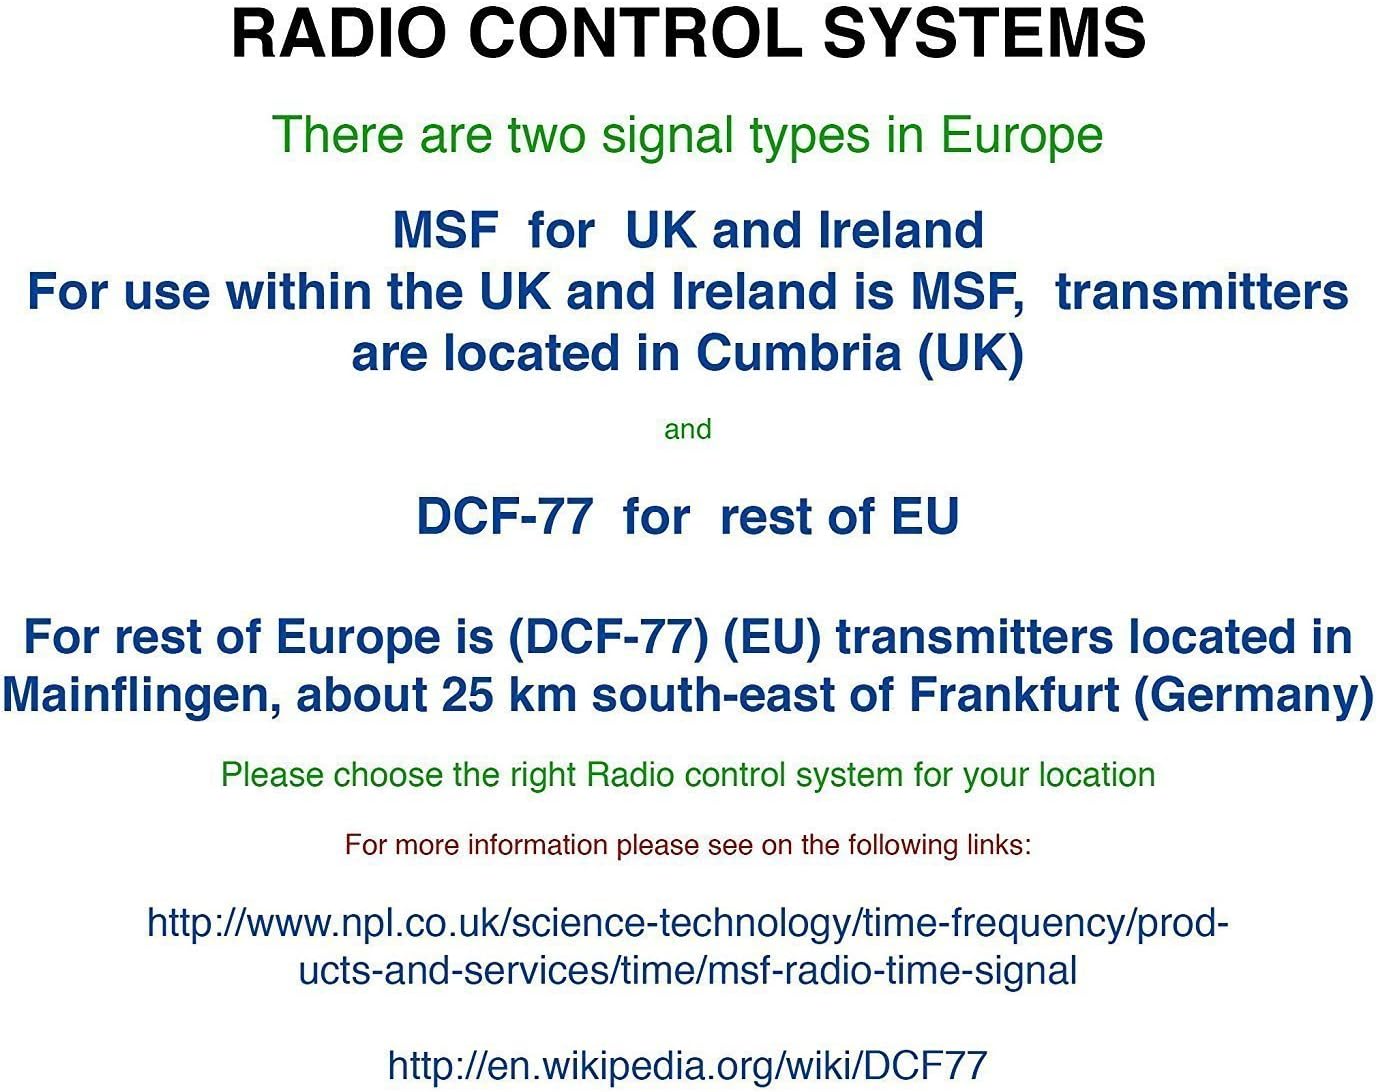
Figura 1.1: Frente view of the Youshiko YC8061-B Jumbo Radio Controlled Wall Clock, displaying time, date, day, temperature, and humidity.
2. Contenido del paquete
- Youshiko YC8061-B Jumbo Radio Controlled Wall Clock
- Manual de instrucciones
Nota: Se requieren 4 pilas AA para su funcionamiento y no están incluidas en el paquete.
3. Producto terminadoview
Familiarize yourself with the main components and controls of your clock.

Figura 3.1: Atrás view del reloj, resaltando el compartimento de la batería y los botones de control.
Botones de control:
- MODE / SET: Used to switch between display modes and enter setting mode.
- ARRIBA ABAJO: Used to adjust values during setting mode.
- WAVE / RCC: Manually initiates or stops radio control signal reception.
- ALARM ON / OFF: Activa o desactiva la alarma.
- DORMITAR: Activa la función de repetición cuando suena la alarma.
4. Instalación de la batería
- Localice la tapa del compartimiento de la batería en la parte posterior del reloj.
- Retire la cubierta deslizándola hacia abajo o levantándola.
- Inserte 4 pilas AA nuevas, asegurándose de la polaridad correcta (+ y -) como se indica dentro del compartimento.
- Vuelva a colocar la tapa del compartimiento de la batería.
The clock will power on and begin searching for the radio control signal automatically.
5. Initial Setup & Time Synchronization
The Youshiko YC8061-B clock is designed to automatically set its time and date via the MSF radio signal broadcast from Cumbria, UK. This signal is specifically for use within the UK and Ireland.

Figure 5.1: Explanation of radio control systems (MSF for UK/Ireland, DCF-77 for rest of EU).
Sincronización automática:
- After battery installation, the clock will automatically start searching for the MSF signal. A radio wave icon will flash on the display.
- Coloque el reloj cerca de una ventana, lejos de dispositivos electrónicos que puedan causar interferencias.
- The initial synchronization process may take several minutes to a few hours, depending on your location and signal strength.
- Once the signal is successfully received, the radio wave icon will appear solid on the display, and the clock will show the correct time and date.
- The clock will automatically adjust for Daylight Saving Time (DST) and perform daily checks to maintain accuracy.
Búsqueda de señal manual:
If the clock does not synchronize automatically or if you wish to force a signal search, press and hold the WAVE / RCC button. The radio wave icon will flash, indicating it is searching for the signal.
Manual Time Setting (if radio signal is unavailable):
In areas where the radio signal cannot be received, you can manually set the time and date:
- Mantenga pulsado el MODE / SET Botón hasta que los dígitos de la hora comiencen a parpadear.
- Utilice el UP or ABAJO Botones para ajustar el valor intermitente (por ejemplo, hora, minutos).
- Prensa MODE / SET again to confirm the setting and move to the next adjustable item (e.g., minute, year, month, day, 12/24-hour format, temperature unit).
- Repita los pasos 2 y 3 hasta que todos los ajustes estén configurados.
- Prensa MODE / SET una última vez para salir del modo de configuración.
6. Instrucciones de funcionamiento
Modos de visualización:
The clock displays time (hours, minutes, seconds), date (day, month, year), day of the week, indoor temperature, and humidity. The time digits are large (8.3 cm) for easy readability.
Función de alarma:
- Para configurar la hora de la alarma, presione el botón MODE / SET button repeatedly until the alarm time is displayed.
- Mantenga pulsado MODE / SET until the alarm hour flashes. Use UP or ABAJO Para ajustar.
- Prensa MODE / SET to confirm the hour and move to minutes. Use UP or ABAJO Para ajustar.
- Prensa MODE / SET para salir de la configuración de alarma.
- Para activar o desactivar la alarma, presione el botón ALARMA ENCENDIDA / APAGADA Botón. Aparecerá un icono de alarma en la pantalla cuando se active.
Función de repetición:
Cuando suene la alarma, presione el DORMITAR Botón para silenciar temporalmente la alarma. La alarma volverá a sonar después de aproximadamente 5 minutos.
Selección de la unidad de temperatura:
To switch between Celsius (°C) and Fahrenheit (°F) for temperature display, press the UP Botón durante la visualización de la hora normal.
7. Opciones de montaje
The Youshiko YC8061-B clock offers versatile placement options:
Montaje en pared:
The clock features a keyhole slot on the back for easy wall mounting. Use a suitable screw (not included) in your desired location.

Figure 7.1: The clock displayed on a wall, showcasing its suitability for wall mounting.
Soporte de mesa:
An integrated foldable stand on the back allows the clock to be placed on any flat surface, such as a desk, shelf, or bedside table.

Figure 7.2: The clock positioned on a table using its integrated stand.
8. Mantenimiento
Limpieza:
Limpie el reloj con un paño suave y seco. No utilice limpiadores abrasivos ni disolventes, ya que pueden dañar la pantalla o el cristal.asing.
Reemplazo de batería:
When the display dims or the clock stops functioning correctly, replace all 4 AA batteries simultaneously. Do not mix old and new batteries or different types of batteries.
9. Solución de problemas
| Problema | Posible causa | Solución |
|---|---|---|
| El reloj no muestra nada. | Las baterías están agotadas o insertadas incorrectamente. | Reemplace las baterías por otras nuevas, asegurándose de la polaridad correcta. |
| Radio wave icon is flashing, or time is incorrect. | Mala recepción de señal de radio. | Move the clock to a location with better signal reception (e.g., near a window, away from electronics). Manually initiate signal search using the WAVE / RCC button. |
| La alarma no suena. | La alarma no está activada. | Press the ALARM ON / OFF button to activate the alarm (alarm icon should appear). |
| Las lecturas de temperatura y humedad parecen inexactas. | Clock is placed in an area with extreme temperature fluctuations or direct sunlight. | Relocate the clock to a stable indoor environment. Allow time for readings to stabilize. |
10. Especificaciones

Figure 10.1: Dimensions of the Youshiko YC8061-B Jumbo Radio Controlled Wall Clock.
| Característica | Detalle |
|---|---|
| Número de modelo | YC8061-B |
| Dimensiones (L x An x Al) | 24.8 x 20.6 x 2.8 cm (9.76 x 8.11 x 1.1 pulgadas) |
| Peso | 600 gramos |
| Fuente de poder | 4 pilas AA (no incluidas) |
| Tipo de pantalla | LCD digital |
| Señal de tiempo | MSF (UK & Ireland version) |
| Características especiales | Radio-controlled, Automatic DST adjustment, Indoor Temperature Display, Indoor Humidity Display, Calendar (Day, Month, Year), Alarm with Snooze, Wall Mountable / Table Stand |
| Color | Negro |
11. Información de garantía
Youshiko products are manufactured to high-quality standards. This product is covered by a standard manufacturer's warranty against defects in materials and workmanship. Please retain your proof of purchase for warranty claims. Specific warranty terms and duration may vary by region. For detailed warranty information, please refer to the documentation provided at the time of purchase or contact Youshiko customer support.
12. Soporte
Should you encounter any issues or have questions regarding your Youshiko YC8061-B Jumbo Radio Controlled Wall Clock that are not addressed in this manual, please contact Youshiko customer support. Contact details can typically be found on the product packaging or the official Youshiko websitio.
Ask a question about this manual
Ask about setup, troubleshooting, compatibility, parts, safety, or missing instructions. Manuals+ will review the question and use this page’s manual context to help answer it.