
1. Introducción
The EPEVER VS6048AU is a 60A common positive Pulse Width Modulation (PWM) solar charge controller designed for 12V, 24V, 36V, and 48V solar panel power systems. It incorporates advanced digital techniques to ensure efficient and reliable battery charging and load management. This controller is suitable for various applications, including solar home systems, traffic signals, solar street lights, and solar garden lamps.
Características principales:
- 3-StagCarga PWM inteligente: Bulk, Boost/Equalize, Float.
- Supports three battery charging options: Sealed, Gel, and Flooded.
- Integrated LCD display for dynamic monitoring of operating data and working conditions.
- Dual USB output ports (Max. 5VDC/2.4A) for charging electronic devices.
- Configuración de botones fácil de usar para una operación cómoda y conveniente.
- Multiple load control modes for versatile application.
- Función de estadísticas energéticas.
- Función de compensación de temperatura de la batería.
- Extensive electronic protections for system safety.

Image 1.1: The EPEVER VS6048AU Solar Charge Controller shown in various application settings, including home power supply, street lighting, monitoring, and green energy solutions.
2. Información de seguridad
Lea atentamente todas las instrucciones y advertencias antes de instalar y utilizar el producto. El incumplimiento de estas instrucciones podría provocar descargas eléctricas, incendios o lesiones graves.
- Asegúrese de que todo el cableado esté correctamente polarizado y conectado de forma segura para evitar daños al controlador y otros componentes.
- Desconecte siempre el panel solar y la energía de la batería antes de instalar o ajustar el controlador.
- Install the controller in a well-ventilated area, away from flammable gases, moisture, and direct sunlight.
- Utilice disyuntores o fusibles adecuados para el panel solar, la batería y los circuitos de carga.
- No desmonte ni intente reparar el controlador usted mismo. Contacte con personal cualificado para obtener servicio técnico.
- Utilice equipo de protección personal adecuado, incluida protección para los ojos, cuando trabaje con baterías.
- Mantenga a los niños alejados de los componentes del sistema de energía solar.
Protecciones Electrónicas: The VS6048AU controller includes comprehensive electronic protections:
- Protección de polaridad inversa fotovoltaica
- Batería con exceso de volumentagy protección
- Batería sobre protección de descarga
- Protección contra polaridad inversa de la batería
- Protección contra sobrecalentamiento de la batería
- Protección contra sobrecarga de carga
- Protección contra cortocircuitos de carga
- Protección contra sobrecalentamiento del controlador

Image 2.1: Visual representation of the electronic protections integrated into the controller and a basic solar power system connection diagram.
3. Producto terminadoview
Familiarize yourself with the components and interface of your EPEVER VS6048AU solar charge controller.

Imagen 3.1: Frente view of the EPEVER VS6048AU controller with key components labeled.
- Pantalla LCD: Muestra el estado del sistema, los parámetros y los códigos de error.
- Botón MENÚ: Used to navigate through different display interfaces and enter/exit setting modes.
- Botón de ajuste: Se utiliza para confirmar selecciones, modificar parámetros y borrar datos.
- USB Output Ports (5VDC/2.4A): Para cargar dispositivos electrónicos externos.
- Temp. Sensor Port (RTS Port): Connects to the optional remote temperature sensor for accurate battery temperature compensation.
- Terminales fotovoltaicos: Conectarse al conjunto de paneles solares.
- Terminales de la batería: Conectarse al banco de baterías.
- Terminales de carga: Conectar a cargas de CC.
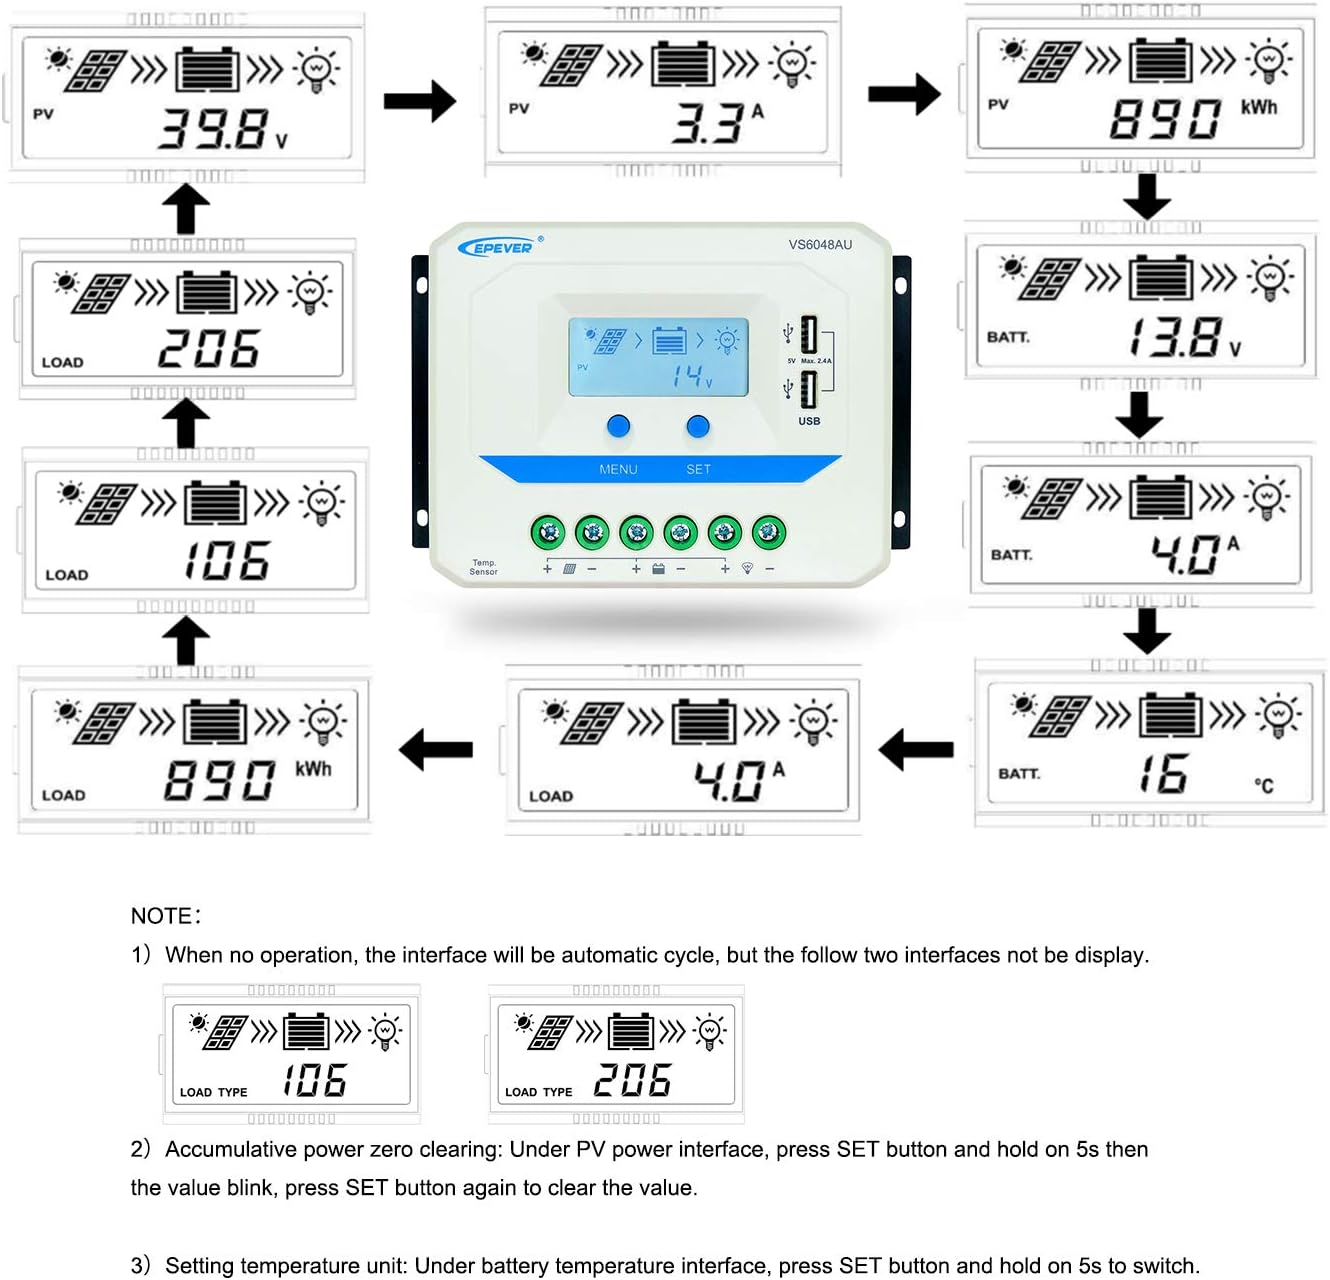
Image 3.2: Dimensions of the EPEVER VS6048AU Solar Charge Controller (approximately 21.4 cm x 12.87 cm x 7.22 cm).
LCD Display Status Description
The LCD display provides visual feedback on the system's operational status. Refer to the table below for icon meanings:

Image 3.3: Detailed description of the icons displayed on the VS6048AU LCD screen.
4. Configuración e instalación
Siga estos pasos para instalar correctamente su controlador de carga solar. Asegúrese de que todas las fuentes de alimentación estén desconectadas antes de realizar cualquier conexión.
Secuencia de cableado:
- Conecte la batería: Connect the battery to the controller's battery terminals. Ensure correct polarity (positive to positive, negative to negative). The controller will detect the battery voltage.
- Conectar la carga: Conecte la carga de CC a los terminales de carga del controlador. Asegúrese de que la polaridad sea correcta.
- Conecte el panel solar: Conecte el conjunto de paneles solares a los terminales fotovoltaicos del controlador. Asegúrese de que la polaridad sea correcta.
Importante: Conecte siempre primero la batería, luego el panel solar y, por último, la carga. Desconecte en orden inverso: la carga, luego el panel solar y, por último, la batería.
Guía de vídeo de instalación:
Video 4.1: An official EPEVER video demonstrating the connection process for the solar charge controller, including battery and load connections. This visual guide can assist with proper installation.
5. Instrucciones de funcionamiento
The EPEVER VS6048AU controller features an intuitive LCD display and button interface for monitoring and configuration.
Navegación por pantalla LCD:
When no operation is performed, the LCD interface will automatically cycle through various display screens, showing real-time data such as PV voltage, corriente, volumen de la bateríatage, y estado de carga.
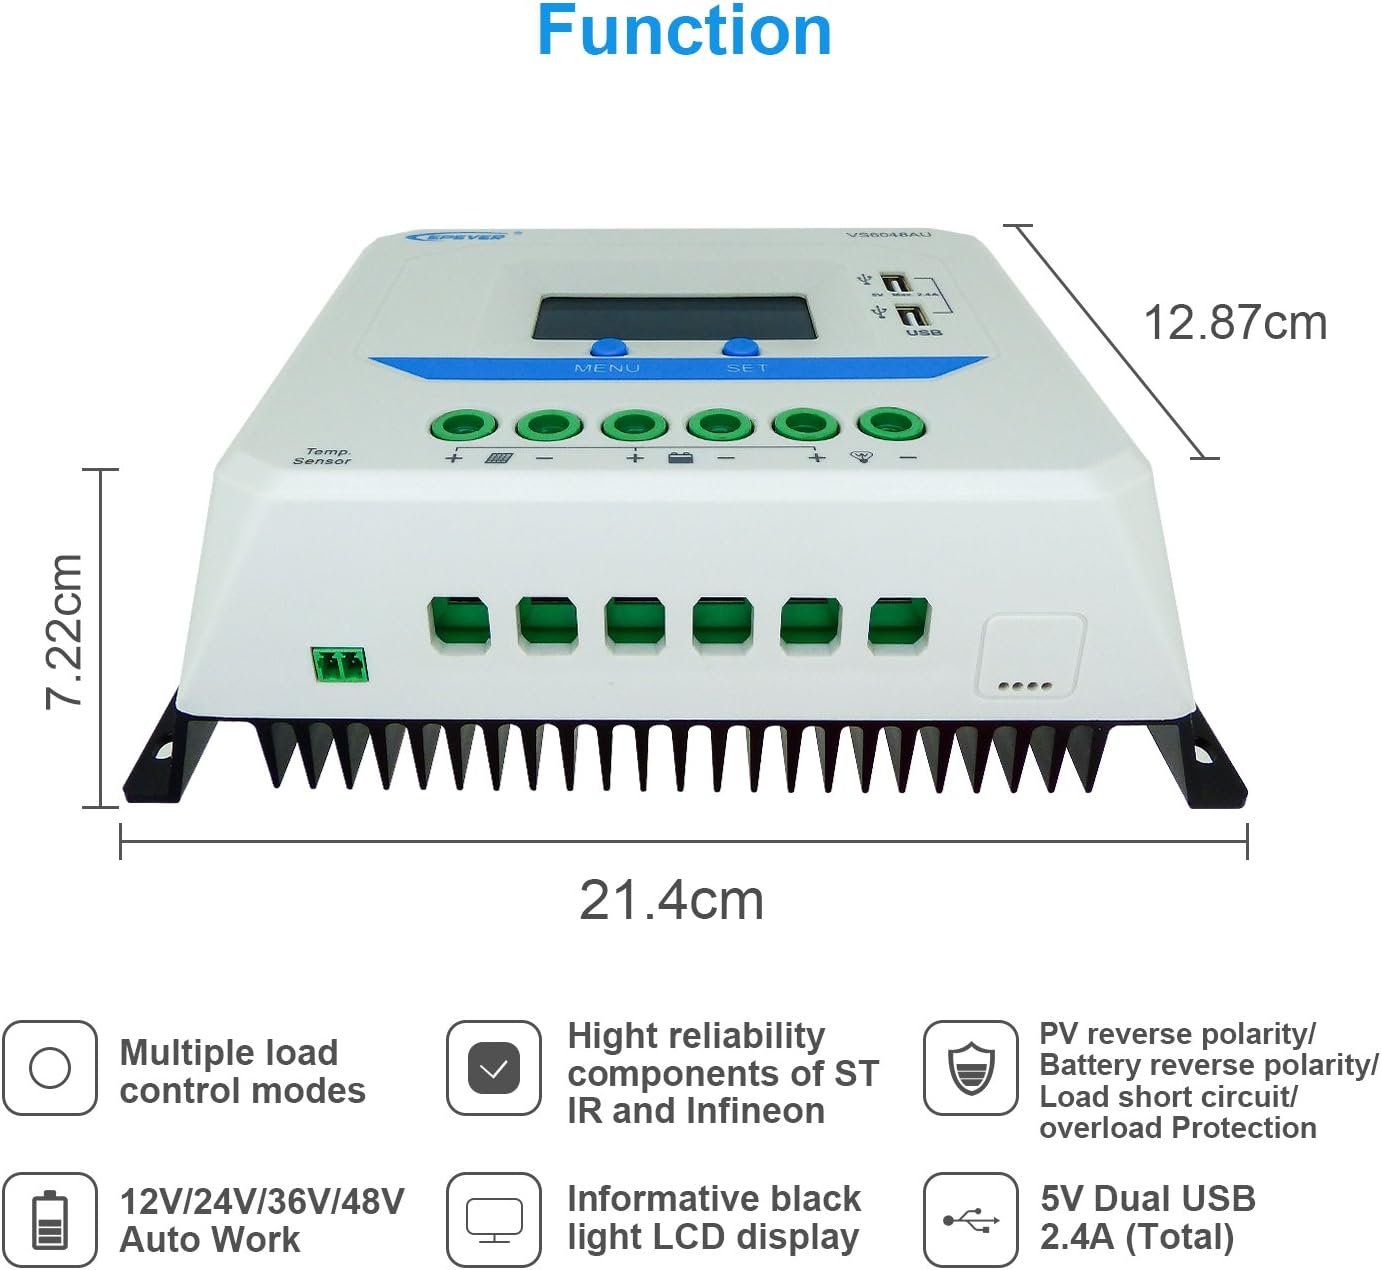
Image 5.1: Illustration of the automatic cycling interfaces on the VS6048AU LCD display.
- Presione el MENÚ button to manually cycle through the display interfaces.
- Mantenga pulsado el MENÚ button to enter or exit the parameter setting mode.
- In parameter setting mode, use the COLOCAR button to adjust values or confirm selections.
Operaciones Especiales:
- Accumulative Power Clearing: Under the PV power interface, press and hold the COLOCAR button for 5 seconds until the value blinks, then press COLOCAR again to clear the accumulative power value.
- Unidad de temperatura de ajuste: Under the battery temperature interface, press and hold the COLOCAR Botón durante 5 segundos para cambiar entre Celsius (°C) y Fahrenheit (°F).
Modos de carga:
El controlador utiliza un 3-stagAlgoritmo de carga PWM inteligente:
- Carga a granel: La batería se carga a la corriente máxima hasta su volumentage alcanza el volumen Boosttage.
- Boost/Equalize Charging: The battery is charged at a constant voltage. An Equalize charge is typically performed once a month to balance battery cells.
- Carga flotante: El volumen de la bateríatage is maintained at the Float voltage, and the charging current is reduced to a trickle to keep the battery fully charged.
The controller supports charging for Sealed, Gel, and Flooded battery types. Ensure the correct battery type is selected in the settings for optimal charging performance.
Salida USB:
The dual USB ports provide a maximum output of 5VDC/2.4A for charging compatible electronic devices.
6. Mantenimiento
Regular maintenance ensures the longevity and optimal performance of your EPEVER VS6048AU solar charge controller.
- Limpieza: Mantenga el controlador limpio y libre de polvo y residuos. Utilice un paño seco para limpiarlo.
- Conexiones: Revise periódicamente todas las conexiones del cableado para comprobar su firmeza y evitar la corrosión. Las conexiones sueltas pueden causar sobrecalentamiento y daños.
- Ventilación: Asegúrese de que el área de instalación tenga ventilación adecuada para evitar el sobrecalentamiento del controlador.
- Inspección: Inspect the controller and wiring for any signs of damage, such as frayed cables or cracked casing. Replace damaged components immediately.
- Estado de la batería: Supervisar el volumen de la bateríatage and performance regularly. Ensure the battery type setting in the controller matches your battery.
7. Solución de problemas
Esta sección aborda problemas comunes que puede encontrar con su controlador de carga solar.
| Problema | Posible causa | Solución |
|---|---|---|
| Sin visualización en LCD | Batería no conectada o con bajo volumentage; polaridad inversa. | Verifique las conexiones y la polaridad de la batería. Asegúrese de que el volumen de la bateríatage está por encima de 9 V. |
| La batería no se carga | PV panels not connected; PV reverse polarity; insufficient sunlight; PV open circuit voltagy demasiado bajo. | Check PV connections and polarity. Ensure adequate sunlight. Verify PV open circuit voltage está dentro de las especificaciones. |
| La carga no funciona | Load disconnected; load short circuit; load overload; battery low voltage desconecte. | Check load connections. Remove short circuit. Reduce load. Recharge battery. |
| Sobrecalentamiento del controlador | Poor ventilation; excessive ambient temperature; prolonged high current operation. | Ensure proper ventilation. Relocate controller to a cooler environment. Reduce load if possible. |
| La salida USB no funciona | Device not compatible; controller fault. | Try another USB device. If issue persists, contact support. |
8. Especificaciones
Detailed technical specifications for the EPEVER VS6048AU Solar Charge Controller.

Image 8.1: Comprehensive technical specifications table for the EPEVER VS-AU series, including the VS6048AU model.
| Parámetro | Valor (VS6048AU) |
|---|---|
| Modelo | VS6048AU |
| Vol. Nominal del sistematage | Trabajo automático de 12 V/24 V/36 V/48 V |
| Volumen de entrada de la bateríatage Rango | 9V ~ 64V |
| Corriente nominal de carga/descarga | 60A |
| máx. Volumen de circuito abierto fotovoltaicotage | 96 V |
| Tipo de batería | Sellado (predeterminado) / Gel / Inundado |
| Aumentar el volumen de cargatage | Sealed: 14.4V, Gel: 14.2V, Flooded: 14.6V |
| Ecualizar el volumen de cargatage | Sellado: 14.6 V, Gel: No, Inundado: 14.8 V |
| Vol. De carga flotantetage | Sellado/Gel/Inundado: 13.8V |
| Vol bajotage Vuelva a conectar Voltage | Sellado/Gel/Inundado: 12.6V |
| Vol bajotage Desconectar Voltage | Sellado/Gel/Inundado: 11.1V |
| Autoconsumo | ≤10 mA (12 V), ≤18 mA (24 V) |
| Compensación de temperatura | -3mV/°C/2V (77°F) |
| Toma de tierra | Positivo común |
| Salida USB | 5 V CC/2.4 A (Total) |
| Dimensión general | 214x128.7x72.2 milímetros |
| Terminales | 3 AWG (25 mm²) |
| Peso neto | 1.02 kilogramos |
| Recinto | IP30 |
| Temperatura del entorno de trabajo | -25 °C ~ +55 °C |
| Rango de humedad | ≤95% (NC) |
9. Garantía y soporte
EPEVER products are designed for reliability and performance. For technical assistance or warranty inquiries, please refer to the following:
- Apoyo técnico: EPEVER provides technical support through its local service centers. For assistance, please contact the authorized dealer or service center in your region.
- Información de garantía: Please refer to the warranty card included with your product or visit the official EPEVER webSitio para conocer los términos y condiciones detallados de la garantía.
- Free Solar System Design: EPEVER's service centers may offer free solar system design assistance to help you optimize your setup.