
1. Introducción
The Flashpoint Zoom Li-Ion Mini R2 TTL Flash is a compact and powerful flash unit designed for use with select Sony mirrorless cameras, including models such as A7RIII, a7rII, a7R, a58, a99, ILCE6000L, a77II, RX10, and the a9. This flash features an integrated R2 radio transceiver, enabling wireless triggering and control. It can function as a master unit to command other Flashpoint and Godox R2-compatible slave units, offering versatile lighting solutions for various photographic scenarios.
2. Precauciones de seguridad
- No desmonte ni modifique la unidad de flash. Las reparaciones solo deben ser realizadas por personal de servicio autorizado.
- Mantenga el flash seco. No lo exponga a la lluvia, la humedad ni a la humedad excesiva.
- No toque el tubo de flash después de disparar, ya que puede estar caliente.
- Mantener fuera del alcance de los niños.
- Use only the specified battery and charger. Improper use can lead to fire, explosion, or electric shock.
- Evite la exposición directa de los ojos al flash, especialmente a corta distancia, ya que puede perjudicar la visión.
3. Producto terminadoview
3.1 Contenido del paquete
- Flashpoint Zoom Li-Ion Mini Flash Unit
- Mini soporte
- Estuche de protección
- Diffuser (assumed from 'Dif' in product data)
3.2 Flash Components
Familiarize yourself with the main components of your Flashpoint Zoom Li-Ion Mini R2 TTL Flash.

Figura 3.2.1: Frente view of the Flashpoint Zoom Li-Ion Mini R2 TTL Flash, showing the flash head and main body.
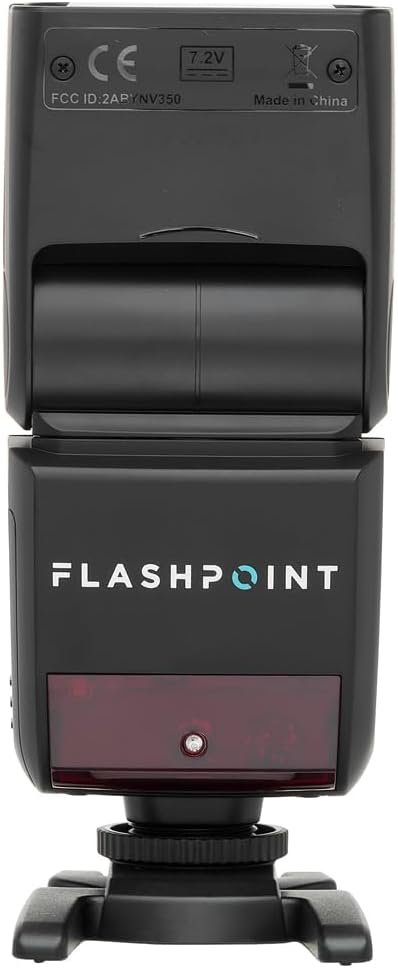
Figura 3.2.2: Trasero view of the flash, highlighting the LCD display and control buttons for mode, zoom, sync, and power.

Figura 3.2.3: The flash unit with its built-in wide-angle diffuser panel extended from the flash head.
4. Configuración
4.1 Instalación de la batería
- Localice el compartimiento de la batería en el costado de la unidad de flash.
- Slide the battery cover release latch and open the compartment.
- Insert the Li-Ion battery, ensuring correct polarity as indicated inside the compartment.
- Cierre la tapa del compartimiento de la batería hasta que encaje firmemente en su lugar.

Figura 4.1.1: Lado view of the flash unit, indicating the battery compartment with a 'BATT.PUSH' label.
4.2 Montaje en la cámara
- Asegúrese de que la unidad de flash esté apagada.
- Slide the flash's hot shoe foot into your Sony camera's hot shoe mount.
- Tighten the locking ring on the flash foot to secure it to the camera. Do not overtighten.
4.3 Encendido / Apagado
Press and hold the power button (usually marked with a ⚡ or power symbol) on the rear control panel to turn the flash on or off.
5. Instrucciones de funcionamiento
5.1 Modos básicos de funcionamiento
The Flashpoint Zoom Li-Ion Mini R2 TTL Flash supports various operating modes:
- Modo de flash automático TTL: Automatically sets the flash output for correct exposure.
- Modo manual (M): Allows manual adjustment of flash power output.
- Modo multi(estroboscópico): Fires a series of rapid flashes during a single exposure.
- Modos esclavos ópticos S1/S2: Triggers the flash optically when another flash fires.
Utilice el MODO button on the control panel to cycle through these modes.

Figura 5.1.1: Detallado view of the flash control panel, showing buttons for MODE, ZOOM, SYNC, SLAVE, GR/CH, and the SET dial.
5.2 R2 Wireless System
The integrated R2 radio transceiver provides wireless control. Set the flash to Master or Slave mode and configure the group (GR) and channel (CH) settings to match your R2-compatible transmitter or other R2 flashes. Refer to your R2 transmitter's manual for detailed wireless setup.
5.3 Ajuste del cabezal del flash
The flash head can be rotated and tilted to bounce light off ceilings or walls for softer illumination.
- Rotación horizontal: 0 a 270 grados.
- Inclinación vertical: -7 a 90 grados.

Figura 5.3.1: Illustration demonstrating the flexible rotation and tilt capabilities of the flash head.
5.4 Función de zoom
The flash features an automatically zooming flashhead from 24-105mm. This adjusts the flash coverage to match the focal length of your lens. In manual mode, you can also adjust the zoom manually using the ZOOM botón.
6. Mantenimiento
- Limpieza: Utilice un paño suave y seco para limpiar la unidad de flash. Para la suciedad difícil, utilice un paño ligeramente seco.amp cloth with mild detergent, then wipe dry. Do not use organic solvents like thinner or benzene.
- Almacenamiento: Cuando no lo utilice durante períodos prolongados, retire la batería y guarde el flash en un lugar fresco y seco, preferiblemente en su estuche protector.
- Cuidado de la batería: Recharge the Li-Ion battery regularly, even if not in use, to maintain its lifespan. Avoid fully discharging the battery.
7. Solución de problemas
If you encounter issues with your Flashpoint Zoom Li-Ion Mini R2 TTL Flash, refer to the following common problems and solutions:
| Problema | Posible causa / solución |
|---|---|
| El flash no dispara. | Check if the flash is powered on. Ensure the battery is charged and correctly installed. Verify the flash is securely mounted on the camera hot shoe. Check camera flash settings. |
| Flash output is inconsistent or incorrect. | Ensure TTL mode is selected for automatic exposure, or adjust manual power settings. Check for obstructions between the flash and subject. Verify flash head zoom matches lens focal length. |
| La activación inalámbrica falla. | Confirm that the flash and transmitter are set to the same R2 group and channel. Ensure both units are within range and have fresh batteries. Check for radio interference. |
| Difficulty mounting flash on camera hot shoe. | Ensure the locking ring is fully loosened. Some camera hot shoes may have tighter tolerances; apply firm, even pressure. If persistent, verify compatibility with your specific camera model. |
| Unable to update firmware via micro-USB port. | The micro-USB port may be recessed. Try using a micro-USB cable with a very slim connector housing. If issues persist, contact Flashpoint customer support for guidance on compatible cables or alternative update methods. |
8. Especificaciones
| Característica | Especificación |
|---|---|
| Número de guía | 82ft / 25m (at ISO 100) |
| Tiempo de reciclaje | 0.1 a 1.7 segundos |
| Rango de Zoom | 24-105 mm (automático/manual) |
| Bounce Head Rotation | Horizontal: 0 to 270 degrees |
| Bounce Head Tilt | Vertical: -7 to 90 degrees |
| Dimensiones (L x An x Al) | 8.4 x 7.2 x 2.8 pulgadas |
| Peso del artículo | 1.87 libras |
| Montajes compatibles | Sony Alfa |
| Número de modelo | Zoom-Lion Mini |
| ASIN | B07CV42KFV |
9. Garantía y soporte
9.1 Información de garantía
Flashpoint products typically come with a limited manufacturer's warranty. For specific details regarding the warranty period and terms for your Zoom Li-Ion Mini R2 TTL Flash, please refer to the warranty card included with your product or visit the official Flashpoint websitio.
9.2 Atención al cliente
For technical assistance, troubleshooting beyond this manual, or service inquiries, please contact Flashpoint customer support. Contact information can usually be found on the Flashpoint websitio web o en la documentación de su producto.