
1. Introducción
The EPEVER 20A MPPT Solar Charge Controller, model Tracer2210AN, is an advanced Maximum Power Point Tracking (MPPT) device designed for 12V/24V automatic work solar systems. It efficiently manages power flow from solar panels to batteries, ensuring optimal charging and extending battery life. This controller features high conversion efficiency, supports various battery types, and offers comprehensive protection functions. This manual provides essential information for the safe installation, operation, and maintenance of your solar charge controller.

Image 1.1: EPEVER 20A MPPT Solar Charge Controller (Tracer2210AN). This image shows the front view of the solar charge controller with its LCD display and control buttons.
2. Instrucciones de seguridad
- Conecte siempre la batería al controlador de carga primero, then the solar panel, and finally the load. Disconnect in the reverse order: load, then solar panel, then battery.
- Asegúrese de que haya una ventilación adecuada alrededor del controlador para evitar el sobrecalentamiento.
- Utilice calibres de cable adecuados para todas las conexiones para evitar volatilidad.tage drop and overheating. Refer to the specifications section for recommended cable sizes.
- Avoid short circuits at all terminals.
- Install the controller in a dry, well-ventilated area, away from direct sunlight and moisture.
- No intente reparar ni modificar el controlador usted mismo. Para obtener servicio técnico, contacte con personal cualificado.
- Use equipo de protección personal (EPP) adecuado durante la instalación, incluida protección para los ojos y guantes aislantes.
3. Producto terminadoview
The Tracer2210AN controller incorporates advanced features for efficient solar power management:
- Tecnología MPPT avanzada: Ensures maximum power extraction from solar panels with tracking efficiency not less than 99.5% and a maximum conversion efficiency of 98%.
- Componentes de alta calidad: Utilizes international famous brands of ST and IR components for reliability and durability.
- Compatibilidad de la batería: Supports various battery types including lead-acid (sealed, gel, flooded) and lithium-ion (LiFePO4, Li(NiCoMn)O2), with user-defined settings.
- Compensación de temperatura: Includes battery temperature compensation function for lead-acid batteries.
- Monitoreo en tiempo real: Provides real-time energy statistics and supports communication via RS-485 bus with Modbus protocol for monitoring and parameter setting via mobile APP or PC software (requires optional accessories like MT50, WiFi, or BLE adapters).
- Funciones de protección: Features multiple safety protections including overheating power reduction.
3.1 Componentes del controlador

Imagen 3.1: Frente view of the EPEVER Tracer2210AN controller with labeled components. Key components include the LCD display, SELECT and ENTER buttons, remote temperature sensor port, solar panel terminals, battery terminals, load terminals, and an RJ45 communication port.

Imagen 3.2: Arriba y abajo views of the EPEVER Tracer2210AN controller. The top view shows the model information and certifications, while the bottom view displays the terminal connections and communication port.
4. Configuración
4.1 Montaje del controlador
Mount the controller vertically on a wall or a stable surface. Ensure there is sufficient space around the controller for proper air circulation to dissipate heat. The dimensions of the controller are 220mm x 154mm x 52mm.

Image 4.1: EPEVER MPPT 20A Solar Charge Controller with its physical dimensions indicated. The controller measures 220mm in length, 154mm in width, and 52mm in height.
4.2 conexiones de cableado
Follow the connection order carefully to avoid damage to the controller or other components. Always connect the battery first, then the solar panel, and finally the load. Disconnect in the reverse order.
- Conecte la batería: Conecte los terminales positivo y negativo de la batería a los terminales correspondientes del controlador. Asegúrese de que la polaridad sea correcta.
- Conecte el panel solar: Connect the positive and negative terminals of the solar panel to the corresponding PV terminals on the controller. Ensure correct polarity.
- Conectar la carga: Connect the positive and negative terminals of the DC load to the corresponding load terminals on the controller. Ensure correct polarity.
- Conectar el sensor de temperatura remoto (opcional): If using, connect the RTS300R47K3.81A temperature sensor to the designated port on the controller and attach the sensor to the battery for accurate temperature compensation.

Image 4.2: Connection diagram illustrating the proper wiring sequence for the EPEVER solar charge controller. It shows connections from the solar panel, battery (with fuse), and DC load, as well as an optional inverter for AC loads.
5. Instrucciones de funcionamiento
5.1 Pantalla LCD y botones
The controller features an LCD display that shows system status, charging parameters, and error codes. The 'SELECT' and 'ENTER' buttons are used to navigate through menus and adjust settings.
5.2 Configuración del tipo de batería
The controller supports various battery types. It is crucial to select the correct battery type for optimal charging and battery longevity. The default setting is 'Sealed' for lead-acid batteries.
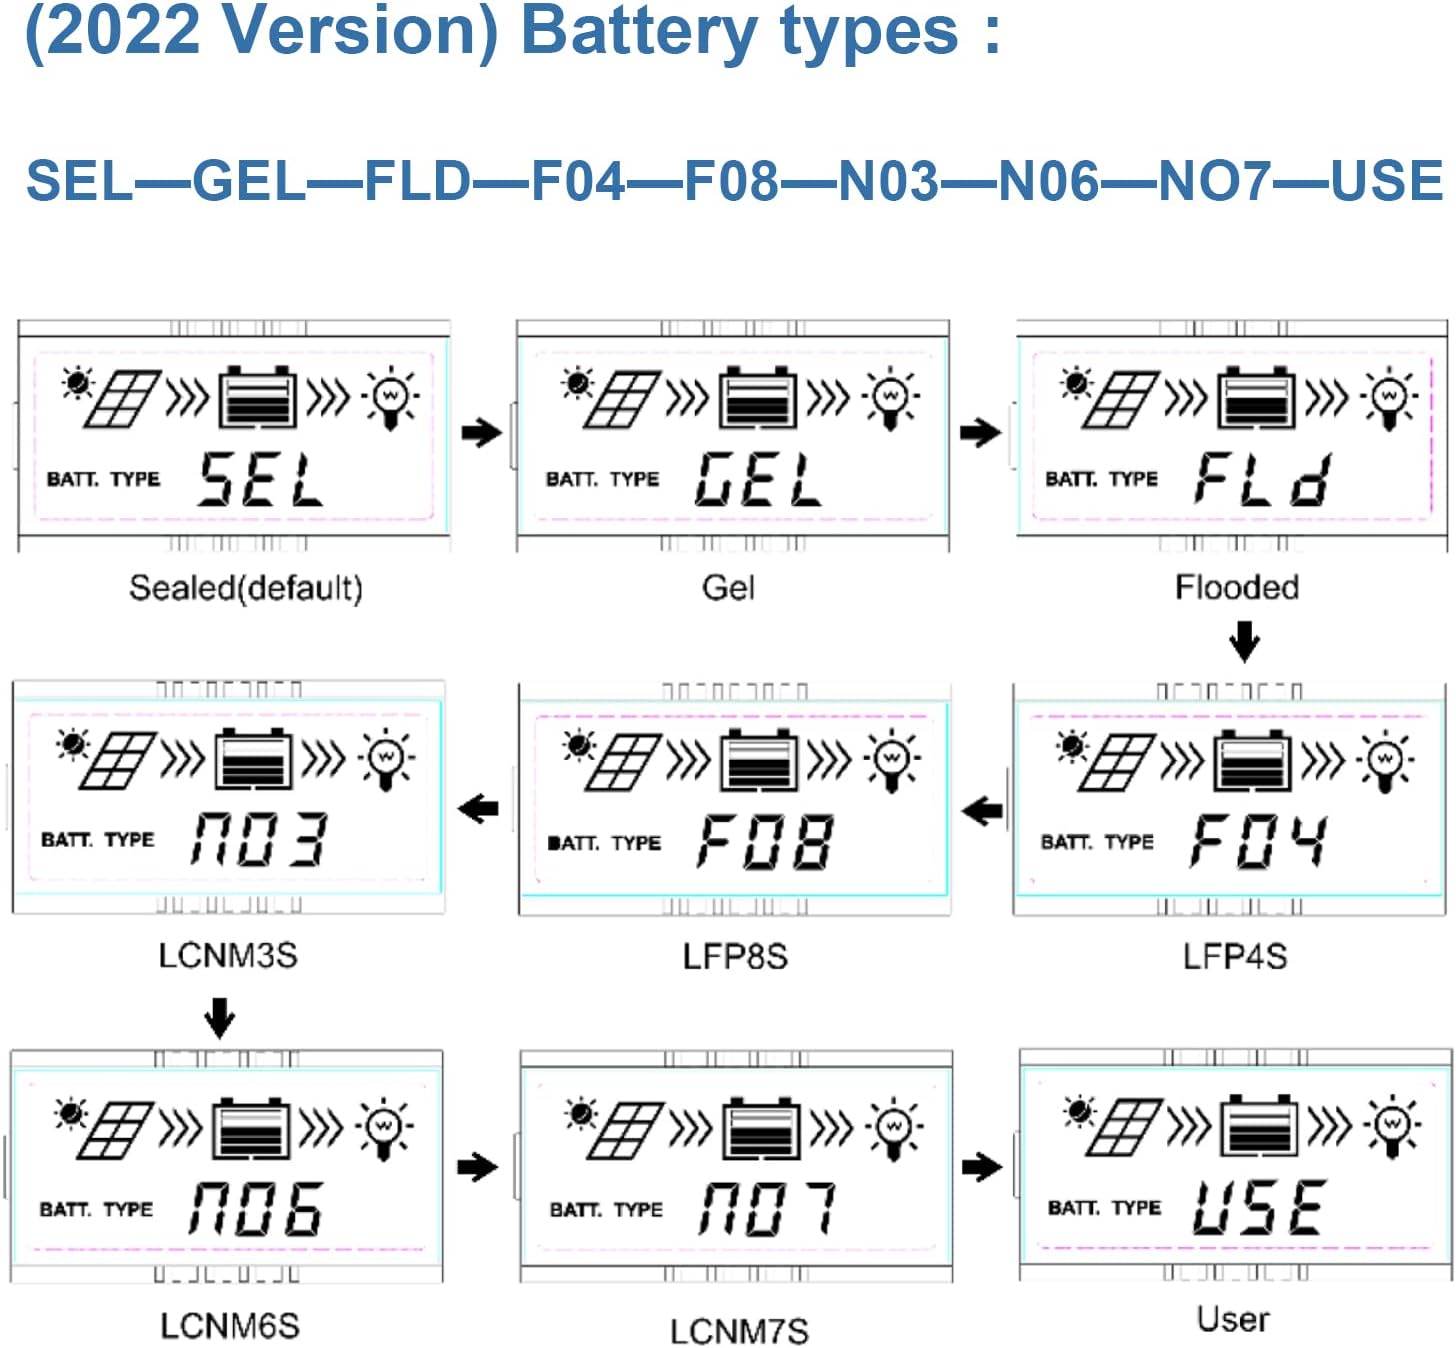
Image 5.1: LCD display showing various battery type selections. Options include Sealed (SEL), Gel (GEL), Flooded (FLD), LiFePO4 (LFP4S, LFP8S), Li(NiCoMn)O2 (LCNM3S, LCNM6S, LCNM7S), and User-defined (USE).
Para cambiar el tipo de batería:
- Press the 'SELECT' button to cycle through the main display screens until you reach the battery type setting.
- Press and hold the 'ENTER' button to enter the setting modification mode.
- Use the 'SELECT' button to choose the desired battery type (e.g., GEL, FLD, LFP4S, USE).
- Press 'ENTER' again to confirm and save the selection.
5.3 Monitoreo y comunicación
The Tracer2210AN controller can be monitored and configured remotely using optional accessories:
- Medidor remoto MT50: Connects via RJ45 cable to display real-time data and modify parameters.
- WiFi/BLE Adapters (eBox-WIFI-01, eBox-BLE-01): Connects to the RS-485 port to enable wireless monitoring and control via a mobile application.
- PC Communication Cable (CC-RS485-USB-150U): Connects to a PC for monitoring and parameter setting using EPEVER PC software.
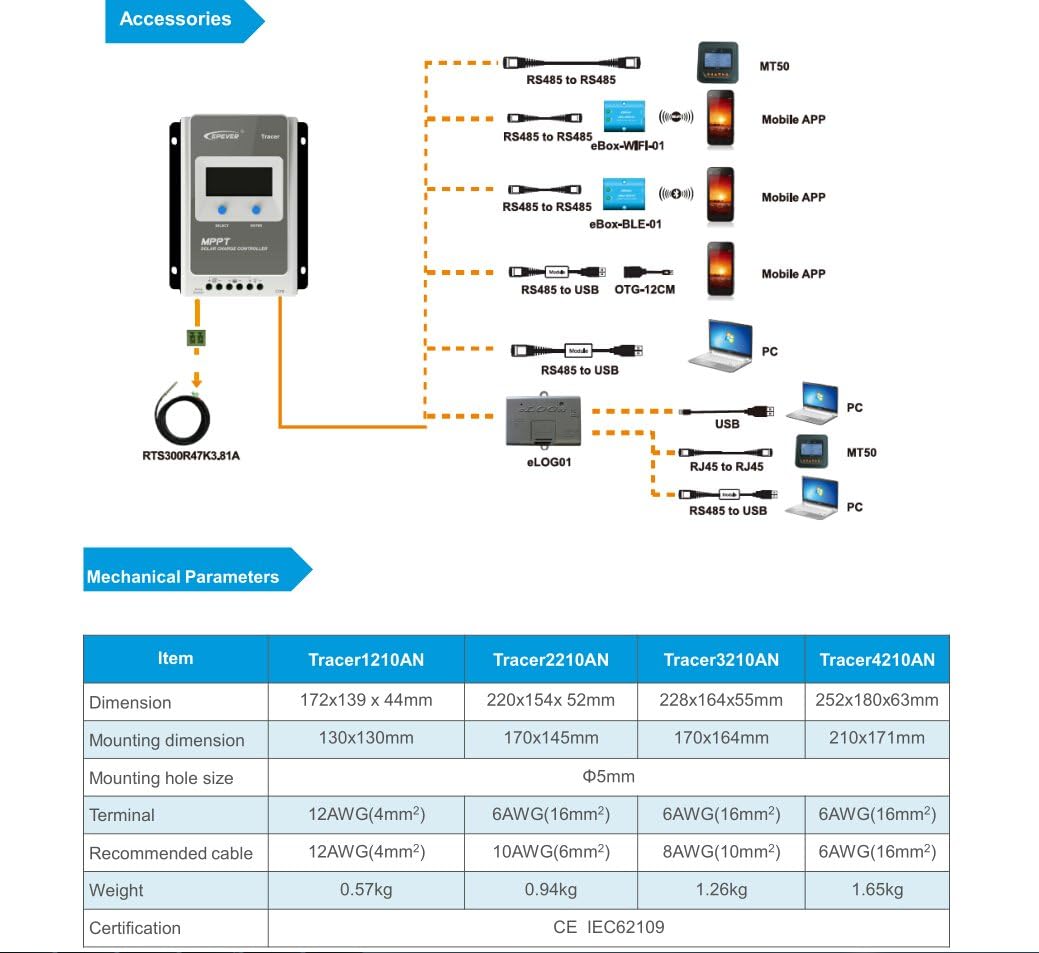
Image 5.2: Diagram showing the EPEVER solar charge controller and its compatible accessories. These include the RTS300R47K3.81A temperature sensor, MT50 remote meter, eBox-WIFI-01, eBox-BLE-01, OTG-12CM, and eLOG01 for various monitoring and communication options.

Image 5.3: The EPEVER Tracer2210AN solar charge controller connected to an MT50 remote meter, displaying system information. This setup allows for convenient monitoring and control.
6. Mantenimiento
El mantenimiento regular garantiza la longevidad y el rendimiento óptimo de su controlador de carga solar EPEVER:
- Comprobar conexiones: Periodically inspect all wiring connections for tightness and corrosion. Loose connections can cause voltage gotas y sobrecalentamiento.
- Limpiar el controlador: Mantenga el controlador limpio y libre de polvo y residuos. Utilice un paño seco para limpiar la superficie. Asegúrese de que las aberturas de ventilación no estén obstruidas.
- Inspeccionar si hay daños: Verifique si hay daños físicos en el controlador, los cables o los terminales.
- Inspección de la batería: For lead-acid batteries, check electrolyte levels (if applicable) and terminal condition. Ensure lithium batteries are within their recommended operating parameters.
- Condiciones ambientales: Asegúrese de que el entorno de instalación permanezca dentro de los rangos de temperatura y humedad de funcionamiento especificados.
7. Solución de problemas
Si encuentra problemas con su controlador de carga solar, consulte los siguientes pasos comunes de solución de problemas:
- Sin pantalla/encendido:
- Verifique las conexiones de la batería y asegúrese de que el volumen de la bateríatage está dentro del rango operativo del controlador.
- Verify that the battery fuse (if installed) is intact.
- Sin carga desde el panel solar:
- Ensure solar panel connections are secure and correct polarity is observed.
- Check the solar panel's open-circuit voltage (Voc) and short-circuit current (Isc) to ensure it is producing power.
- Verifique que el vol. del panel solartage is within the controller's input voltage rango.
- Check for shading on the solar panels.
- La carga no funciona:
- Verifique las conexiones de carga y asegúrese de que la polaridad sea correcta.
- Verify that the battery has sufficient charge. The controller may disconnect the load if the battery voltage es demasiado bajo.
- Check load settings on the controller to ensure the load output is enabled.
- Calentamiento excesivo:
- Ensure the controller is installed in a well-ventilated area and its heat sinks are not obstructed.
- Reduce the load or solar input if operating in extreme temperatures.
For more detailed troubleshooting or specific error codes, please refer to the comprehensive manual provided by EPEVER or contact their customer support.
8. Especificaciones
The following table outlines the key electrical and mechanical parameters for the Tracer2210AN MPPT Solar Charge Controller:

Image 8.1: Table detailing the electrical parameters for Tracer series controllers, including the Tracer2210AN. This table provides specific values for system voltage, currents, power, and environmental conditions.
| Parámetro | Value (Tracer2210AN) |
|---|---|
| Volumen nominal del sistematage | Trabajo automático de 12 V/24 V |
| Corriente de carga nominal | 20A |
| Corriente de descarga nominal | 20A |
| Máxima potencia de entrada fotovoltaica | 260W (12V Battery System) 520W (24V Battery System) |
| máx. Volumen de circuito abierto fotovoltaicotage | 100V (at min. operating temp) 92V (at 25℃ ambient temp) |
| Volumen de la bateríatage Rango | 8-32 V |
| Volumen MPPtage Rango | V(BAT+2V) ~ 72V |
| Toma de tierra | Negativo común |
| Eficiencia de seguimiento | ≥99.5% |
| máx. Eficiencia de conversión | 98% |
| Temperatura del entorno de trabajo | -25℃ ~ +50℃ |
| Rango de temperatura de almacenamiento | -20℃ ~ +70℃ |
| Humedad relativa | ≤95%, Carolina del Norte |
| Recinto | IP30 |
| Dimensiones (L x An x Al) | 220 x 154 x 52 mm |
| Peso | 0.94 kilogramos |
| Tamaño de terminal | #6 AWG (16 mm²) |
| Cable recomendado | #10 AWG (6 mm²) |
9. Garantía y soporte
For warranty information, please refer to the documentation provided with your purchase or contact your authorized EPEVER dealer. EPEVER products typically come with a manufacturer's warranty covering defects in materials and workmanship.
For technical support, product inquiries, or service, please visit the official EPEVER website or contact an authorized EPEVER service center. Ensure you have your product model (Tracer2210AN) and serial number available when seeking support.