1. Introducción
Thank you for choosing the Zerone LP-838 Small Power Amplifier. This manual provides essential information for the safe and efficient operation of your device. Please read these instructions thoroughly before use and retain them for future reference.
2. Producto terminadoview
2.1 Características principales
- Diseño compacto y portátil.
- RCA and 3.5mm audio input compatibility.
- High-power audio amplifier chip for 2.1 channel output.
- Adjustable Treble, Bass, and Volume controls.
- Durable all-aluminum alloy shell for electromagnetic interference reduction.
2.2 Identificación de componentes
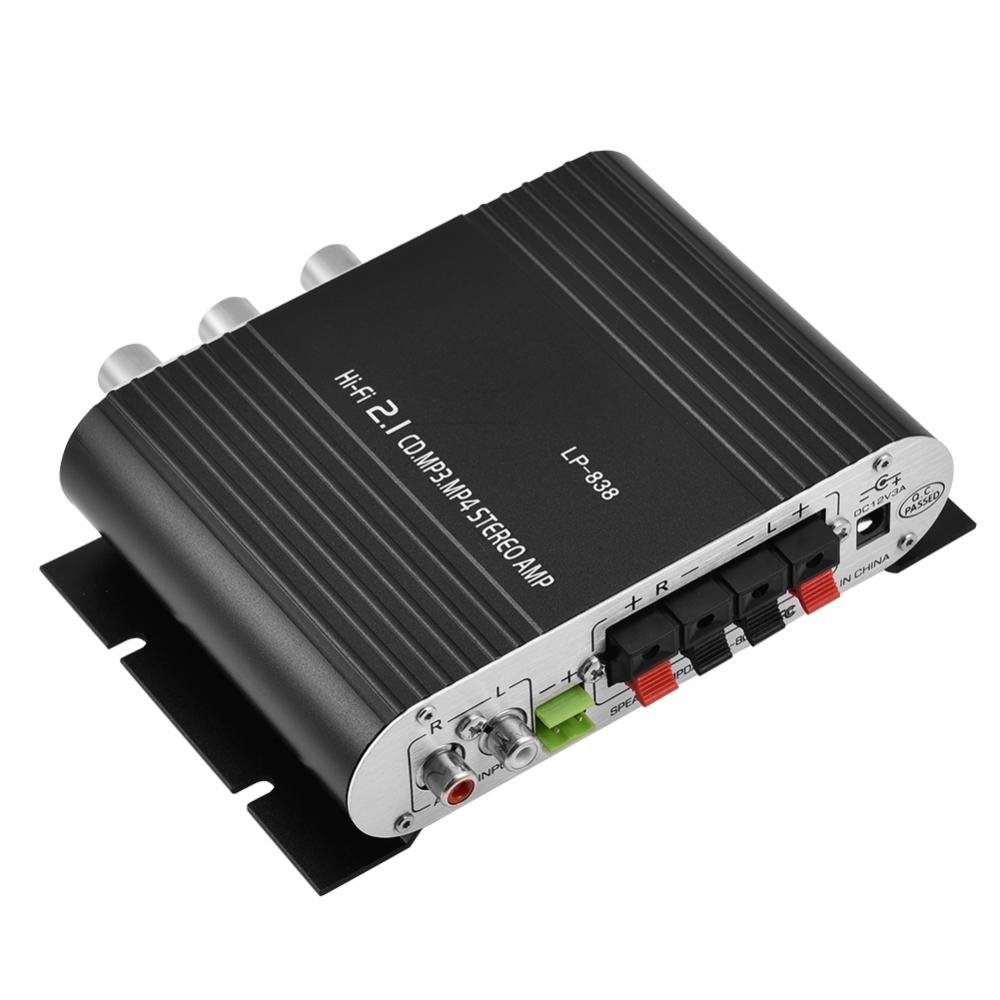
Figura 1: Controles y entradas del panel frontal
This image displays the front panel of the LP-838 amplifier. From left to right, it features a power switch, a bass volume knob, a 3.5mm MP3 input jack, and three rotary knobs for Treble, Bass, and Master Volume control. The unit also supports RCA audio input, as indicated by the text overlay.

Figura 2: Conexiones del panel trasero
This image shows the rear panel of the LP-838 amplifier. On the left are the RCA audio input jacks (red for right, white for left). In the center are the spring-clip speaker terminals for connecting left and right speakers. On the right is the DC 12V/3A power input jack and a 'Q.C. PASSED' stamp, indicating quality control.
Panel frontal:
- Interruptor de alimentación: Alterna el ampLifier encendido / apagado.
- BASS VOLUME Knob: Ajusta el nivel de graves de la salida de audio.
- Entrada MP3: 3.5mm jack for connecting portable audio devices.
- Perilla de AGUDOS: Ajusta la respuesta de alta frecuencia.
- Perilla de BAJO: Ajusta la respuesta de baja frecuencia.
- Perilla de VOLUMEN: Controla el volumen de salida general.
Panel trasero:
- ENTRADA DE AUDIO (RCA): Red and white RCA jacks for connecting audio sources (e.g., DVD players, computers).
- SPEAKER OUTPUTS (+R -R +L -L): Spring-clip terminals for connecting passive speakers. Ensure correct polarity (+ to + and - to -).
- Entrada CC 12 V/3 A: Power input jack for connecting the external power adapter (not included).
3. Configuración
- Conectar altavoces: Connect your passive speakers to the SPEAKER OUTPUT terminals on the rear panel. Ensure the positive (+) terminal of the ampEl amplificador se conecta al terminal positivo (+) del altavoz y al terminal negativo (-) del ampEl amplificador se conecta al terminal negativo (-) del altavoz. El amplifier admite altavoces con una impedancia de 4-8 ohmios.
- Conectar fuente de audio:
- For RCA input: Connect your audio source (e.g., CD player, TV, computer) to the RCA AUDIO INPUT jacks on the rear panel using an RCA cable.
- For 3.5mm input: Connect your portable audio device (e.g., smartphone, MP3 player) to the MP3 input jack on the front panel using a 3.5mm audio cable.
- Conecte la electricidad: Connect a compatible DC 12V/3A power adapter (not included) to the DC 12V/3A input jack on the rear panel. Plug the power adapter into a wall outlet.
Important: Ensure all connections are secure before powering on the ampmás duradero.
4. Instrucciones de funcionamiento
- Encendido: Coloque el interruptor de encendido en el panel frontal en la posición "ON". El indicador de encendido se iluminará.
- Seleccionar entrada: El amplifier automatically uses the active input. If both RCA and 3.5mm inputs are connected, the 3.5mm input may take precedence.
- Ajustar el volumen: Start with the VOLUME knob set to a low level. Begin playing audio from your source, then slowly increase the VOLUME knob to your desired listening level.
- Ajustar tono: Use the TREBLE and BASS knobs to fine-tune the high and low frequencies according to your preference. The BASS VOLUME knob provides additional control over the bass output.
- Apagado: When finished, turn the VOLUME knob down to its minimum setting, then flip the POWER switch to the 'OFF' position.
5. Mantenimiento
- Limpieza: Utilice un paño suave y seco para limpiar el exterior del amplificador. No utilice limpiadores líquidos ni disolventes.
- Ventilación: Asegúrese de que ampEl ventilador se coloca en un área bien ventilada para evitar el sobrecalentamiento. No obstruya las ranuras de ventilación.
- Almacenamiento: Cuando no lo utilice durante períodos prolongados, desconecte el adaptador de corriente y guarde el ampConservar en un lugar fresco y seco.
6. Solución de problemas
| Problema | Posible causa | Solución |
|---|---|---|
| Sin poder | Adaptador de corriente no conectado o defectuoso; interruptor de encendido apagado. | Ensure power adapter is securely connected and functional. Flip power switch to ON. |
| No hay salida de sonido | Incorrect audio input connection; speaker wires loose or incorrect polarity; volume too low; audio source issue. | Check audio input cables and connections. Verify speaker wire connections and polarity. Increase volume. Test audio source with another device. |
| Sonido distorsionado | Volume too high; incorrect tone settings; faulty audio source or cable. | Reduce volume. Adjust Treble and Bass knobs. Test with a different audio source or cable. |
| Ruido de zumbido o zumbido | Problema de bucle de tierra; interferencia de otros dispositivos electrónicos; cables defectuosos. | Asegúrese de que todos los componentes estén correctamente conectados a tierra. amplifier away from other electronic devices. Try different audio cables. |
7. Especificaciones
- Marca: Zerone
- Número de modelo: Zeroneq8ae3d902g-02 (LP-838)
- Volumentage: 14.4 voltios (en funcionamiento)
- Número de canales: 2
- Impedancia del altavoz: 4-8 ohmios
- Tipo de montaje: Montaje en superficie
- Peso del artículo: 7.8 onzas
- ASIN: B07DM4QJGX
- Código postal: 763741184919
- Fecha de primera disponibilidad: 4 de julio de 2019
8. Información de garantía
For specific warranty terms and conditions, please refer to the documentation provided at the time of purchase or contact your retailer. Warranty coverage typically includes defects in materials and workmanship under normal use.
9. Soporte
If you encounter issues that cannot be resolved using the troubleshooting guide, please contact the retailer or manufacturer for assistance. Provide your product model number (LP-838) and a detailed description of the problem when seeking support.