1. Producto terminadoview
The Integra DTM-7 is a Network A/V Stereo Receiver designed to integrate modern digital audio and video technologies with traditional stereo sound. It supports advanced HDMI switching for 4K and HDR10 content, offers robust network connectivity for streaming services, and includes wireless audio capabilities. The receiver is built with a focus on sound quality and versatile control options.
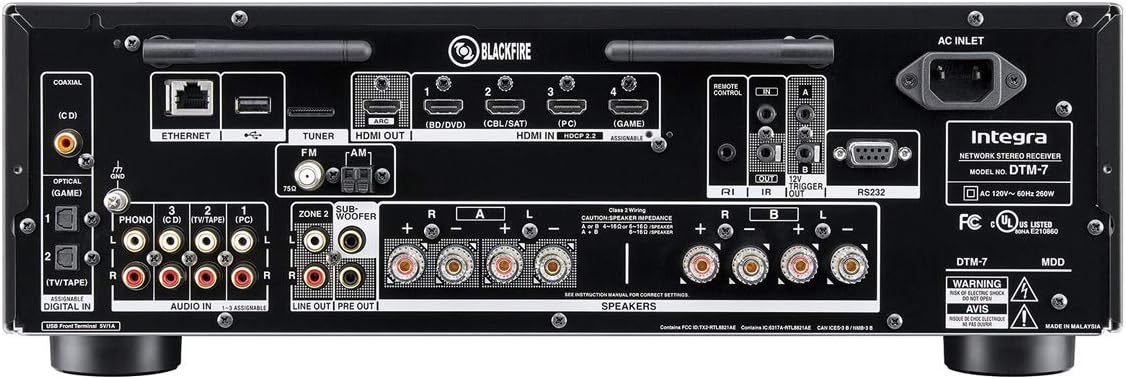
Figura 1.1: Frente view of the Integra DTM-7 Network A/V Stereo Receiver. This image displays the front panel controls, display, and input jacks.
Características principales:
- Salida de alta potencia: Delivers 100 Watts per channel (8 Ohms, 20 Hz-20 kHz, 0.08% THD, 2 Channels Driven, FTC) with 4-ohm stability, housed in an anti-resonant steel chassis and audiophile-grade aluminum front panel.
- Conectividad HDMI avanzada: Features 4 HDMI inputs and 1 HDMI output, supporting 4K/60 Hz, HDR10, HLG (Hybrid Log-Gamma), Dolby Vision, and BT.2020 Pass-thru with HDCP 2.2, 4:4:4 Color Space, and WCG (Wide Color Gamut).
- Integración con Sonos: Compatible with existing Sonos Home Sound Systems or as a starting point for a new one, allowing for music streaming capability with Sonos Connect and a firmware update.
- Extensive Network and Wireless Audio: Includes Wi-Fi and Bluetooth compatibility, providing access to internet radio sources such as Tidal, Pandora, Spotify, Deezer, and TuneIn. Supports Chromecast Built-In, DTS Play-Fi technology, and AirPlay for wireless audio streaming.
- Conectividad analógica: Features a built-in phono preamp for turntable connection.
- Opciones de control flexibles: Controllable via the included IR remote, the Integra Control Pro app (for iOS and Android devices), or through 3rd party control systems utilizing IP or RS232C.
2. ¿Qué hay en la caja?
Verifique que todos los elementos enumerados a continuación estén incluidos en el paquete:
- Integra DTM-7 Network A/V Stereo Receiver
- Cable de alimentación
- Antena de FM interior
- Antena de bucle AM
- Micrófono de configuración de altavoz
- Basic manual (this document provides detailed instructions)
- Mando a distancia
- 2 pilas AAA (para control remoto)
3. Configuración
3.1 Conexión de sus componentes
Before making any connections, ensure the receiver and all components are powered off and unplugged from the wall outlet. Refer to the rear panel diagram for connection points.

Figura 3.1: Rear panel connections of the Integra DTM-7. This image illustrates the various input and output ports for audio, video, and network connections.
- Conexiones de altavoz: Connect your passive speakers to the SPEAKER terminals on the rear panel. Ensure correct polarity (+ to + and - to -) for each speaker. The DTM-7 supports 4-ohm compatible speakers. For optimal performance, use high-quality speaker cables.
- Conexiones HDMI: Connect your video sources (e.g., Blu-ray player, game console, streaming device) to the HDMI IN ports. Connect your TV or projector to the HDMI OUT port. The HDMI ports support 4K/60 Hz, HDR10, Dolby Vision, and HDCP 2.2.
- Conexión de red: For wired network access, connect an Ethernet cable from your router to the ETHERNET port. For wireless network access, ensure the Wi-Fi antennas are properly attached and positioned.
- Conexiones de audio analógicas: Connect analog audio sources (e.g., CD player, cassette deck) to the AUDIO IN ports. For turntables, connect to the PHONO input, which includes a built-in preampmás duradero.
- Conexiones de antena: Conecte las antenas FM y AM suministradas a sus respectivos terminales para la recepción de radio.
- Conexión de energía: After all other connections are made, connect the power cord to the AC INLET on the receiver and then to a wall outlet.
3.2 Configuración inicial y calibración
After connecting your components, perform the initial setup:
- Encendido: Presione el EN MODO DE ESPERA button on the front panel or remote control to power on the receiver.
- On-Screen Setup Guide: Follow the on-screen instructions displayed on your TV for initial configuration, including language selection and network settings.
- Calibración de altavoces: Use the supplied speaker setup microphone. Connect it to the dedicated port on the front panel. Place the microphone at your primary listening position and follow the on-screen prompts to automatically calibrate your speakers for optimal sound.
4. Instrucciones de funcionamiento
4.1 Funcionamiento básico
- Encendido/apagado: Presione el EN MODO DE ESPERA Botón en el panel frontal o en el control remoto.
- Selección de entrada: Utilice el APORTE selector buttons on the front panel or the remote control to choose your desired audio/video source (e.g., HDMI 1, CD, NET).
- Control de volumen: Ajustar el VOLUMEN PRINCIPAL perilla en el panel frontal o en el VOLUMEN +/- Botones del control remoto.
- Control de tono: Utilice el BASS y TRIPLICAR knobs on the front panel to adjust the sound characteristics to your preference.
4.2 Funciones de red e inalámbricas
The DTM-7 offers a range of network and wireless audio capabilities:
- Servicios de transmisión: Access integrated streaming services such as Tidal, Pandora, Spotify, Deezer, and TuneIn directly from the receiver's menu. A stable internet connection is required.
- Chromecast integrado: Cast audio from compatible apps on your smartphone, tablet, or computer directly to the receiver.
- DTS Play-Fi: Enjoy high-quality wireless audio from your mobile device or PC to the receiver and other DTS Play-Fi enabled products.
- Salida en antena: Stream audio from your Apple devices (iPhone, iPad, Mac) to the receiver over your home network.
- Bluetooth: Empareje sus dispositivos habilitados para Bluetooth para transmitir audio de forma inalámbrica al receptor.
4.3 Opciones de control
- Mando a distancia por infrarrojos: Use the included remote for direct control of all receiver functions. Ensure line of sight to the receiver's IR sensor.
- Integra Control Pro App: Download the free Integra Control Pro app for iOS and Android devices. This app provides comprehensive control over the receiver's functions, including input selection, volume, network features, and settings.
- 3rd Party Control: The DTM-7 supports integration with custom installation systems via IP control or RS232C for advanced home automation.
5. Mantenimiento
To ensure the longevity and optimal performance of your Integra DTM-7 receiver, follow these maintenance guidelines:
- Limpieza: Gently wipe the exterior surfaces with a soft, dry cloth. Do not use abrasive cleaners, waxes, or solvents, as they can damage the finish.
- Ventilación: Ensure adequate ventilation around the receiver. Do not block the ventilation openings on the top or sides. Avoid placing the unit in an enclosed cabinet without proper airflow.
- Eliminación de polvo: Utilice periódicamente un cepillo suave o una aspiradora con accesorio de cepillo para eliminar el polvo de las rejillas de ventilación.
- Cable de alimentación: Revise periódicamente el cable de alimentación para detectar cualquier signo de daño. Si está dañado, deje de usarlo y contacte con atención al cliente para obtener un reemplazo.
6. Solución de problemas
If you encounter issues with your DTM-7 receiver, refer to the following common troubleshooting steps:
- Sin energía:
- Asegúrese de que el cable de alimentación esté enchufado de forma segura tanto al receptor como a un tomacorriente de pared que funcione.
- Compruebe si el tomacorriente de pared funciona enchufando otro dispositivo.
- Sin sonido:
- Verifique que esté seleccionada la fuente de entrada correcta.
- Verifique que todas las conexiones de los altavoces tengan la polaridad correcta y un ajuste seguro.
- Asegúrese de que el volumen no esté al mínimo o silenciado.
- Confirm that your speakers are functional.
- Sin vídeo:
- Ensure the HDMI cables are securely connected to both the source device, the receiver's HDMI IN, and the TV's HDMI OUT.
- Verify that the correct HDMI input is selected on the receiver and the correct HDMI input is selected on your TV.
- Pruebe con un cable o puerto HDMI diferente.
- Problemas de conexión de red:
- For wired connections, ensure the Ethernet cable is properly connected to the receiver and your router.
- For Wi-Fi, check your router's status and ensure the receiver is within range. Re-enter Wi-Fi credentials if necessary.
- Reinicie el enrutador y el receptor.
- El control remoto no funciona:
- Reemplace las pilas del control remoto.
- Asegúrese de que no haya obstrucciones entre el control remoto y el sensor IR del receptor.
If the problem persists after trying these steps, please refer to the Integra support websitio o póngase en contacto con el servicio de atención al cliente.
7. Especificaciones
| Característica | Especificación |
|---|---|
| Potencia de salida | 100 W/Ch. (8 Ohms, 20 Hz-20 kHz, 0.08% THD, 2 Channels Driven, FTC) |
| Entradas/Salidas HDMI | 4 entradas / 1 salida |
| Funciones HDMI | 4K/60 Hz, HDR10, HLG, Dolby Vision, BT.2020 Pass-thru, HDCP 2.2, 4:4:4 Color Space, WCG |
| Tecnología de conectividad | AirPlay, Bluetooth, HDMI, Wi-Fi, Ethernet |
| Wireless Audio Features | Chromecast Built-In, DTS Play-Fi, AirPlay, Spotify, Pandora, Tidal, Deezer, TuneIn |
| Modo de salida de audio | Estéreo |
| Configuración de canales de sonido envolvente | 2.1 |
| Entrada de fono | Yes (Built-in phono preamp) |
| Tipo de control | IR Remote, Android/iOS App (Integra Control Pro), IP, RS232C |
| Dimensiones del producto (ancho x alto x profundidad) | 17.1 x 5.9 x 12.9 pulgadas (aprox.) |
| Peso del artículo | 18.7 libras |
| Fabricante | Onkyo |
8. Garantía y soporte
For detailed warranty information, please refer to the warranty card included with your product or visit the official Integra website. For technical support, product registration, or service inquiries, please contact Integra customer support or visit their official websitio para obtener la información más actualizada.
Manufacturer: Onkyo