
1. Introducción
This manual provides detailed instructions for the installation, operation, and maintenance of your Akozon Digital Programmable Timer. Please read this manual carefully before use to ensure proper function and safety.

Figure 1: Akozon Digital Programmable Timer 12V
2. Producto terminadoview y características
The Akozon Digital Programmable Timer is a weekly programmable electronic timer designed for precise control of various electrical equipment. Its robust design and advanced features ensure reliable operation.
- Control automático: Automatically turns electrical equipment on and off according to preset schedules.
- Alta precisión: Equipped with a high-precision chip for accurate timing.
- Programación Semanal: Supports advanced programming for up to one week in advance.
- Múltiples programas: Features 16 ON/OFF settings (programs) for daily or weekly scheduling.
- Energía de respaldo: Integrated high-performance rechargeable battery maintains time display and stores data for over 12 months during power outages.
- Construcción duradera: Housing made of hard, durable plastic for extended lifespan.
- Pantalla LCD: Clear LCD for easy viewing del tiempo y estado del programa.
- Instalación en riel DIN: Designed for convenient installation on a DIN rail.
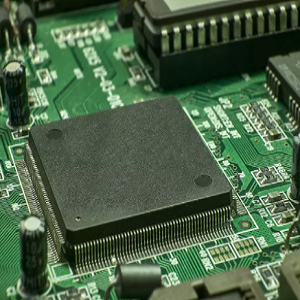
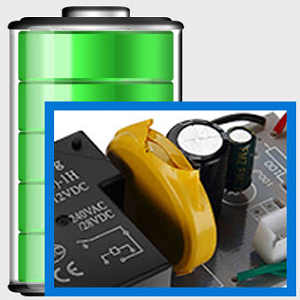
Figure 2: Internal components showing the high-precision chip and rechargeable backup battery.
3. Especificaciones
| Número de modelo | Akozonqegcgmk04u-01 |
| Vol de entradatage | 12 V CC / CA |
| Capacidad de salida | 25(16)A, 240 VCA |
| Consumo de energía | <1 W |
| Rango de tiempo | 1 minuto a 168 horas |
| Programas | 16 ON/OFF settings (daily/weekly) |
| Error de tiempo | <±2 seconds/day |
| Memoria de falla de energía | >12 months (with internal rechargeable battery) |
| Temperatura de funcionamiento | -20°C a 55°C |
| Método de instalación | Carril DIN |
| Dimensiones (aprox.) | 36 mm (ancho) x 86 mm (alto) x 65 mm (profundidad) |
| Peso (aprox.) | 120 gramos |
| Mostrar | Pantalla LCD |

Figura 3: Dimensiones detalladas del producto y especificaciones clave.
4. Información de seguridad
- Desconecte siempre la energía antes de la instalación o el mantenimiento.
- La instalación debe ser realizada por un electricista calificado para evitar descargas eléctricas o daños al dispositivo.
- Asegúrese de que el volumen de entradatage matches the timer's specifications (12V DC/AC). Connecting to incorrect voltagPodría dañar la unidad.
- Do not expose the device to excessive moisture or extreme temperatures outside the specified operating range.
- Do not disassemble the timer; refer servicing to qualified personnel.
5. Configuración e instalación
5.1 Instalación en riel DIN
The timer is designed for easy installation on a standard 35mm DIN rail. Simply clip the timer onto the rail in your distribution box.

Figura 4: Example of the timer installed on a DIN rail within a distribution box.
5.2 Instrucciones de cableado
Refer to the wiring diagram below for correct connection. Ensure all connections are secure and comply with local electrical codes.
- Terminales 1 y 2: Power input (12V DC/AC).
- Terminales 3, 4, 5: Output contacts.
- 3: Normalmente cerrado (NC)
- 4: Común (COM)
- 5: Normalmente abierto (NO)

Figure 5: Detailed wiring diagram showing connections for power input and output contacts.

Figura 6: Examples of wiring methods, including direct load connection and connection via a contactor.
6. Instrucciones de funcionamiento
6.1 Initial Setup and Unlocking
- Upon first use, connect the timer to power (12V DC/AC).
- Presione el REINICIAR button to clear all previous settings and initialize the timer.
- The timer display may be locked. To unlock, press the C/R button four times. The lock icon will disappear from the display. If no operation occurs for 15 seconds, the timer will automatically lock again.
6.2 Configuración de la hora y el día actuales
After unlocking, set the current time and day:
- Presione el P button (Program button) once.
- Presione el D+ Botón para configurar el día actual de la semana (MO, MA, WE, TH, FR, SA, SU).
- Presione el H+ para configurar la hora actual.
- Presione el M+ para configurar el minuto actual.
- Presione el P Presione nuevamente el botón para salir del modo de ajuste de hora.

Figura 7: Primer plano view of the timer's control buttons.

Figure 8: Explanation of button functions and display elements, including day, hour, minute, and reset.
6.3 controles manuales
Presione el MANUAL C/R button to cycle through manual control modes:
- EN: La salida está continuamente encendida.
- COCHE: Timer operates according to programmed schedules.
- OFF: La salida está continuamente apagada.
Seleccionar AUTO for the timer to follow your programmed settings.
7. Programación de horarios de encendido y apagado
El temporizador admite hasta 16 programas de encendido/apagado. Siga estos pasos para configurar los horarios que desee:
- Presione el P Botón para acceder al modo de programación. La pantalla mostrará "1 ON".
- Prensa D+ Para seleccionar los días de este programa. Puede elegir un solo día, días laborables, fines de semana o todos los días.
- Prensa H+ para configurar la hora de encendido.
- Prensa M+ para configurar el minuto de encendido.
- Prensa P De nuevo. La pantalla mostrará "1 OFF".
- Prensa D+ to select the day(s) for this OFF program (usually the same as ON, but can be different).
- Prensa H+ para establecer la hora de APAGADO.
- Prensa M+ para configurar el minuto de apagado.
- Repita los pasos 1 a 8 para programas de encendido/apagado adicionales (hasta 16). Presione P to advance to the next program number.
- Para salir del modo de programación, presione el botón MANUAL C/R button. Ensure the timer is set to AUTO Modo para que se ejecuten los programas.
Note: If you need to cancel a program, press the C/R botón mientras viewing the specific ON or OFF program. This will clear the settings for that program.
8. Aplicaciones
The Akozon Digital Programmable Timer is versatile and can be used in various applications, including:
- Controlling lamps and lighting systems (e.g., streetlights, garden lights, neon signs).
- Managing water heaters and preheaters.
- Automating agricultural facilities (e.g., irrigation systems).
- Controlling broadcasting equipment.
- Scheduling household appliances.
- Operating sprayers and bottling equipment.

Figura 9: Examples of environments where the timer can be used, such as controlling outdoor lighting and industrial equipment.
9. Mantenimiento
- Mantenga el temporizador limpio y sin polvo. Utilice un paño suave y seco para limpiarlo.
- No utilice limpiadores abrasivos ni disolventes.
- Asegúrese de que haya una ventilación adecuada alrededor del dispositivo para evitar el sobrecalentamiento.
- The internal battery is designed for long-term backup. If the timer consistently loses time or program settings after a power outage, the internal battery may need professional inspection.
10. Solución de problemas
| Problema | Posible causa | Solución |
|---|---|---|
| La pantalla está en blanco. | No hay fuente de alimentación o batería interna agotada. | Check power connections. Allow time for the internal battery to charge (connect to power for several hours). |
| El temporizador no responde al presionar los botones. | Timer is locked. | Presione el C/R button four times to unlock. |
| Los programas no se están ejecutando. | El temporizador no está en modo AUTO. Configuración incorrecta del programa. | Prensa MANUAL C/R hasta que aparezca "AUTO". Review y la configuración correcta del programa. |
| La hora o las configuraciones se pierden después de un corte de energíatage. | Internal backup battery is not charging or is depleted. | Ensure the timer is connected to power for sufficient time to charge the internal battery. If the issue persists, contact customer support. |
| Output is always ON or OFF, ignoring programs. | El temporizador está en modo de encendido o apagado manual. | Prensa MANUAL C/R until "AUTO" is displayed. |
11. Garantía y soporte
Akozon products are manufactured to high-quality standards. For warranty information or technical support, please refer to the contact details provided with your purchase or visit the official Akozon websitio.
Conserve su comprobante de compra para reclamos de garantía.