1. Introducción
The DENALI SoundBomb Split Dual-Tone Air Horn is an advanced acoustic warning device designed for motorcycles, offering a powerful 120dB sound output at approximately 1 meter. Its unique split design allows the compressor and acoustic unit to be mounted separately, providing greater installation flexibility, especially for vehicles with limited space. This manual provides essential information for the proper installation, operation, and maintenance of your SoundBomb Split horn.
2. Información de seguridad
Please read and understand all safety instructions before installing and operating the horn. Failure to do so may result in product damage, property damage, or personal injury.
- Desconecte siempre la batería del vehículo antes de realizar cualquier trabajo eléctrico.
- Asegúrese de que todas las conexiones eléctricas estén seguras y adecuadamente aisladas para evitar cortocircuitos.
- Mount the horn and compressor in locations that do not obstruct vehicle controls or airflow.
- Avoid prolonged exposure to the horn's sound, as it can cause hearing damage.
- If you are unsure about any installation steps, consult a qualified motorcycle technician.
3. Contenido del paquete
Verifique que todos los componentes enumerados a continuación estén presentes en su paquete:
- DENALI SoundBomb Acoustic Unit
- DENALI SoundBomb Air Compressor
- 3-foot (approx. 1 meter) Air Hose
- Relé de 12 V 30 A
- Bridas para cables
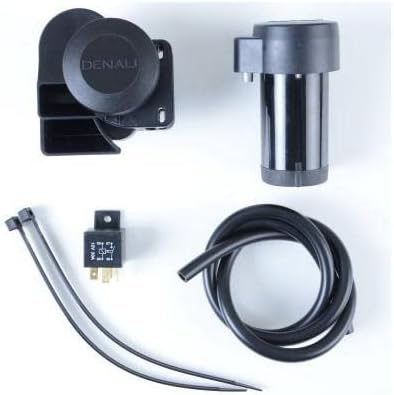
This image displays all the components included in the DENALI SoundBomb Split Dual-Tone Air Horn kit. Visible are the main acoustic horn unit, the separate air compressor, a flexible hose to connect them, a 12V relay for electrical connection, and several cable ties for mounting and wire management.
4. Configuración e instalación
The DENALI SoundBomb Split horn is designed for flexible installation. The compressor can be mounted up to 3 feet (approximately 1 meter) away from the acoustic unit, allowing for optimal placement on various motorcycle models, including those with fairings or limited space.
4.1. Montaje
- Identify suitable mounting locations for both the acoustic unit and the compressor. Ensure they are protected from direct water spray and road debris.
- Securely mount the acoustic unit and compressor using appropriate hardware (not included, unless specified).
- Connect the acoustic unit to the compressor using the provided 3-foot air hose. Ensure a tight seal to prevent air leaks.
4.2. Conexión eléctrica
- The SoundBomb horn requires a 12V power source and draws 20A. It is compatible with CANbus electrical systems.
- Utilize the included 12V 30A relay for proper power management and to protect your motorcycle's electrical system.
- Connect the horn's wiring to the relay according to the relay's diagram. Typically, this involves connecting to a switched 12V source, ground, and the horn trigger wire from your motorcycle's existing horn button.
- Asegúrese de que todas las conexiones estén bien engarzadas y aisladas con tubo termorretráctil o cinta aisladora.
- Once all connections are made, re-connect the vehicle's battery.
For detailed wiring diagrams, please refer to the specific instructions provided with your relay or consult a professional.
5. Instrucciones de funcionamiento
Once properly installed, the DENALI SoundBomb Split horn operates like your motorcycle's standard horn. Simply press your motorcycle's horn button to activate the SoundBomb. The horn will produce its loud, dual-tone sound as long as the button is pressed.
6. Mantenimiento
The DENALI SoundBomb Split horn is designed for durability and requires minimal maintenance.
- Periodically inspect all mounting points and electrical connections to ensure they remain secure.
- Keep the horn and compressor free from excessive dirt and debris. Clean with a damp paño según sea necesario.
- Do not attempt to disassemble the horn or compressor, as this may void the warranty and damage the unit.
7. Solución de problemas
If you experience issues with your SoundBomb Split horn, refer to the following common troubleshooting steps:
| Problema | Posible causa | Solución |
|---|---|---|
| La bocina no suena | No power to the horn/relay; Blown fuse; Loose electrical connection; Faulty relay. | Check fuse in the horn circuit; Verify 12V power at the relay and horn; Inspect all wiring connections; Test or replace the relay. |
| Horn sounds weak or inconsistent | Air leak in hose connection; Low voltage; Compressor issue. | Check air hose connections for leaks; Ensure battery voltage is adequate; Contact support if compressor is suspected faulty. |
| Horn sounds continuously | Stuck horn button; Faulty relay. | Check motorcycle horn button for proper operation; Test or replace the relay. |
8. Especificaciones
| Característica | Detalle |
|---|---|
| Salida de sonido | 120dB at 3 feet (approx. 1 meter) |
| Consumo de corriente | 20A |
| Dimensiones del compresor | 114.3 x 73.66 x 76.2 mm (4.5 x 2.9 x 3.0 pulgadas) |
| Acoustic Unit Dimensions | 104.14 x 93.98 x 86.36 mm (4.1 x 3.7 x 3.4 pulgadas) |
| Diseño | All-black, compact, CANbus compatible |
| Origen | Designed in USA, Manufactured in Italy |
9. Garantía y soporte
For information regarding warranty coverage and technical support, please refer to the documentation provided at the time of purchase or visit the official DENALI webSitio. Conserve su comprobante de compra para reclamaciones de garantía.