
1. Introducción
Thank you for choosing the XTUGA MRV122FX 12-Channel Audio Mixer. This professional mixing console is designed for high-quality audio performance in various settings, including live gigs, studio recording, and DJ events. It features an ultra-low noise design, advanced microphone preamplifiers, a built-in digital effects processor, Bluetooth connectivity, and USB playback/recording capabilities. This manual provides detailed instructions to help you set up, operate, and maintain your mixer for optimal performance.

Imagen 1.1: Frente view of the XTUGA MRV122FX 12-Channel Audio Mixer, showcasing all controls and input/output sections.
2. Características principales
- Diseño de ruido ultrabajo: Engineered for the highest possible headroom and minimal noise interference.
- Studio-Grade XDR2 Mic Preamps: Equipped with 6-16 Extended Dynamic Range mic preamplifiers, offering a 60dB gain range, 130dB dynamic range, and +22dBu line input handling.
- Poder fantasma: +48V phantom power available for condenser microphones.
- Ecualizador de canal: 4-band active EQ on mono channels (High, Mid-high, Mid-low, Low) and 2-band EQ on stereo channels. Includes an 18dB/octave, 75Hz Lo-Cut filter on mic channels.
- Built-in Digital Effects Processor: Features 16 high-quality 24-bit DSP effects with Tap Tempo functionality.
- Multi-format Play Support: Integrated Bluetooth for wireless audio streaming from mobile devices, and a digital display MP3 player with U-DISK input and recording (REC) function.
- Two-Way USB Function: Allows music playback via USB and connection to a computer for recording.
- Construcción robusta: Ultra-fashion all-metal chassis design for durability and high-density dust resistance.
- Fuente de alimentación universal: multivol.tage power supply (100-240V) for worldwide use.
- Dual 7-Band Stereo Graphic Equalizer: For precise overall mix adjustment.
3. Configuración
3.1 Desembalaje y colocación
Carefully remove the mixer from its packaging. Inspect the unit for any signs of damage. Place the mixer on a stable, flat surface, ensuring adequate ventilation around the unit.
3.2 Conexión de alimentación
Connect the provided power cable to the mixer's power input and then to a suitable AC power outlet (100-240V). Ensure the power switch is in the OFF position before connecting. The mixer is designed with a multi-voltage power supply for global compatibility.

Image 3.1: Rear panel of the mixer showing the 100-240V power input and fuse holder.
3.3 Conexión de entradas
The MRV122FX features 12 input channels, including 10 mono microphone/line inputs and 2 stereo line inputs (channels 9/10 and 11/12). Channels 1-8 are mono inputs with XLR and 1/4" TRS/TS jacks.
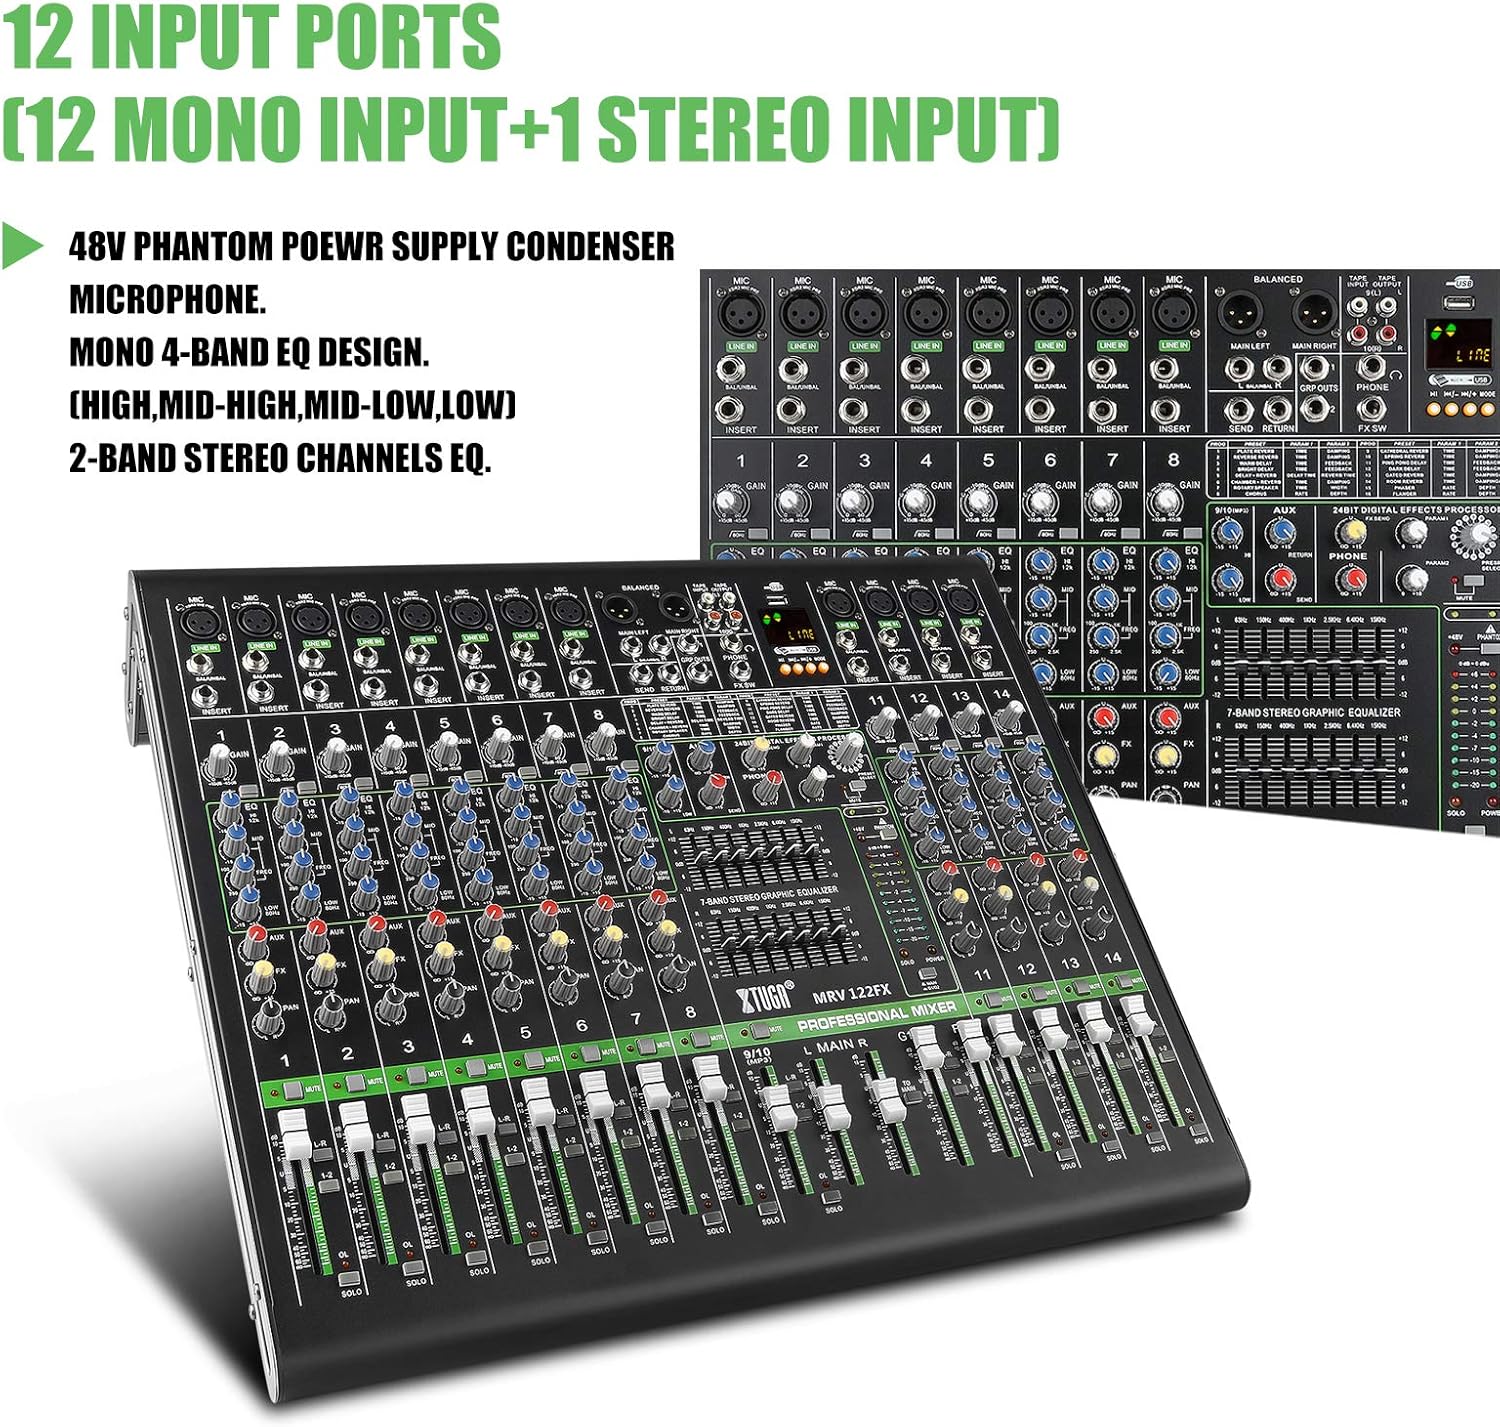
Image 3.2: Close-up of the mixer's input section, highlighting the 12 input ports (10 mono, 2 stereo).
- Micrófonos: Connect dynamic or condenser microphones to the XLR inputs (channels 1-8). For condenser microphones, activate the +48V phantom power switch located near the master section.
- Dispositivos de nivel de línea: Conectar instrumentos (teclados, guitarras con preamplificador)amps), media players, or other line-level devices to the 1/4" TRS/TS LINE IN jacks on mono channels or the stereo LINE IN jacks on channels 9/10 and 11/12.
- Insertar puntos: Channels 1-8 include 1/4" TRS insert jacks for connecting external signal processors (e.g., compressors, gates) to individual channels.
3.4 Conexión de salidas
- Salidas principales: Connect your main PA system or recording interface to the MAIN L/R XLR or 1/4" TRS outputs.
- Envío AUX: Use the AUX SEND 1/4" output to connect to stagMonitores electrónicos o procesadores de efectos externos.
- Auriculares: Connect headphones to the PHONES 1/4" stereo jack for monitoring.
- Salida USB: Connect the USB port to a computer for digital audio recording.
4. Funcionamiento de la batidora
4.1 Channel Controls (Mono Channels 1-8)
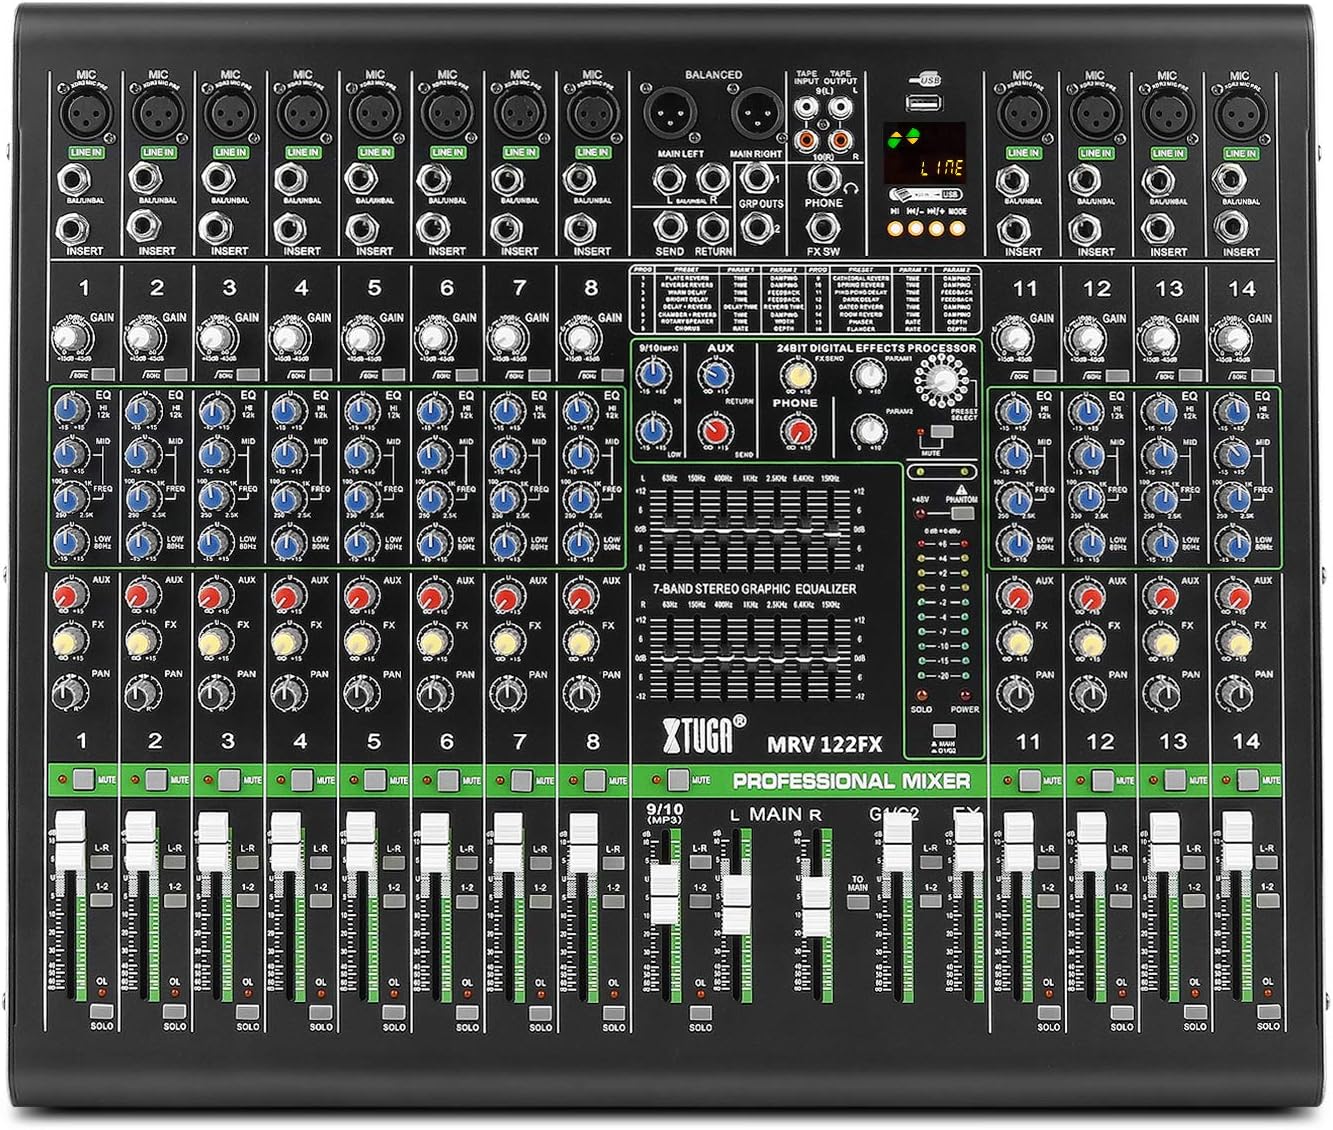
Imagen 4.1: Detallada view of a single channel strip, showing Gain, EQ, Aux, FX, Pan, Mute, and Fader controls.
- GANAR: Adjusts the input sensitivity for the microphone or line input. Set this to achieve a strong signal without clipping (the OL LED should flash only occasionally).
- EQ (High, Mid-high, Mid-low, Low): These four knobs allow you to shape the tone of the input signal. Adjust to enhance or cut specific frequencies.
- LO-CUT: Activates an 18dB/octave, 75Hz high-pass filter to remove unwanted low-frequency rumble.
- Auxiliar: Controls the amount of channel signal sent to the AUX SEND output.
- Efectos especiales: Controls the amount of channel signal sent to the internal effects processor.
- SARTÉN: Positions the channel signal within the stereo field (left to right).
- MUDO: Silences the channel.
- SOLO: Routes the channel signal to the headphones for isolated monitoring without affecting the main mix.
- Fader de canal: Ajusta el nivel de volumen general del canal en la mezcla principal.
4.2 Stereo Channels (9/10 and 11/12)
These channels are designed for stereo line-level inputs. They typically feature 2-band EQ, AUX, FX, BALANCE (instead of PAN), MUTE, SOLO, and a channel fader.
4.3 Controles de la sección maestra
- Faders L/R PRINCIPALES: Control the overall output volume of the main stereo mix.
- RETORNO AUXILIAR: Adjusts the level of the signal returning from an external effects processor connected to the AUX RETURN inputs.
- TELÉFONOS Nivel: Controla el volumen de la salida de auriculares.
- Ecualizador gráfico estéreo de 7 bandas: This equalizer allows for fine-tuning the overall frequency response of the main mix. Adjust the sliders to boost or cut specific frequency bands.

Image 4.2: Close-up of the 7-band stereo graphic equalizer, showing frequency bands and boost/cut controls.
4.4 Procesador de efectos digitales (DSP)

Image 4.3: Section of the mixer highlighting the 24-bit digital effects processor with 16 modes.
- Perilla de PROGRAMA: Rotate to select one of the 16 built-in DSP effects (e.g., Reverb, Delay, Chorus).
- Perilla de PARÁMETRO: Ajusta un parámetro específico del efecto seleccionado (por ejemplo, tiempo de caída para reverberación, tiempo de retardo para retardo).
- Nivel de efectos: Controls the overall volume of the effects return into the main mix.
- TEMPO DEL TOQUE: For time-based effects like delay, press this button repeatedly to set the tempo.
4.5 Bluetooth, MP3/USB Playback and Recording

Image 4.4: Close-up of the digital display and multimedia control section, including USB and Bluetooth functionality.
- Bluetooth: Activate Bluetooth on your mobile device and search for the mixer. Pair with the device to stream audio wirelessly. Use the dedicated controls on the mixer to manage playback.
- MP3 (U-DISK) Playback: Insert a USB flash drive (U-DISK) containing MP3 files into the USB port. Use the digital display and control buttons to navigate and play tracks.
- Función REC: The mixer supports recording directly to a USB flash drive. Refer to the digital display interface for recording options.
- Conexión USB a la computadora: Connect the mixer to a computer via USB to use it as an audio interface for recording or playback.
5. Mantenimiento
To ensure the longevity and optimal performance of your XTUGA MRV122FX mixer, follow these maintenance guidelines:
- Limpieza: Utilice un paño suave y seco para limpiar el exterior de la batidora. Evite usar limpiadores abrasivos, disolventes o ceras, ya que pueden dañar el acabado y los controles.
- Protección contra el polvo: Keep the mixer covered when not in use to prevent dust and debris from accumulating on the controls and inside the chassis.
- Condiciones ambientales: Opere y almacene el mezclador en un ambiente fresco y seco, alejado de la luz solar directa, temperaturas extremas y alta humedad.
- Seguridad eléctrica: Always disconnect the power cable before cleaning or if the unit will be unused for an extended period.
6. Solución de problemas
If you encounter issues with your XTUGA MRV122FX mixer, refer to the following common problems and solutions:
- Sin salida de sonido:
- Verifique todas las conexiones eléctricas y asegúrese de que el mezclador esté encendido.
- Verify that main faders and channel faders are raised.
- Ensure no MUTE buttons are active on channels or master.
- Verifique las conexiones a su ampAltavoces amplificados o amplificados.
- Confirm input sources are active and sending a signal.
- Distortion or Unclear Sound:
- Reduce the GAIN on input channels if the OL (Overload) LED is constantly lit.
- Lower the main output faders if the main meters are consistently in the red.
- Check all cables for damage or improper connection.
- La energía fantasma no funciona:
- Asegúrese de que el interruptor de alimentación fantasma de +48 V esté activado.
- Verify that condenser microphones are connected via XLR cables.
- Problemas de conectividad Bluetooth:
- Asegúrese de que Bluetooth esté habilitado tanto en el mezclador como en su dispositivo.
- Check that the mixer is in pairing mode.
- Move your device closer to the mixer to reduce interference.
- Digital Display Language (e.g., Chinese):
- Some units may default to a specific language. Check the digital display's menu options for a language setting. If no option is available, contact customer support for assistance.
7. Especificaciones
| Característica | Especificación |
|---|---|
| Número de modelo | MRV122FX |
| Número de canales | 12 |
| Peso del artículo | 8.89 kilogramos |
| Dimensiones del producto | 60 x 56 x 24 cm |
| Tecnología de conectividad | XLR, USB, Bluetooth |
| Fuente de poder | Eléctrico con cable (100-240 V) |
| Mic Input (Max) | 30 dBu |
| Line Input (Max) | 21 dBu |
| Mixer Rated Output (Main) | +4dBu |
| Frequency Response (Mic Input to Main Output) | +0-1 dB, <10Hz to 80KHz; +0-3 dB, <10Hz to 120KHz |
| EQ (each band) | ±15 dB |
| Procesador de efectos digitales | 24-bit, 16 FX settings |
8. Garantía y soporte
Para obtener información sobre la garantía, asistencia técnica o consultas de servicio, consulte la documentación incluida con su compra o póngase en contacto con su distribuidor. Conserve el comprobante de compra para cualquier reclamación de garantía.