
1. Introducción
This manual provides essential information for the safe and effective operation of your Skyking MECO-G R-2025THz Digital Auto-Ranging Clamp Meter. This True RMS meter is designed for measuring AC current up to 1000A, voltage, resistance, frequency, and temperature. Please read this manual thoroughly before use and retain it for future reference.
2. Información de seguridad
To ensure safe operation and avoid damage to the meter, observe the following safety precautions:
- Always adhere to safety regulations as per GB4793-1 and IEC 61010-1. This meter is rated for CAT III 600V and CAT II 1000V.
- No exceda los valores de entrada máximos especificados para cada función.
- Ensure test leads are properly connected to the correct input terminals before making any measurements.
- Inspect the meter, test leads, and accessories for any damage before each use. Do not use if damaged.
- Never attempt to measure current on circuits with voltagy excediendo la clasificación del medidor.
- Tenga mucho cuidado al trabajar con circuitos eléctricos activos.
3. Producto terminadoview
The Skyking MECO-G R-2025THz is a compact and versatile digital clamp Medidor. Los componentes clave incluyen:
- Cl actualamp Mandíbula: For non-contact AC current measurement. Features a 45mm jaw opening.
- Dial de función giratorio: Selects measurement functions (OFF, 1000A~, 600A~, 60A~, V, mV, Ω, Hz/Duty, Temp).
- Pantalla LCD: 3 digits, 6000 counts, True RMS readings. Includes backlight for low-light conditions.
- Botones de función: Includes buttons for Hz/Duty, Range, and Select.
- Terminales de entrada: Dedicated ports for 'V', 'COM', and 'Hz/°C°F Ω' test lead connections.
- Desencadenar: Located on the side for opening the clamp mandíbula.
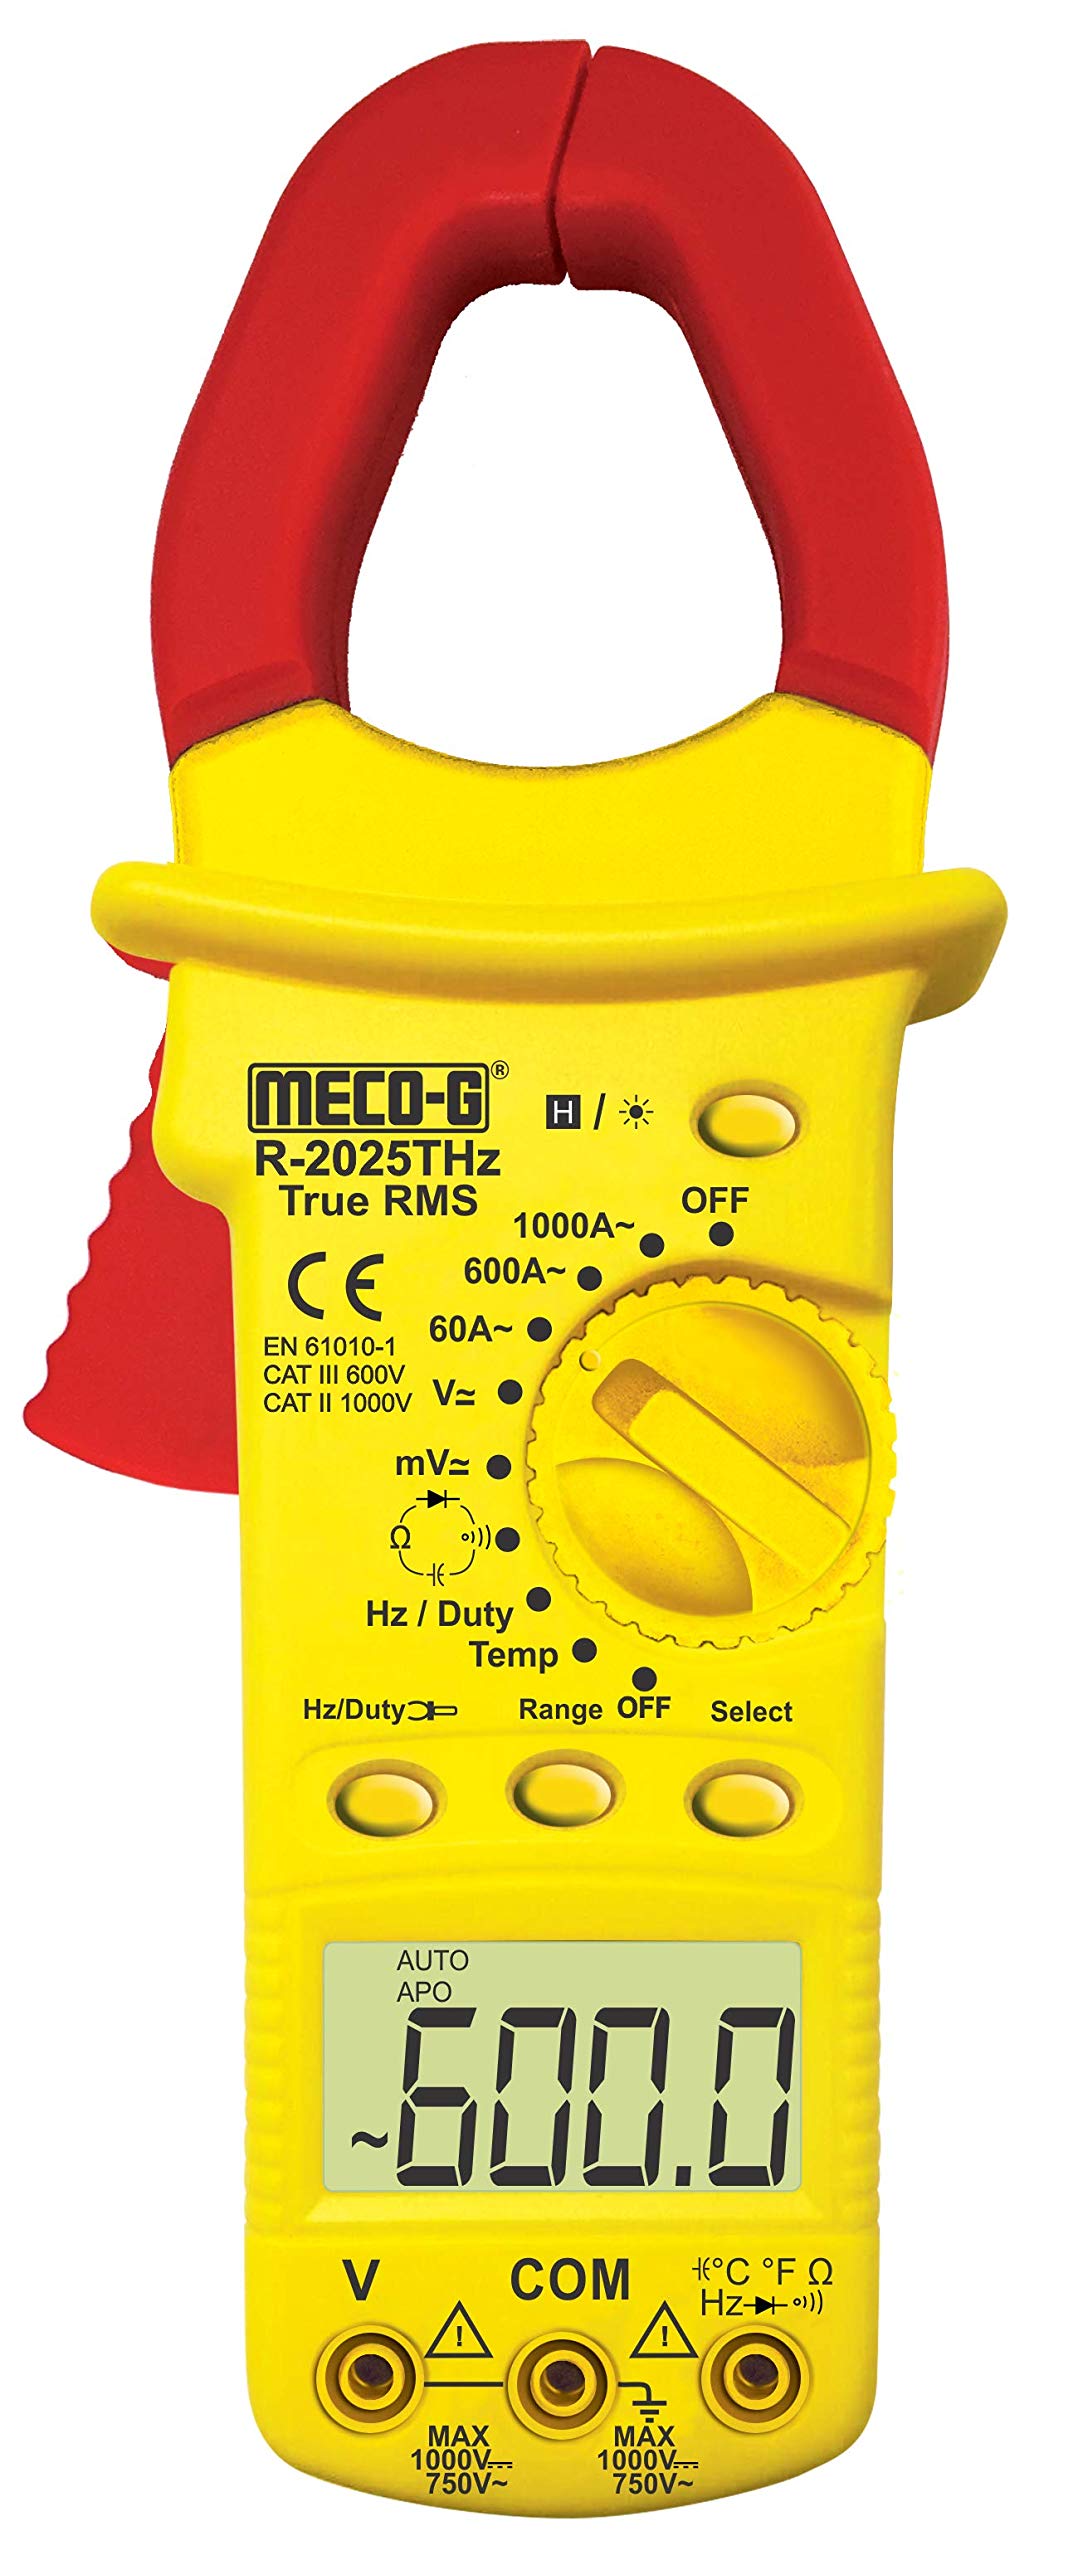
This image displays the main components of the clamp meter, including the current clamp, function selector dial, LCD display, and input jacks for test leads.
4. Configuración
Antes de usar el clamp meter, perform the following setup steps:
4.1. Instalación de la batería
- Asegúrese de que el medidor esté apagado.
- Localice la tapa del compartimiento de la batería en la parte posterior del medidor.
- Desatornille el/los tornillo(s) de retención y retire la cubierta.
- Insert the required batteries (not included) according to the polarity indicators inside the compartment.
- Vuelva a colocar la tapa de la batería y fíjela con el/los tornillo(s).
4.2. Conexión de los cables de prueba
Por voltage, resistance, frequency, and temperature measurements, connect the test leads as follows:
- Insert the red test lead into the 'V' or 'Hz/°C°F Ω' input terminal.
- Inserte el cable de prueba negro en el terminal de entrada 'COM' (común).
5. Instrucciones de funcionamiento
Follow these steps for various measurement functions:
5.1. Encendido y apagado
Rotate the function dial from the 'OFF' position to the desired measurement function to turn the meter ON. Rotate back to 'OFF' to power down. The meter features an Auto Power-Off function after 15 minutes of inactivity.
5.2. AC Current Measurement (1000A, 600A, 60A)
- Rotate the function dial to the '1000A~', '600A~', or '60A~' position.
- Presione el gatillo para abrir el clamp mandíbula.
- Rodee solo un conductor del circuito con el clamp mandíbula. Asegúrese de que la mandíbula esté completamente cerrada.
- Lea el valor de la corriente CA en la pantalla LCD.
5.3. Vol.tagMedición electrónica (V, mV)
- Conecte los cables de prueba como se describe en la Sección 4.2.
- Rotate the function dial to the 'V' or 'mV' position.
- Toque las sondas de prueba en los puntos de prueba deseados en el circuito.
- Leer el vol.tage value on the LCD display. Use the 'Select' button to switch between AC and DC voltage si aplica.
5.4. Medición de resistencia (Ω)
- Conecte los cables de prueba como se describe en la Sección 4.2.
- Gire el dial de función a la posición 'Ω'.
- Asegúrese de que el circuito o componente bajo prueba esté desenergizado.
- Toque las sondas de prueba a través del componente o circuito para medir la resistencia.
- Lea el valor de resistencia en la pantalla LCD.
5.5. Frequency / Duty Cycle Measurement (Hz/Duty)
- Conecte los cables de prueba como se describe en la Sección 4.2.
- Rotate the function dial to the 'Hz/Duty' position.
- Touch the test probes to the desired test points.
- Press the 'Hz/Duty' button to toggle between frequency and duty cycle measurements.
- Lea el valor en la pantalla LCD.
5.6. Temperature Measurement (Temp)
- Connect the K-Type Thermocouple leads (included) to the 'V' and 'COM' input terminals, observing polarity.
- Rotate the function dial to the 'Temp' position.
- Coloque la sonda del termopar en el punto donde se va a medir la temperatura.
- Read the temperature value on the LCD display. Use the 'Select' button to switch between Celsius (°C) and Fahrenheit (°F).
5.7. Función de retención de datos
Press the 'Hold' button (if available, or 'Select' button may serve this function) to freeze the current reading on the display. Press it again to release the hold function.
5.8. Función de retroiluminación
Press the 'Back Light' button (if available, or 'Select' button may serve this function) to illuminate the LCD display for better visibility in dark environments. Press it again to turn off the backlight.
6. Mantenimiento
Un mantenimiento adecuado garantiza la longevidad y precisión de su clamp metro:
- Limpieza: Limpie el medidor casing con anuncioamp Paño. No utilice limpiadores abrasivos ni disolventes.
- Reemplazo de batería: When the low battery indicator appears on the display, replace the batteries promptly to ensure accurate readings. Refer to Section 4.1 for battery installation.
- Almacenamiento: If the meter is not used for an extended period, remove the batteries to prevent leakage. Store the meter in a dry environment, within the specified storage temperature range of -10°C to 50°C (14°F to 122°F).
7. Solución de problemas
Si tiene problemas con su clamp medidor, consulte los siguientes problemas y soluciones comunes:
- Sin pantalla: Check if the meter is turned ON. Verify battery installation and ensure batteries are not depleted. Replace batteries if necessary.
- Lecturas incorrectas: Ensure test leads are correctly connected. Verify that the correct measurement function and range are selected. Check for any damage to the test leads or meter.
- Meter Turns Off Automatically: This is a normal function (Auto Power-Off) designed to conserve battery life. The meter will turn off after 15 minutes of inactivity. Rotate the function dial to turn it back on.
8. Especificaciones
| Característica | Especificación |
|---|---|
| Mostrar | 3 Digits, 6000 Counts Trms |
| Apagado automático | 15 minutos de inactividad |
| Temperatura y humedad de funcionamiento | 0°C ~ 40°C (32°F ~ 104°F) & ≤ 80% RH |
| Temperatura y humedad de almacenamiento | -10 ° C ~ 50 ° C (14 ° F ~ 122 ° F) |
| Normas de seguridad | GB4793-1, IEC 61010-1, CAT II 600V, CAT III 1000V |
| Indicación de batería baja | Se muestra el icono de batería |
| Apertura de mandíbula | 45 mm |
| Dimensiones (L x An x Al) | 140 x 70 x 35mm (Approx.) |
| Peso | 180gms. Approx (With Battery) |
| Material | Metal |
| Fuente de poder | Funciona con pilas (pilas no incluidas) |
| Número de modelo | R-2025THz |
9. Garantía y soporte
Para obtener información sobre la garantía o asistencia técnica, consulte la documentación proporcionada al momento de la compra o póngase en contacto con su vendedor. Conserve el recibo de compra como comprobante.