1. Introducción
Thank you for choosing the lightmaXX LED PAR 54 54x 1W RGBW Spot. This manual provides essential information for the safe and efficient operation of your new lighting fixture. Please read this manual thoroughly before installation and use, and retain it for future reference.
The lightmaXX LED PAR 54 is a versatile and powerful LED spotlight designed for various stage, event, and decorative lighting applications. It features 54 x 1W RGBW LEDs, offering a wide spectrum of colors and effects.
2. Instrucciones de seguridad
- Seguridad eléctrica: Always connect the device to a grounded power outlet. Ensure the voltage matches the specifications of the unit. Disconnect from power before cleaning or servicing.
- Ventilación: Asegúrese de que haya suficiente ventilación alrededor de la unidad para evitar el sobrecalentamiento. No obstruya las aberturas de ventilación.
- Ambiente: This device is intended for indoor use only. Protect it from moisture, rain, and extreme temperatures.
- Manejo: Avoid direct eye exposure to the light source. Do not operate the unit if the power cord or housing is damaged.
- Uso profesional: Installation and operation should be performed by qualified personnel familiar with stagequipo de iluminación.
3. Contenido del paquete
Por favor, compruebe que todos los artículos estén presentes y en buen estado al desembalar:
- 1x lightmaXX LED PAR 54 54x 1W RGBW Spot
- 1x cable de alimentación
- 1x Manual de instrucciones (este documento)
4. Producto terminadoview
The lightmaXX LED PAR 54 is designed for robust performance and ease of use. Below are key visual references to help you identify components.

Figura 4.1: Frente view of the lightmaXX LED PAR 54, showing the array of 54 RGBW LEDs.

Figura 4.2: Lado view of the lightmaXX LED PAR 54, illustrating its compact design and adjustable mounting bracket.
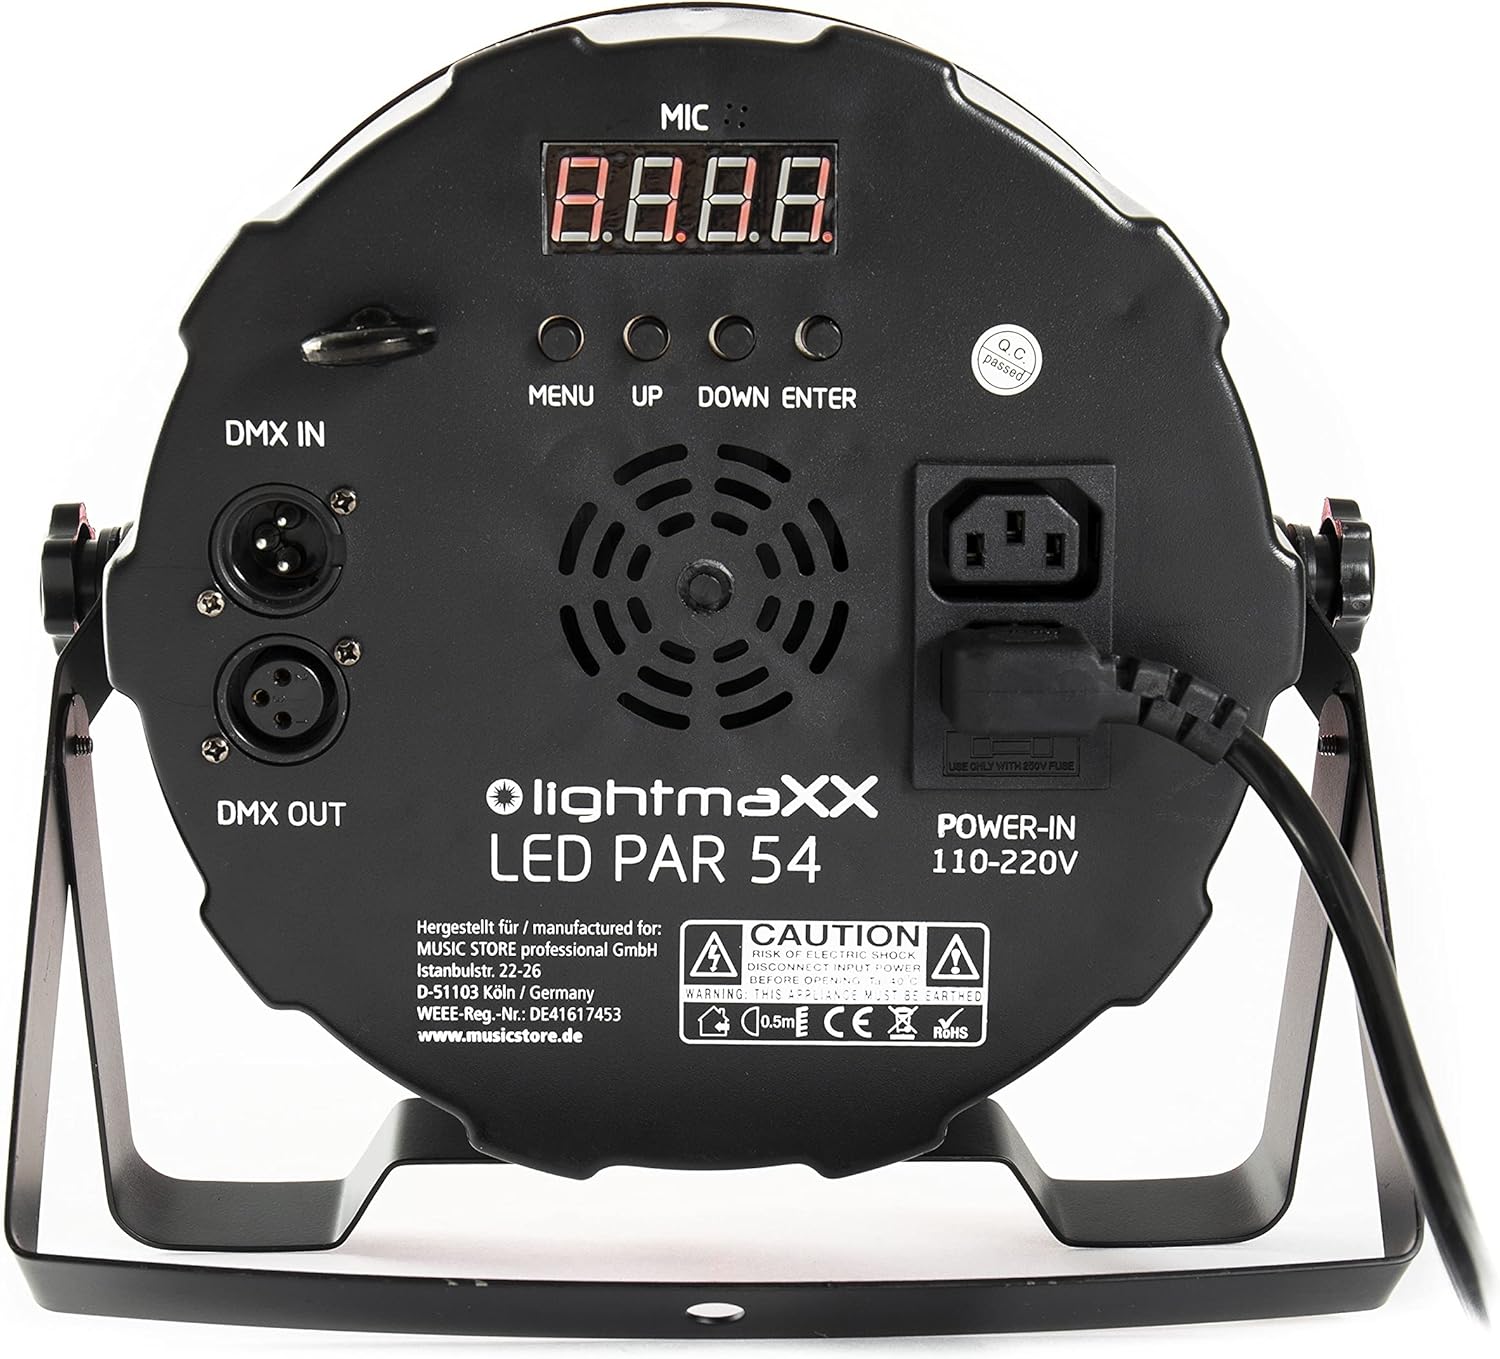
Figure 4.3: Rear panel of the lightmaXX LED PAR 54, featuring DMX In/Out, power input, and control buttons.

Figure 4.4: Close-up of the control panel, showing the digital display and 'MENU', 'UP', 'DOWN', 'ENTER' buttons for navigation.
5. Configuración
5.1 Montaje
The LED PAR 54 can be mounted in various positions using its adjustable bracket. Ensure the mounting surface or truss is capable of supporting the weight of the fixture. Always use a safety cable when suspending the unit overhead.
- Attach the mounting bracket securely to a truss or stand using appropriate clampS (no incluido).
- Adjust the angle of the fixture using the side knobs on the bracket.
- Secure the safety cable to the designated safety point on the fixture and to the mounting structure.
5.2 Conexión de alimentación
Connect the supplied power cable to the 'POWER-IN' socket on the rear panel of the fixture and then to a suitable 110-220V AC power outlet. Ensure the power source is stable and grounded.
5.3 Conexión DMX (opcional)
For DMX control, connect a DMX cable from your DMX controller's output to the 'DMX IN' socket on the first fixture. For multiple fixtures, daisy-chain them by connecting the 'DMX OUT' of the first fixture to the 'DMX IN' of the next, and so on. Terminate the last fixture in the chain with a DMX terminator if experiencing signal issues.
6. Operating the LED PAR 54
6.1 Funciones del panel de control
The rear control panel allows you to navigate through the menu and select operating modes and settings:
- MENÚ: Press to enter the main menu or to go back to the previous menu level.
- UP: Increases the value of a setting or moves up through menu options.
- ABAJO: Decreases the value of a setting or moves down through menu options.
- ENTRAR: Confirms the selected option or value.
Modos de funcionamiento de 6.2
The LED PAR 54 typically offers several operating modes:
- Modo automático: El dispositivo ejecuta espectáculos de luces preprogramados de forma automática.
- Modo activado por sonido: The light show reacts to ambient sound detected by the built-in microphone.
- Modo DMX: Allows external control of all functions (color, dimming, strobe, programs) via a DMX controller. Refer to the DMX chart in the specifications section for channel assignments.
- Modo de color estático: Select a fixed color using the RGBW mixing capabilities.
6.3 Color Mixing (RGBW)
The fixture uses Red, Green, Blue, and White LEDs to create a wide range of colors. In DMX mode, you can control the intensity of each color channel independently. In static color mode, you can often select preset colors or adjust RGBW values directly from the control panel.

Figure 6.1: The lightmaXX LED PAR 54 projecting a vibrant red light beam.
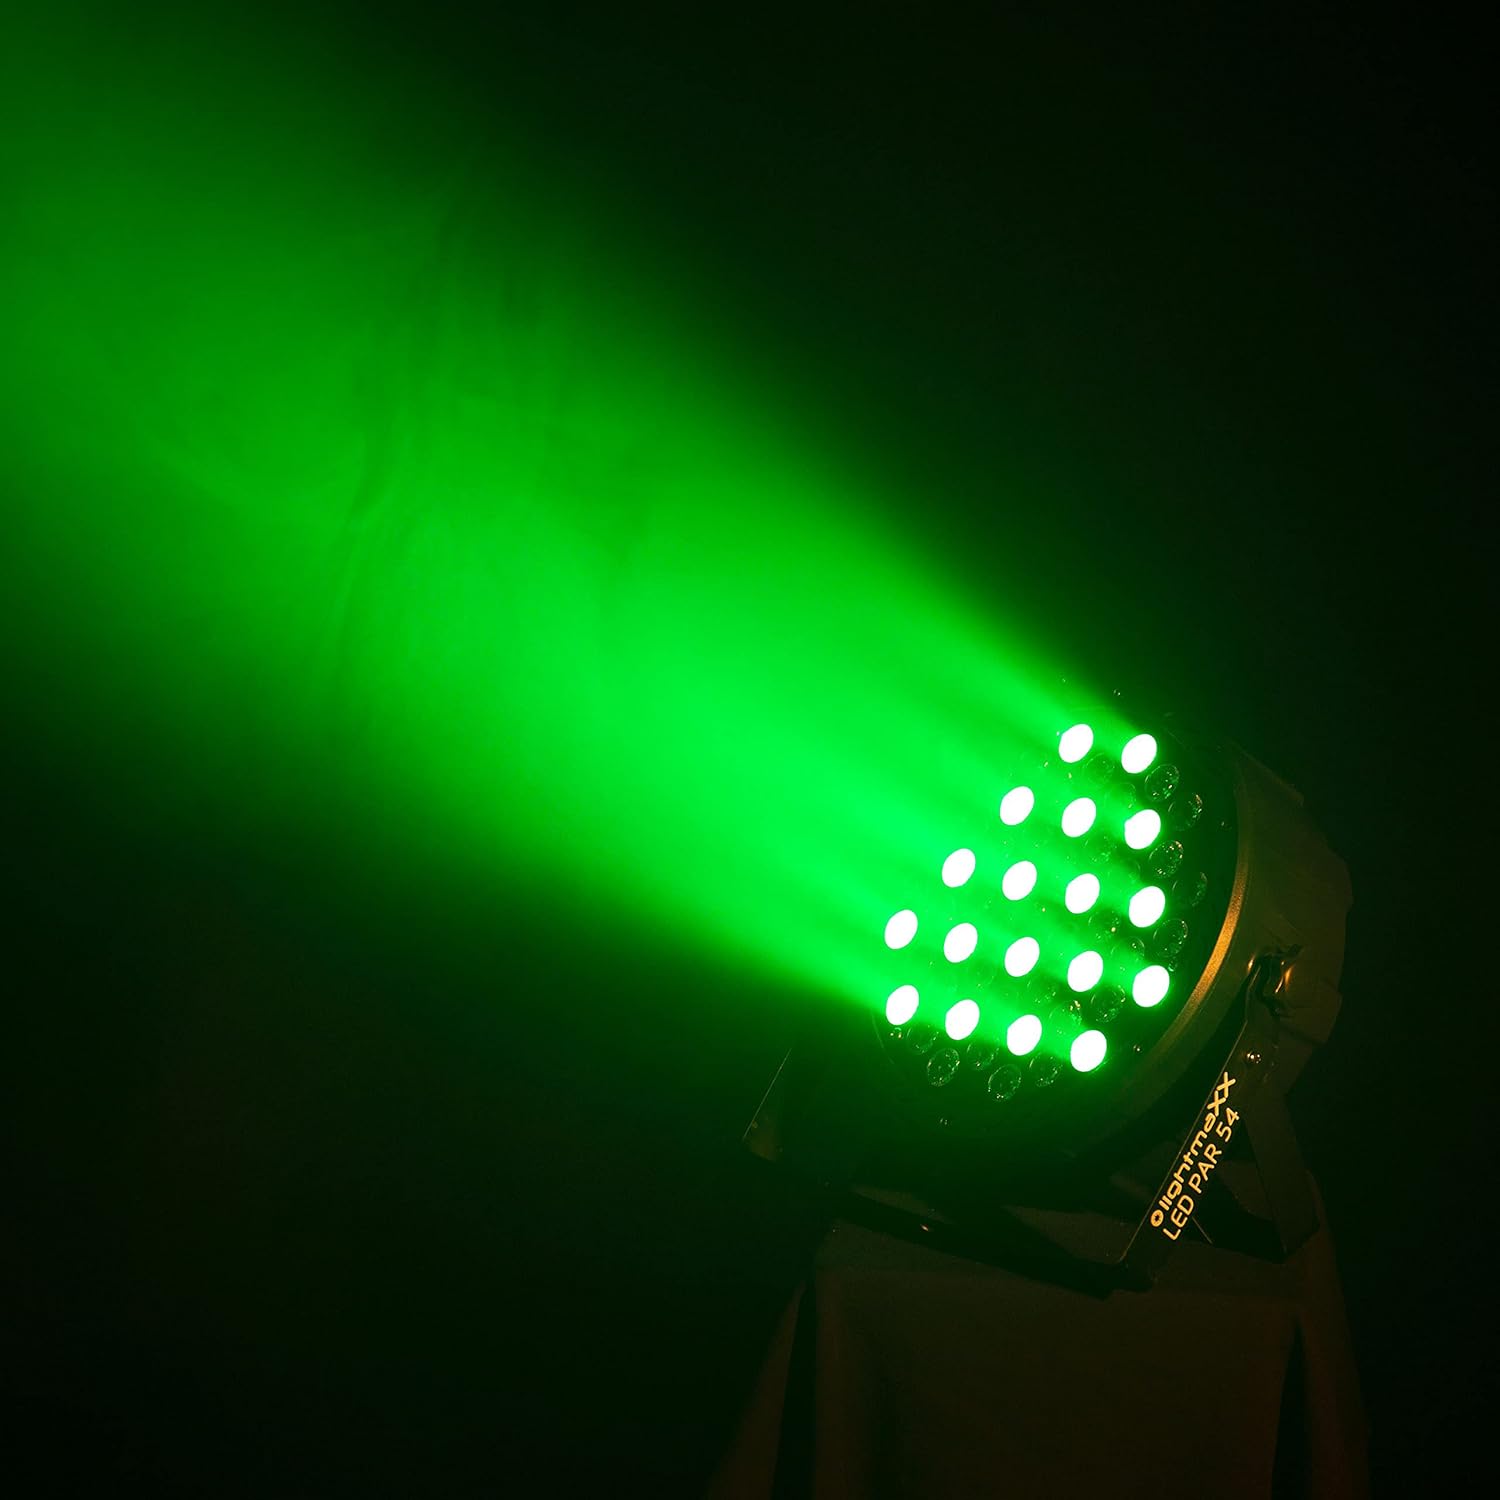
Figure 6.2: The lightmaXX LED PAR 54 projecting a bright green light beam.

Figure 6.3: The lightmaXX LED PAR 54 projecting a deep blue light beam.
6.4 Vídeos de productos
Watch these videos to see the lightmaXX LED PAR 54 in action and understand its various lighting effects.
Video 6.4.1: Demonstration of various color changes and effects of the LED PAR light. This video showcases the dynamic capabilities of the fixture in a stage ajuste.
Video 6.4.2: Another demonstration highlighting different color combinations and transitions of the LED PAR light. This video provides further insight into the fixture's versatility.
7. Mantenimiento
7.1 Limpieza
La limpieza regular ayuda a mantener una salida de luz óptima y prolonga la vida útil del artefacto.
- Desconecte la unidad de la alimentación antes de limpiarla.
- Use a soft, lint-free cloth to wipe the exterior and lens. Do not use abrasive cleaners or solvents.
- Limpie periódicamente las aberturas de ventilación para garantizar un flujo de aire adecuado.
7.2 Reemplazo de fusibles
If the unit does not power on, the fuse may need replacement. The fuse holder is located near the power input socket on the rear panel.
- Desconecte la unidad de la energía.
- Carefully open the fuse holder.
- Replace the old fuse with a new one of the exact same type and rating (e.g., 250V fuse as indicated on the unit).
- Cierre el portafusibles de forma segura.
8. Solución de problemas
If you encounter issues with your LED PAR 54, refer to the table below for common problems and solutions.
| Problema | Posible causa | Solución |
|---|---|---|
| Sin poder | Cable de alimentación desconectado, tomacorriente defectuoso, fusible quemado. | Check power connections, try a different outlet, replace fuse (see Section 7.2). |
| Sin salida de luz | Dimmer setting too low, incorrect mode, DMX signal issue. | Increase dimmer, select appropriate operating mode, check DMX connections and address. |
| Incorrect colors or flickering | DMX signal interference, incorrect DMX channel settings. | Ensure DMX cables are good quality, check DMX address and mode settings, try a DMX terminator. |
| Sobrecalentamiento de la unidad | Blocked ventilation, operating in high ambient temperature. | Clear ventilation openings, ensure adequate space around the unit, reduce ambient temperature if possible. |
9. Especificaciones
| Característica | Detalle |
|---|---|
| Marca | luzmaXX |
| Modelo | LEDPAR54 |
| Referencia del fabricante | LIG0015761-000 |
| Lamp Tipo | CONDUJO |
| Configuración de LED | 54 LED RGBW de 1 W |
| Características especiales | Cambio de color |
| Volumentage | 12 Volt (Operating range 110-220V AC) |
| Quétage | 60 vatio |
| Peso del artículo | 1.78 kilogramos |
| Temperatura de color | 6500 Kelvin (LED blancos) |
| Material | Aluminio |
| Color | Negro |
| Dimensiones del producto | 25.3 x 25.2 x 13.6 cm |
| País natal | Alemania |
| Número de artículos en el paquete | 1 |
10. Garantía y soporte
Para obtener información sobre la garantía y asistencia técnica, consulte la documentación incluida con su compra o póngase en contacto con su distribuidor. Conserve el comprobante de compra para cualquier reclamación de garantía.