
REY KB2415-1-B2-ECO
KING KB ECO2S Garage Heater 15000W/240V Instruction Manual
Model: KB2415-1-B2-ECO | Power: 15000W / 240V
1. Introducción
The KING KB ECO2S Garage Heater is designed to provide efficient and controlled heating for garages and similar large spaces. This unit features an integrated ECO2S electronic thermostat with remote control, offering energy-efficient 2-stage heating and an Eco mode that automatically adjusts wattage. It also includes fan-only and timer modes, along with an auto-memory feature to retain settings after power interruptions. Constructed with spiral steel elements and a high CFM fan, it ensures even air distribution and prolonged heater life. A universal wall/ceiling bracket is included for flexible installation.

Imagen: Frente view of the KING KB ECO2S Garage Heater, highlighting the control panel and heating elements.
2. Información importante de seguridad
ADVERTENCIA: Lea todas las instrucciones antes de instalar o usar este calentador. El incumplimiento de estas instrucciones podría provocar descargas eléctricas, incendios, daños materiales o lesiones personales.
- Always disconnect power before servicing or cleaning the heater.
- Este calentador se calienta cuando está en uso. Para evitar quemaduras, no permita que la piel expuesta toque superficies calientes.
- Mantenga los materiales combustibles, como muebles, almohadas, ropa de cama, papeles, ropa y cortinas al menos a 3 pies (0.9 m) del frente del calentador y manténgalos alejados de los lados y la parte trasera.
- No utilizar en exteriores.
- Este calentador no está diseñado para usarse en baños, áreas de lavandería y lugares interiores similares.
- No coloque el cable debajo de alfombras. No cubra el cable con tapetes, alfombras o cobertores similares. Coloque el cable lejos del área de tránsito y en un lugar donde nadie pueda tropezar con él.
- Enchufe siempre los calentadores directamente a un tomacorriente de pared. Nunca los utilice con un cable de extensión o una toma de corriente reubicable (tomacorriente o regleta).
- This heater is for 240V applications only. Ensure proper wiring and circuit breaker capacity.
- La instalación debe ser realizada por un electricista calificado de acuerdo con todos los códigos eléctricos locales y nacionales.
3. Contenido del paquete
The KING KB ECO2S Garage Heater package includes the following items:
- Calentador de garaje KING KB ECO2S
- Soporte universal para montaje en pared o techo
- Control remoto de mano
- Soporte de pared para control remoto
- Installation Hardware (lag bolts, nuts, etc.)
- Heavy-duty pigtail (for electrical connection)
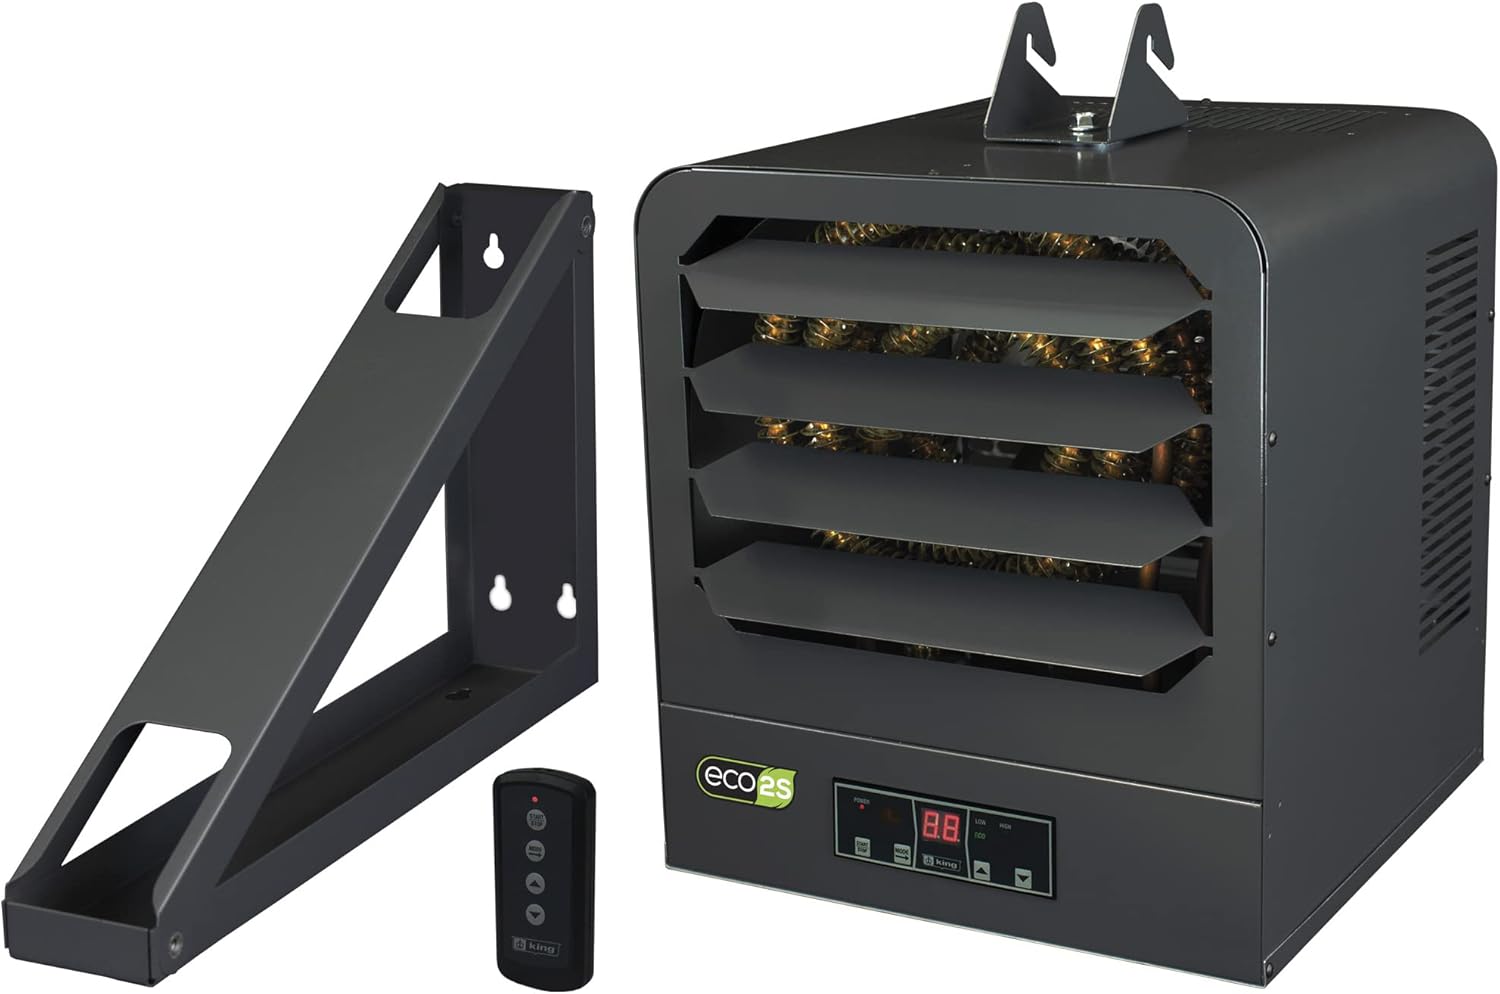
Image: KING KB ECO2S Garage Heater shown with its included mounting bracket and remote control.
4. Configuración e instalación
4.1 Montaje del calentador
The universal bracket allows for wall or ceiling mounting. Ensure the mounting surface can support the heater's weight (approximately 48 pounds) and is structurally sound. Use the provided lag bolts to secure the bracket to framing members.
- Attach the bracket to the heater using the large knobs on the sides.
- Adjust the heater's angle using the smaller knobs on the bracket. The heater can be tilted to four different positions to direct heat as needed.

Image: Diagram illustrating recommended garage coverage based on heater wattage. The 15000W model heats up to 1,500 sq ft.
4.2 Conexión eléctrica
ADVERTENCIA: La instalación eléctrica debe ser realizada por un electricista autorizado de acuerdo con todos los códigos eléctricos locales y nacionales.
- Ensure power is disconnected at the circuit breaker before beginning any wiring.
- Remove the access panel on the heater by loosening the Phillips screw.
- Remove the knockout on the side of the heater where the wiring will enter.
- Install the provided grommet with integral strain relief into the knockout hole.
- Connect the heavy-duty pigtail wires to the terminal block inside the heater:
- Black wire to L1 lug.
- Red wire to L2 lug.
- Green wire to the grounding screw.
- Ensure all wires are securely tightened and that no insulation is under the terminals.
- Tighten the strain relief nut to secure the pigtail and prevent damage to the wiring.
- Close the access panel and secure it with the Phillips screw.
- This 15000W, 240V unit requires a minimum of 8 AWG copper wire and a 40 Amp cortacircuitos.

Imagen: Trasera view of the heater with the wiring access panel open, showing the terminal block for electrical connections.
4.3 Ajuste del termostato
On the back of the heater, there is a toggle switch to select between the built-in thermostat and an external thermostat.
- Set the switch to "I" for the built-in thermostat (recommended for most users).
- Set the switch to "II" if you are using an external thermostat wired by an electrician.
- Incorrect setting of this switch will prevent normal operation.
4.4 Referencia de vídeo de instalación
The following video demonstrates the wiring and mounting process for a similar garage heater. While the model shown is 6000W, the general installation principles apply to the KING KB ECO2S heater.
Video: Installation guide for a 6000W garage heater, demonstrating wiring and mounting steps. Principles are similar for the KING KB ECO2S heater.
5. Instrucciones de funcionamiento
The heater features an intuitive control panel and a remote control for convenient operation.
5.1 Panel de control
Upon plugging in the unit, it will beep, indicating power and correct voltage. The control panel features a digital display and several buttons:
- Botón de encendido: Enciende y apaga la unidad.
- Botón de modo: Cycles through different heating modes:
- Bajo: Operates at a lower wattage.
- Modo ecologico: Automatically uses the lowest wattage needed to heat the room, optimizing energy efficiency.
- Solo ventilador: Circula el aire sin calentar.
- Alto: Operates at maximum wattage for rapid heating.
- Botones arriba / abajo: Ajuste la temperatura deseada.
- Botón del temporizador: Sets a timer for the heater to run for a predetermined length of time, after which it will automatically shut off.

Imagen: Frente view of the heater, showing the adjustable louvers for directing airflow.
5.2 control remoto
The compact remote control provides full functionality from a distance, allowing you to adjust settings without directly accessing the unit.
- Botón de encendido: Enciende y apaga la unidad.
- Botón de modo: Cycles through heating modes (Low, Eco, Fan Only, High).
- Temperatura arriba/abajo: Ajusta la temperatura deseada.
- Botón del temporizador: Establece el temporizador de funcionamiento.
The remote control is a convenient feature, especially when the heater is mounted high or in a hard-to-reach location.
6. Mantenimiento
WARNING: Always disconnect power at the main service panel before attempting any maintenance or cleaning.
- Limpieza: Limpie periódicamente el exterior del calentador con un paño suave.amp Paño. No utilice limpiadores abrasivos ni disolventes.
- Eliminación de polvo: Use a vacuum cleaner with a brush attachment to remove dust from the grilles and heating elements. Ensure the heater is completely cool before cleaning.
- Inspección: Regularly inspect the power cord and plug for any signs of damage. If damaged, do not use the heater and contact a qualified electrician for repair.
- Lubricación: The unit features a permanently lubricated motor and does not require additional lubrication.
7. Solución de problemas
| Problema | Posible causa | Solución |
|---|---|---|
| El calentador no enciende. | No llega energía a la unidad. Se disparó el disyuntor. Thermostat switch set incorrectly. | Compruebe la fuente de alimentación. Restablecer el disyuntor. Ensure thermostat switch on back is set to "I" for built-in thermostat. |
| El calentador no produce calor, pero el ventilador funciona. | Ajuste de temperatura demasiado bajo. Calentador en modo “Sólo ventilador”. | Increase desired temperature. Change mode to Low, Eco, or High. |
| El calentador se enciende y apaga con frecuencia. | Temperature setting too close to ambient temperature. Protección contra sobrecalentamiento activada. | Ajuste la configuración de temperatura. Ensure proper clearance around the heater. Clean dust from elements. |
| El control remoto no funciona. | Baterías agotadas. Obstrucción entre el control remoto y el calentador. | Reemplace las baterías del control remoto. Retire cualquier obstrucción. |
8. Especificaciones
| Característica | Detalle |
|---|---|
| Número de modelo | KB2415-1-B2-ECO |
| Marca | REY |
| Quétage | 15000 W |
| Volumentage | 240 voltios |
| Ampanhelo | 62.5 Amps |
| Tipo de habitación | Cochera |
| Tipo de montaje | Montaje en pared / Montaje en techo |
| Características especiales | Energy Efficient, Remote Control, 2-Stage Heating, Eco Mode, Timer, Fan Only Mode, Auto Memory, Built-In Fan Delay, Patented Smart Limit Protection |
| Peso del artículo | 48 libras |
| Dimensiones del producto | 25.5 x 19 x 21 pulgadas |
| Código Postal | 093319220443 |
9. Garantía y soporte
Para obtener información sobre la garantía, consulte la documentación incluida con su producto o visite el sitio web oficial de KING. website. For technical support, troubleshooting assistance, or to inquire about replacement parts, please contact KING customer service.
La información de contacto normalmente se puede encontrar en el fabricante. websitio o en el embalaje del producto.
Ask a question about this manual
Ask about setup, troubleshooting, compatibility, parts, safety, or missing instructions. Manuals+ will review the question and use this page’s manual context to help answer it.