1. Producto terminadoview
This manual provides instructions for the installation, operation, and maintenance of your Geekpure 10 Inch Reverse Osmosis Water Filter Housing. This housing is specifically designed as a replacement component for under-sink reverse osmosis (RO) and pre-filtration systems.
The clear housing allows for convenient visual inspection of the filter cartridge, helping you determine when a replacement is needed. When the PP sediment filter appears dark yellow or brown, it indicates it's time for replacement.
Número de modelo: RO5-FH10S
2. Qué incluye
El paquete incluye los siguientes componentes:
- 1 x Filter Housing (Clear Sump and White Cap)
- 2 x O-rings (one pre-installed, one spare)
- 1 x Filter Wrench
- 2 x Quick-Connect Fittings (1/4" BSP Thread)
- 1 juego de tornillos

Figure 2.1: Included components of the Geekpure RO Filter Housing.
3. Nota importante de compatibilidad
This filter housing is not a universal fit. Thread sizes and specifications can vary significantly between different brands of RO systems. If you are replacing an existing filter housing, it is crucial to ensure compatibility.
- If your existing RO system is no a Geekpure brand, the thread part and injection mold may be different. In such cases, you may need to replace the entire filter housing (top head and sump) together, or source a replacement housing directly from your original system's brand.
- Attempting to reuse the top head from a different brand with this sump may lead to leaks or improper fit.

Figure 3.1: Compatibility information for the RO Filter Housing.
4. Instrucciones de instalación
Follow these steps for proper installation of the filter housing:
- Cierre el suministro de agua: Locate and turn off the feed water valve to your RO system.
- Depressurize the system: Turn off the tank ball valve and open the faucet of your RO system to release pressure.
- Remove old housing: Use the provided filter wrench to unscrew and remove the old filter housing.
- Prepare new housing: Remove the new Geekpure filter housing from its packaging.
- Install filters: Place the appropriate filter cartridges into the housing according to your system's requirements (e.g., PP sediment, Granular Carbon, Carbon Block).
- Apply Teflon tape: For the inlet/outlet threads, wrap enough Teflon tape (3-5 layers) to ensure a watertight seal.
- Lubricar las juntas tóricas: Remove the O-rings from the cap and lubricate them with food-grade silicone lubricant. This helps create a tight seal and prevents leaks.
- Assemble housing: Carefully screw the clear sump onto the white cap, ensuring the O-ring is properly seated in its groove. Hand-tighten first, then use the filter wrench for a snug fit. Do not overtighten.
- Connect to system: Install the top head of the Geekpure filter housing to your RO system. Use the included quick-connect fittings if required.
- Compruebe si hay fugas: Slowly turn on the feed water valve and inspect for any leaks. If leaks occur, turn off the water, relieve pressure, and re-tighten the housing or re-apply Teflon tape/lubricant.

Figure 4.1: Filter housing replacement steps.

Figure 4.2: Using the filter wrench for installation and removal.
Notas de instalación:
- Ensure the water pressure is between 10-50 psi.
- Maintain a work temperature between 40-120°F (5-50°C).
- When installing housings, ensure they are level to prevent leaks.
- Consider installing a water hammer arrestor in your water line to absorb shock and vibration, protecting your plumbing system and filter housings.
Vídeo 4.1: Unboxing y másview of the Geekpure 10 Inch Reverse Osmosis Water Filter Housing components.
5. Operación
The clear design of this filter housing allows for easy monitoring of your filter cartridge's condition. Regularly inspect the sediment filter (typically the first stage in an RO system). When the filter material changes color to dark yellow or brown, it indicates significant sediment accumulation and signals that the filter needs to be replaced to maintain optimal water quality and system performance.
6. Mantenimiento
Cuidado de la junta tórica:
To prevent leaks and ensure a proper seal, always lubricate the O-rings with food-grade silicone lubricant during installation and every filter change. This helps the O-ring seat correctly and maintains its flexibility.
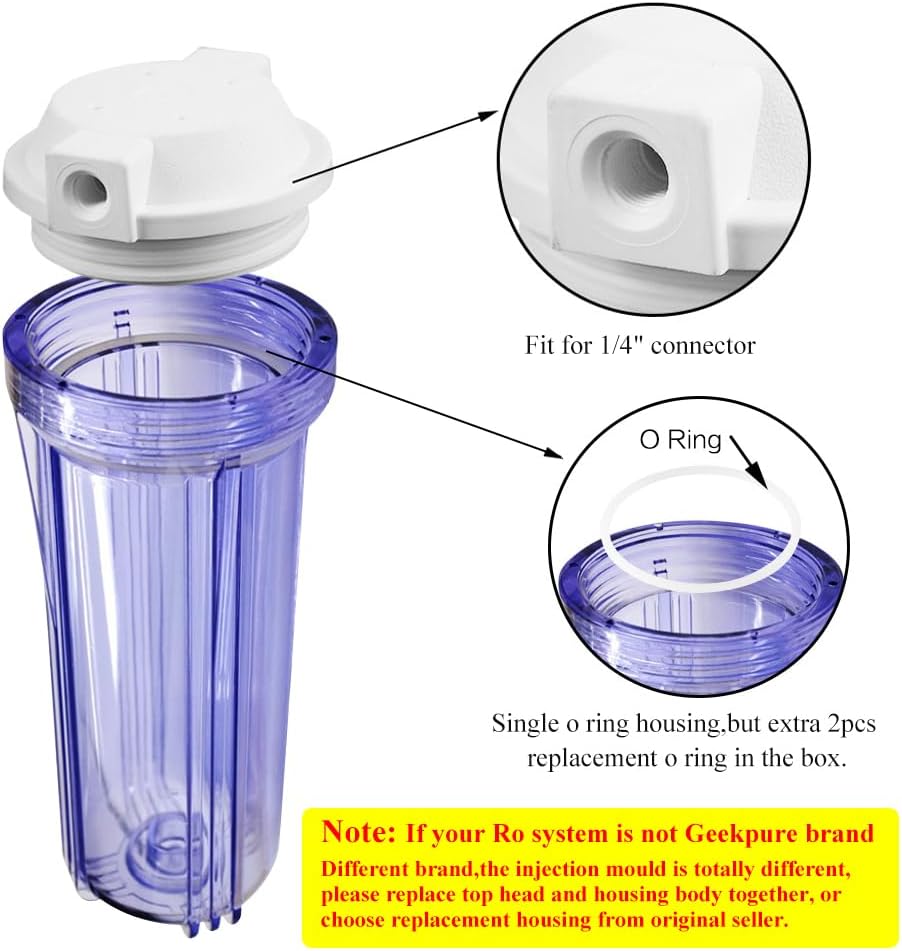
Figure 6.1: Proper O-ring placement and lubrication are essential for a leak-free seal.
Reemplazo del cartucho de filtro:
Replace filter cartridges according to the manufacturer's recommendations or when you observe a significant change in water flow or filter color. This housing fits standard 2.5" x 10" filter cartridges. Compatible filter cartridge options include:
- ASIN: B07LC7RXDB
- ASIN: B07LCDDYHQ
- ASIN: B07LCCJ9P5
- ASIN: B07L9XRCSC
- ASIN: B07LC9G584
- ASIN: B07BGRLFG4
- ASIN: B074XCYF93
- ASIN: B07BGXTY3B

Figura 6.2: Examples of compatible 2.5" x 10" filter cartridges.
7. Solución de problemas
Esta sección aborda problemas comunes que podrías encontrar:
- Leaks from threads: Ensure sufficient Teflon tape (3-5 wraps) is applied to all threaded connections. Re-tighten connections carefully with the wrench.
- Leaks from O-ring seal: Verify that the O-ring is properly seated in its groove and is not pinched or damaged. Apply food-grade silicone lubricant to the O-ring before assembly. Do not overtighten the housing, as this can deform the O-ring or crack the housing.
- Housing cracking or breaking: This can be caused by excessive water pressure or water hammer. Ensure your water pressure is within the recommended 10-50 psi range. Consider installing a water hammer arrestor to protect the system from sudden pressure spikes.
- Difficulty sealing: If the housing consistently leaks despite proper O-ring lubrication and Teflon tape, inspect the housing and cap for any manufacturing defects or cracks, especially around the threads or O-ring seating area.
8. Especificaciones
| Característica | Especificación |
|---|---|
| Número de modelo | RO5-FH10S |
| Material | Polipropileno (PP) |
| Dimensiones del producto (Pr. x An. x Al.) | 4.7" de profundidad x 4.7" de ancho x 11.6" de alto |
| Peso del artículo | 2 libras |
| Tamaño del puerto de entrada / salida | 1/4" Female BSP Thread |
| Compatible Filter Cartridge Size | 2.5" x 10" |
| Temperatura de trabajo | 40-120 °F (5-50 °C) |
| Presión laboral | 10-50 psi |
| Certificación de pruebas externas | Aseguradora de calidad del agua |
| Código Postal | 610895385382 |


