1. Introducción
The MASTECH MS8260E is a versatile 2000-count digital multimeter designed for a wide range of electrical and electronic measurements. It features a large LCD display, non-contact voltage (NCV) detection, and capabilities for measuring AC/DC voltage, AC/DC current, resistance, capacitance, and inductance. This manual provides essential information for the safe and effective operation, maintenance, and troubleshooting of your device.
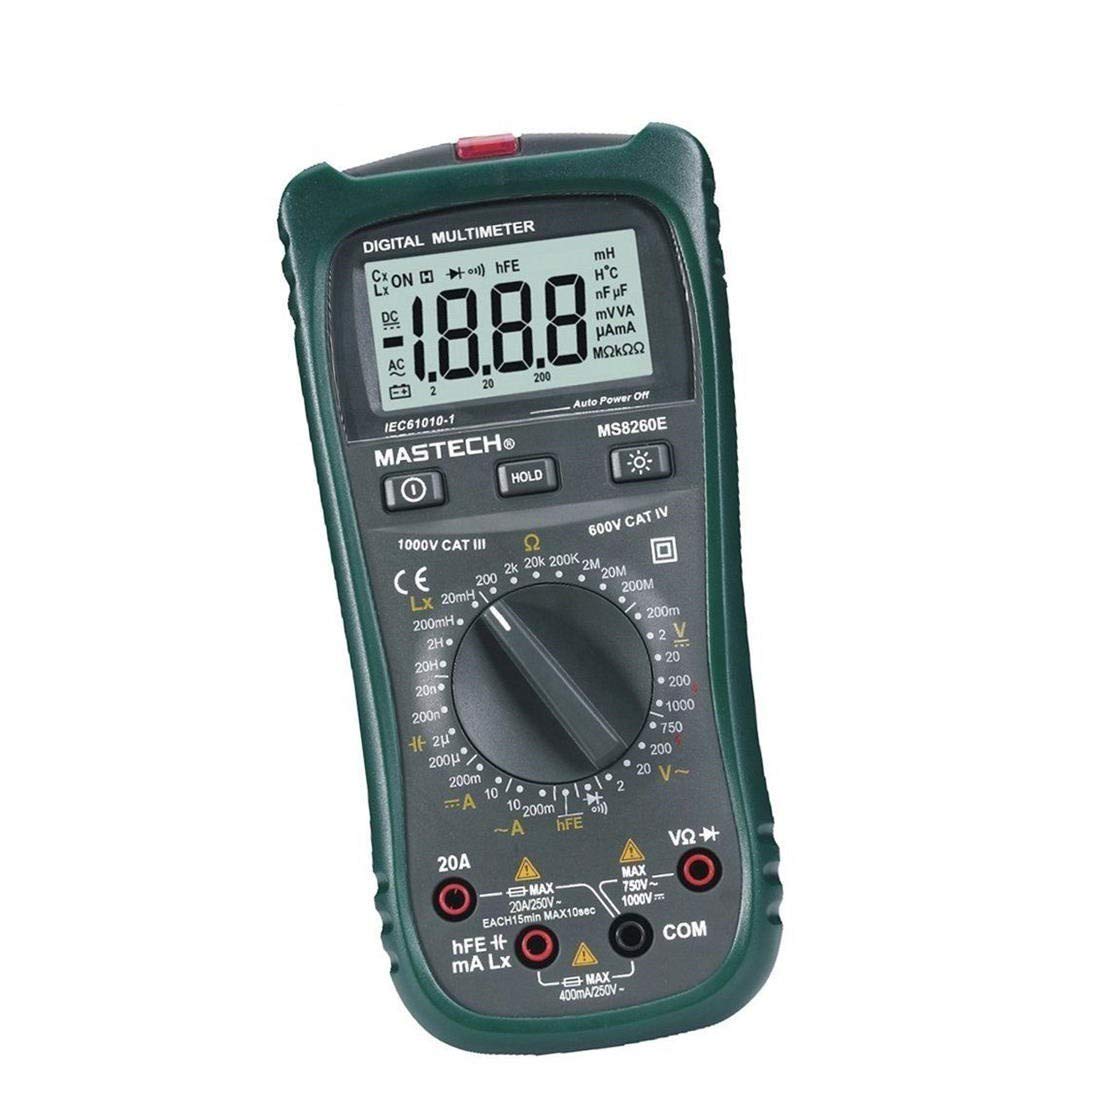
Figura 1: Frente view of the MASTECH MS8260E Digital Multimeter, showing the LCD display, function rotary switch, and input jacks.
2. Información de seguridad
Para garantizar el funcionamiento y servicio seguros del medidor, siga estas pautas de seguridad:
- Lea y comprenda todas las instrucciones de este manual antes de utilizar el medidor.
- Respete siempre los códigos de seguridad locales y nacionales.
- No utilice el medidor si parece dañado o si el aislamiento de los cables de prueba está comprometido.
- Observe the input limits for each measurement range to prevent electrical shock or damage to the meter. This meter is rated for CAT.IV 600V.
- Tenga cuidado al trabajar con vol.tages superior a 30 V CA RMS, 42 V pico o 60 V CC. Estos volúmenestagPueden suponer un riesgo de descarga eléctrica.
- Desconecte siempre la alimentación del circuito y descargue todas las baterías de alto voltaje.tage capacitors before making resistance, continuity, diode, or capacitance measurements.
- Reemplace la batería inmediatamente cuando aparezca el indicador de batería baja para garantizar lecturas precisas.
- No opere el medidor en entornos con gases, vapores o polvo explosivos.
3. Producto terminadoview
The MS8260E multimeter is equipped with several features to facilitate accurate and convenient measurements:
- Large 2000 Counts LCD Display: Provides clear digital readings.
- Volumen incorporado sin contactotagDetector e (NCV): Detecta el volumen de CAtage greater than 110V without physical contact, indicated by a flash warning.
- Función de retención de datos: Congela la lectura mostrada para facilitar el registro.
- Luz de fondo de la pantalla: Improves visibility in dimly lit conditions.
- Apagado automático: Conserves battery life by automatically turning off the meter after a period of inactivity.
- Indicación de batería baja: Alerta al usuario cuando es necesario reemplazar la batería.
- Indicación de polaridad: Automatically displays negative polarity.
- 30-Range Rotary Switch: Selects various measurement functions including AC/DC voltage, AC/DC current, resistance, capacitance, inductance, diode check, continuity test, and transistor (hFE) check.
4. Configuración
4.1 Instalación de la batería
The MS8260E requires one 9V battery (NEDA 1604/6F22). To install or replace the battery:
- Ensure the meter is turned off and disconnect all test leads from the input terminals.
- Localice la tapa del compartimiento de la batería en la parte posterior del medidor.
- Desatornille el/los tornillo(s) de retención y retire la cubierta.
- Insert the 9V battery, observing the correct polarity.
- Vuelva a colocar la tapa del compartimiento de la batería y fíjela con el/los tornillo(s).
4.2 Conexión de cables de prueba
Always connect the black test lead to the "COM" (common) input jack. Connect the red test lead to the appropriate input jack based on the desired measurement:
- para vol.tage, Resistance, Capacitance, Inductance, Diode, Continuity, and hFE measurements: Connect the red lead to the "VΩCAPHz" jack.
- For Current measurements up to 200mA: Connect the red lead to the "mA" jack.
- For Current measurements up to 10A: Connect the red lead to the "10A" jack.
Ensure test leads are fully inserted into the jacks before taking measurements.
5. Instrucciones de funcionamiento
Turn the rotary switch to the desired function. The meter will display "OL" (Overload) if no input is present or if the input exceeds the range.
5.1 Vol. CCtage Medición (DCV)
- Set the rotary switch to the desired DCV range (200mV, 2V, 20V, 200V, 1000V).
- Connect the black test lead to the "COM" jack and the red test lead to the "VΩCAPHz" jack.
- Conecte los cables de prueba al componente o circuito que se va a medir, observando la polaridad.
- Leer el vol.tage valor en la pantalla LCD.
5.2 Vol. CAtage Medición (ACV)
- Set the rotary switch to the desired ACV range (2V, 20V, 200V, 750V).
- Connect the black test lead to the "COM" jack and the red test lead to the "VΩCAPHz" jack.
- Conecte los cables de prueba a través del voltaje de CA.tagy fuente.
- Leer el vol.tage valor en la pantalla LCD.
5.3 Medición de corriente continua (DCA)
- Set the rotary switch to the desired DCA range (200mA, 10A).
- For measurements up to 200mA, connect the red lead to the "mA" jack. For measurements up to 10A, connect the red lead to the "10A" jack. The black lead connects to "COM".
- Abra el circuito donde se va a medir la corriente y conecte el medidor en serie con la carga.
- Lea el valor actual en la pantalla LCD.
5.4 AC Current Measurement (ACA)
- Set the rotary switch to the desired ACA range (200mA, 10A).
- For measurements up to 200mA, connect the red lead to the "mA" jack. For measurements up to 10A, connect the red lead to the "10A" jack. The black lead connects to "COM".
- Abra el circuito donde se va a medir la corriente y conecte el medidor en serie con la carga.
- Lea el valor actual en la pantalla LCD.
5.5 Medición de resistencia (Ω)
- Set the rotary switch to the desired Ω range (200Ω, 2kΩ, 20kΩ, 200kΩ, 2MΩ, 20MΩ, 200MΩ).
- Connect the black test lead to "COM" and the red test lead to "VΩCAPHz".
- Asegúrese de que el circuito esté desenergizado y que todos los capacitores estén descargados.
- Conecte los cables de prueba a través de la resistencia o componente.
- Lea el valor de resistencia en la pantalla LCD.
5.6 Capacitance Measurement (CAP)
- Set the rotary switch to the desired CAP range (20nF, 200nF, 2uF, 200uF).
- Connect the black test lead to "COM" and the red test lead to "VΩCAPHz".
- Asegúrese de que el capacitor esté completamente descargado antes de conectar los cables de prueba.
- Conecte los cables de prueba a través del capacitor.
- Lea el valor de la capacitancia en la pantalla LCD.
5.7 Inductance Measurement (L)
- Set the rotary switch to the desired Inductance range (20mH, 200mH, 2H, 20H).
- Connect the black test lead to "COM" and the red test lead to "VΩCAPHz".
- Conecte los cables de prueba a través del inductor.
- Read the inductance value on the LCD display.
5.8 Prueba de diodos
- Coloque el interruptor giratorio en el símbolo de diodo.
- Connect the black test lead to "COM" and the red test lead to "VΩCAPHz".
- Conecte el cable rojo al ánodo y el cable negro al cátodo del diodo. Un voltaje directotagSe mostrará la caída de tensión (normalmente entre 0.5 V y 0.8 V para diodos de silicio).
- Reverse the leads. The display should show "OL" for a good diode.
5.9 Prueba de continuidad
- Set the rotary switch to the Continuity symbol.
- Connect the black test lead to "COM" and the red test lead to "VΩCAPHz".
- Conecte los cables de prueba a través del circuito o componente.
- Si la resistencia es inferior a aproximadamente 30 Ω, sonará el zumbador, indicando continuidad.
5.10 Prueba de transistores (hFE)
- Coloque el interruptor giratorio en la posición hFE.
- Identify the type (NPN or PNP) and pinout (Emitter, Base, Collector) of the transistor.
- Insert the transistor leads into the corresponding sockets in the hFE test socket on the meter.
- Lea el valor hFE (ganancia de corriente CC) en la pantalla LCD.
5.11 vol. sin contactotagDetección de e (NCV)
- Coloque el interruptor giratorio en la posición NCV.
- Hold the top front part of the meter near the AC voltage fuente (por ejemplo, una toma eléctrica o un cable aislado).
- Si AC voltage greater than 110V is detected, the NCV indicator light will flash, and the buzzer may sound.
6. Mantenimiento
6.1 Limpieza
Limpie el medidor con publicidadamp Paño y detergente suave. No utilice abrasivos ni disolventes. Asegúrese de que el medidor esté seco antes de usarlo.
6.2 Reemplazo de batería
When the "BAT" symbol appears on the display, the battery needs to be replaced. Refer to Section 4.1 for battery installation instructions.
6.3 Reemplazo de fusibles
If the current measurement function fails, the fuse may need replacement. This operation should only be performed by qualified personnel. Refer to the service manual or contact customer support for fuse specifications and replacement procedures.
6.4 Almacenamiento
If the meter is not to be used for an extended period, remove the battery to prevent leakage and damage to the meter. Store the meter in a cool, dry place away from direct sunlight.
7. Solución de problemas
| Problema | Posible causa | Solución |
|---|---|---|
| No hay pantalla o la pantalla es tenue | Batería baja; Medidor apagado | Replace battery; Turn on meter |
| Se muestra "OL" | Input exceeds range; Open circuit (for resistance/continuity) | Select higher range; Check circuit connection |
| Lecturas incorrectas | Low battery; Incorrect range selected; Poor test lead contact | Replace battery; Select appropriate range; Ensure good contact |
| La medición actual no funciona | Fusible fundido | Replace fuse (by qualified personnel) |
8. Especificaciones
| Función de medición | Rango | Exactitud |
|---|---|---|
| Vol DCtagmi (DCV) | 200mV, 2V, 20V, 200V, 1000V | ±0.5% (200mV-200V), ±0.8% (1000V) |
| Vol. CAtage (ACV) | 2V, 20V, 200V, 750V | ±0.8% (2V-200V), ±1.2% (750V) |
| Corriente CC (DCA) | 200 mA, 10 A | ±1.5% (200mA), ±2.0% (10A) |
| Corriente CA (ACA) | 200 mA, 10 A | ±1.8% (200mA), ±3.0% (10A) |
| Resistencia (Ω) | 200Ω, 2kΩ, 20kΩ, 200kΩ, 2MΩ, 20MΩ, 200MΩ | ±0.8% (200Ω-2MΩ), ±1.0% (20MΩ), ±5.0% (200MΩ) |
| Capacitancia (CAP) | 20nF, 200nF, 2uF, 200uF | ±4.0% (20nF-2uF), ±5.0% (200uF) |
| Inductancia (L) | 20mH, 200mH, 2H, 20H | ±3.0% |
| Continuidad audible | Buzzer sounds at <30Ω | N / A |
| Prueba de diodo | 1mA, 2.8V | N / A |
| Transistor (hFE) | 0 - 1,000 | N / A |
Especificaciones generales:
- Mostrar: LCD de 2000 recuentos
- Clasificación de seguridad: CAT.IV 600V
- Fuerza: 9V battery (NEDA 1604/6F22)
- Peso: Aproximadamente 1 kg (incluida la batería)
9. Garantía y soporte
For warranty information, technical support, or service inquiries, please refer to the warranty card included with your product or visit the official Mastech website. Do not attempt to repair the meter yourself, as this may void the warranty and pose safety risks.