
Introducción
This instruction manual provides detailed guidance for the installation, operation, and maintenance of the Kohler 1227235 Canister Valve Assembly Service Kit. This kit is designed to replace worn or damaged components of your existing Kohler canister flush valve, restoring optimal performance to your toilet. Please read all instructions carefully before beginning installation.
Información de seguridad
- Cierre siempre el suministro de agua al inodoro antes de comenzar cualquier trabajo.
- Utilice equipo de protección personal adecuado, como guantes y protección para los ojos, durante la instalación.
- Asegúrese de que todas las conexiones estén seguras para evitar fugas.
- Si no está seguro de algún paso, consulte con un plomero calificado.
Contenido del paquete
Verifique que todos los componentes estén presentes antes de comenzar la instalación:
- Canister valve assembly components (specific parts may vary by kit, typically include seals, gaskets, and valve body parts).
- Instrucciones de instalación (este manual).
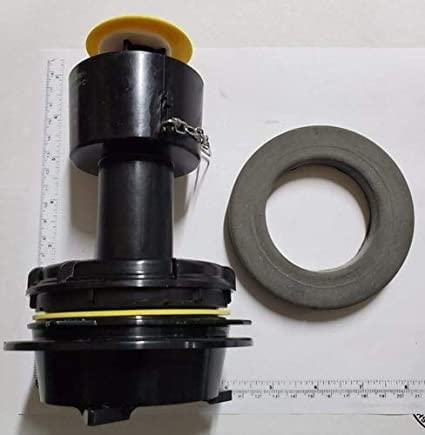
Figura 1: Example of Kohler 1227235 Canister Valve Assembly Service Kit components. Actual contents may vary slightly.
Configuración e instalación
This section outlines the steps for replacing the canister valve assembly. Tools typically required include a sponge or towel, and possibly a wrench for the water supply line.
- Cierre el suministro de agua: Locate the water supply valve for the toilet, usually on the wall behind or near the toilet. Turn the valve clockwise until the water supply is completely shut off.
- Inodoro con cisterna: Flush the toilet to drain the tank. Hold the flush lever down until as much water as possible has drained from the tank. Use a sponge or towel to remove any remaining water from the tank.
- Disconnect Supply Line (if necessary): If the canister valve assembly requires removal from the bottom of the tank, you may need to disconnect the water supply line from the fill valve. Place a small bucket underneath to catch any residual water.
- Remove Old Canister Valve Assembly: Depending on your specific Kohler toilet model, the canister valve assembly may twist off, unclip, or be secured by nuts from underneath the tank. Carefully follow the removal procedure for your toilet model. Remove all old gaskets and seals.
- Base del tanque limpio: Thoroughly clean the area where the canister valve assembly sits at the bottom of the toilet tank. Remove any mineral deposits or debris to ensure a proper seal with the new components.
- Install New Canister Valve Assembly: Assemble the new canister valve components according to the specific design of the Kohler 1227235 kit. Place new gaskets and seals as instructed. Carefully position the new assembly into the tank opening and secure it. Ensure it is seated correctly and tightened appropriately to prevent leaks, but do not overtighten.
- Reconnect Supply Line (if necessary): Reconnect the water supply line to the fill valve, ensuring a hand-tight connection, then a quarter turn with a wrench.
- Restablecer el suministro de agua: Slowly turn the water supply valve counter-clockwise to restore water to the toilet tank. Check for any leaks around the new assembly and the supply line connection.
- Prueba de descarga: Allow the tank to fill completely, then flush the toilet several times to ensure proper operation and check for any leaks or issues with the flush mechanism.
Funcionamiento (Comprobación posterior a la instalación)
After installation, proper operation is indicated by:
- The toilet tank filling to the correct water level without continuous running.
- A complete and efficient flush when the lever is actuated.
- No visible leaks from the tank or connections.
- The flapper or seal closing completely after a flush, preventing water from continuously flowing into the bowl.
Mantenimiento
Regular maintenance helps prolong the life of your canister valve assembly:
- Inspección periódica: Annually inspect the canister valve seal for wear, cracks, or mineral buildup.
- Limpieza: If mineral deposits accumulate, turn off the water, drain the tank, and gently clean the valve components with a soft brush and a mild, non-abrasive cleaner. Avoid harsh chemicals that can damage rubber seals.
- Reemplazo del sello: The flapper or seal is a wear item. If you notice the toilet running intermittently or ghost flushing, the seal may need replacement.
Solución de problemas
| Problema | Posible causa | Solución |
|---|---|---|
| Toilet runs continuously or "ghost flushes" | Worn or dirty canister seal; improper seating of the canister valve. | Inspect and clean the canister seal. If worn, replace the seal. Ensure the canister valve is properly seated and secured. |
| Descarga débil o incompleta | Low water level in tank; obstruction in flush valve. | Adjust the fill valve to ensure the tank fills to the correct water line. Check the canister valve for any obstructions. |
| Leaks from tank base | Improperly installed or damaged tank-to-bowl gasket; loose mounting nuts. | Turn off water, drain tank, and re-check the installation of the canister valve and tank-to-bowl gasket. Tighten mounting nuts if necessary, but do not overtighten. |
Presupuesto
| Número de modelo | 1227235 |
| Marca | Kohler |
| Material | Metal |
| Acabado exterior | Inconcluso |
| Tipo de conexión de entrada | Con rosca |
| Tipo de conexión de salida | TNP |
| Número de puertos | 2 |
| Tipo de válvula | Válvula de globo |
| Peso del artículo | 9.07 gramos |
| Código Postal | 885612296214 |
Garantía y soporte
For warranty information and technical support, please refer to the official Kohler webSitio web o contacte directamente con el servicio de atención al cliente de Kohler. Conserve su comprobante de compra para reclamaciones de garantía.
Kohler oficial Websitio: www.kohler.com