1. Introducción
This manual provides detailed instructions for the installation, operation, and maintenance of your Lorex D841A82B Series 8 Channel 4K HD Digital Video Recorder (DVR). This DVR is designed to provide high-resolution surveillance with advanced features such as 4K recording, person/vehicle detection, and smart home integration. Please read this manual thoroughly before using the product to ensure proper setup and functionality.
2. Contenido del paquete
Verify that all items listed below are included in your product packaging. If any items are missing or damaged, please contact Lorex customer support.
- Lorex D841A82B Series DVR
- Cable HDMI
- Adaptador de corriente
- Cable Ethernet
- Ratón USB
- Guía de inicio rápido (este manual)
3. Producto terminadoview

Figure 3.1: Front Panel of the Lorex D841A82B DVR. This image displays the front of the DVR unit, featuring the "4K Ultra HD DVR" label, a central circular button, and a USB port for connecting a mouse or other peripherals.

Figure 3.2: Side Panel with Ventilation. This image shows the side of the DVR, highlighting the ventilation grilles designed for heat dissipation, crucial for continuous operation.
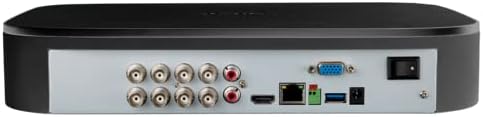
Figura 3.3: Conexiones del panel trasero. This image illustrates the rear panel of the DVR, displaying various input/output ports including BNC connectors for cameras, audio inputs/outputs, HDMI, VGA, Ethernet, USB ports, and the power input with an on/off switch.
4. Características principales
- Grabación 4K Ultra HD: Capable of recording up to 4K (8MP) resolution on all channels, providing detailed video footage.
- Detección de movimiento avanzada: Reduces false alarms with intelligent person and vehicle detection, sending push notifications when relevant motion is detected (available on up to 4 channels).
- Compatibilidad con hogares inteligentes: Integrates with Amazon Alexa and Google Assistant for hands-free voice control, and Chromecast for viewing live or recorded video on your TV.
- Lorex Home Mobile Application: Permite control remoto viewing and control of active deterrence features from a smartphone or tablet.
- Almacenamiento local: Equipped with a pre-installed 2TB security-grade hard drive, ensuring secure local storage without monthly cloud fees. Expandable up to 10TB.
- Búsqueda inteligente: Filter motion events to quickly review comidatage.
- Botón de pánico: Located on the DVR, activates lights and sirens on connected cameras for immediate response.
- Monitoreo 24/7: Designed for continuous operation and reliable surveillance.
5. Guía de configuración
5.1 Conexiones iniciales
- Conectar cámaras: Connect your analog HD security cameras to the BNC video input ports on the rear of the DVR. Ensure connections are secure.
- Conectarse al monitor: Use the provided HDMI cable to connect the DVR's HDMI output port to an HDMI input on your TV or monitor. Alternatively, use a VGA cable for VGA monitors.
- Conectar el ratón USB: Conecte el mouse USB incluido en uno de los puertos USB del DVR (frontal o trasero).
- Conectarse a la red (opcional pero recomendado): para control remoto viewing and smart features, connect the DVR to your router using the supplied Ethernet cable.
- Conecte la electricidad: Connect the power adapter to the DVR's power input and then plug it into a power outlet. Turn on the DVR using the power switch on the rear panel.
5.2 Asistente de configuración inicial
Upon first power-up, the DVR will guide you through a setup wizard. Follow the on-screen prompts to:
- Crea una contraseña segura.
- Configure los ajustes de fecha y hora.
- Set up network parameters (if not automatically detected).
- Adjust recording preferences.
It is crucial to complete these steps to ensure your system is secure and functioning correctly.
6. Instrucciones de funcionamiento
6.1 en vivo View
Después de la configuración inicial, el DVR mostrará la transmisión en vivo view from all connected cameras on your monitor.
- Cámara única View: Haga doble clic en cualquier señal de la cámara para view en pantalla completa. Haz doble clic de nuevo para volver a la multicámara. view.
- Zoom digital: En pantalla completa view, use the digital zoom function to magnify specific areas of interest.
6.2 Grabación y reproducción
The DVR is configured for continuous recording by default. You can adjust recording schedules and motion detection settings via the main menu.
- Acceder a reproducción: Haga clic derecho en el vivo view screen and select "Playback" from the menu.
- Search Footage: Use the date and time filters to locate specific recordings. The Smart Search feature allows filtering by motion events.
- Export Footage: Connect a USB flash drive to a USB port on the DVR to export selected video clips.
6.3 Lorex Home Mobile Application
Download the Lorex Home app from your smartphone's app store.
- Crea una cuenta e inicia sesión.
- Add your DVR by scanning the QR code displayed on the DVR's monitor (found in the network settings) or by manually entering the device ID.
- Una vez conectado, puede view live feeds, play back recordings, receive push notifications, and control active deterrence features remotely.
6.4 Integración de casas inteligentes
The Lorex D841A82B DVR supports integration with Amazon Alexa, Google Assistant, and Chromecast.
- Control de voz: Enable the Lorex skill/action in your smart home app (Alexa or Google Home). Use voice commands to view camera feeds on compatible smart displays or TVs (e.g., "Alexa, show me the front door camera").
- Chromecast: Link your Lorex account to Google Home and cast live or recorded video directly to a Chromecast-enabled display.
7. Mantenimiento
7.1 Administración del disco duro
The DVR's hard drive is designed for continuous operation. When the hard drive is full, the system will automatically overwrite the oldest recordings.
- Realice copias de seguridad periódicas de los alimentos importantes.tage a un dispositivo de almacenamiento externo.
- Verifique periódicamente el estado del disco duro a través de la configuración del sistema del DVR para garantizar un rendimiento óptimo.
7.2 Limpieza
To maintain the DVR's performance and longevity:
- Wipe the exterior of the DVR with a soft, dry cloth.
- Ensure ventilation openings are clear of dust and debris to prevent overheating. Do not use liquid cleaners or aerosol sprays directly on the unit.
7.3 actualizaciones de firmware
Lorex periodically releases firmware updates to improve performance and add new features. Check the Lorex support website for the latest firmware for your model and follow the provided instructions for updating.
8. Solución de problemas
If you encounter issues with your Lorex D841A82B DVR, refer to the following common troubleshooting steps.
| Problema | Posible causa | Solución |
|---|---|---|
| No hay salida de video en el monitor. | Cable HDMI/VGA suelto, entrada de monitor incorrecta, DVR no encendido. | Check cable connections. Ensure monitor is set to the correct input source. Verify DVR power. |
| No hay imagen de cámara. | Loose BNC cable, camera power issue, camera malfunction. | Check BNC connections. Ensure cameras are receiving power. Test camera with another channel or DVR if possible. |
| No se puede conectar a la aplicación Lorex Home. | No network connection, incorrect device ID, firewall settings. | Verify DVR is connected to the internet. Double-check device ID. Ensure router/firewall allows DVR access. |
| Las alertas de detección de movimiento son demasiado frecuentes o no funcionan. | Configuración de sensibilidad, configuración de la zona de detección. | Adjust motion detection sensitivity and detection zones in the DVR settings. Ensure person/vehicle detection is enabled for relevant channels. |
For further assistance, please contact Lorex customer support.
9. Especificaciones
| Característica | Detalle |
|---|---|
| Número de modelo | D841A82B |
| Canales de vídeo | Canal 8 |
| Resolución de grabación | Hasta 4K (8MP) Ultra HD |
| Tamaño del disco duro | 2 TB (preinstalado), ampliable hasta 10 TB |
| Tecnología de conectividad | Ethernet, HDMI |
| Dispositivos compatibles | Cameras, Smartphone, Tablet, Television |
| Dimensiones del producto | 13.25 x 16 x 5.5 pulgadas |
| Peso del artículo | 6.41 libras |
10. Cámaras compatibles
The D841B series DVR is compatible with a wide range of Lorex cameras. Below is a list of compatible camera models:
- LW2287, LW2297, LW4211B
- C841CA, LAB243
- LBV1511, LBV1521B, LBV2521, LBV2531, LBV2561U, LBV2711, LBV2723, LBV4711, LBV8531B, LBV8451XB, LBV8721AB
- LEV2750AB, LEV4712
- LZV2722, LZV2925
- C241XC-E, C241DA-E, C581CB, C581CD, C581DA, C861CF, C861CH, C861XC-E, C881DA, C882DA
11. Soporte y garantía
For technical support, product registration, and warranty information, please visit the official Lorex website or contact Lorex customer service directly. Keeping your product registered helps ensure you receive timely updates and support.
Lorex Websitio: www.lorex.com