Cecotec 05606
Manual de usuario del deshumidificador Cecotec Big Dry 4000 Expert
Modelo: 05606
1. Introducción
Gracias por la compraasing the Cecotec Big Dry 4000 Expert Dehumidifier. This manual provides important information for the proper use, maintenance, and troubleshooting of your appliance. Please read it thoroughly before operation and keep it for future reference.
Información de seguridad
- Coloque siempre el deshumidificador sobre una superficie plana y estable.
- Asegúrese de que haya una ventilación adecuada alrededor de la unidad. No bloquee las entradas ni las salidas de aire.
- No opere la unidad cerca del agua o en entornos excesivamente húmedos.
- Desenchufe la unidad antes de limpiarla o realizar cualquier mantenimiento.
- Mantener fuera del alcance de los niños y las mascotas.
- No inserte objetos en las rejillas de ventilación.
- Utilice únicamente la fuente de alimentación especificada.
2. Componentes del producto
Familiarize yourself with the main parts of your Cecotec Big Dry 4000 Expert Dehumidifier.

Figura 2.1: Frente view of the Cecotec Big Dry 4000 Expert Dehumidifier. This image shows the overall design of the dehumidifier, highlighting its compact and modern appearance with the Cecotec logo visible.

Figura 2.2: Lado view of the dehumidifier with the removable water tank. The image clearly indicates the location and design of the 2.5-liter water collection tank, which slides out for easy emptying.

Figura 2.3: Close-up of the top control panel. This view displays the LED screen showing humidity and temperature, along with touch controls for Timer, Setting, and Power functions.

Figura 2.4: Arriba view showing the air outlet. This image illustrates the dehumidifier's top grille where dry air is expelled, with visual cues of air circulation.
Componentes clave:
- Panel de control: LED display for humidity and temperature, touch buttons for various functions.
- Entrada/Salida de Aire: Ubicado en la parte posterior y superior para la circulación del aire.
- Tanque de agua: Depósito extraíble de 2.5 litros para recogida de agua condensada.
- Ruedas: Para una fácil portabilidad.
- Filtro de aire: Located at the air inlet, requires regular cleaning.
3. Configuración
- Desembalaje: Retire con cuidado el deshumidificador de su embalaje. Conserve el material de embalaje para su posterior almacenamiento o transporte.
- Colocación:
- Place the unit on a firm, level surface in the area where dehumidification is desired.
- Asegúrese de que haya al menos 20 cm (8 pulgadas) de espacio libre alrededor de todos los lados de la unidad para un flujo de aire adecuado.
- Evite colocar la unidad cerca de fuentes de calor, luz solar directa o en áreas con exceso de polvo.
- Conexión de energía: Conecte el cable de alimentación a una toma de corriente con conexión a tierra. Asegúrese de que el voltage coincide con las especificaciones de la unidad.
- Comprobación inicial: Antes del primer uso, asegúrese de que el depósito de agua esté correctamente insertado y vacío.
4. Instrucciones de funcionamiento
Encendido/apagado
- Presione el Fuerza button (refer to Figure 2.3 for button location) on the control panel to turn the unit ON or OFF. The LED display will illuminate when the unit is on.
Configuración de la humedad deseada
- Presione el Configuración button (refer to Figure 2.3 for button location) repeatedly to cycle through desired humidity levels (e.g., 40%, 50%, 60%, 70%, 80% or continuous operation). The display will show the selected humidity.
- La unidad funcionará automáticamente para mantener el nivel de humedad establecido.
Función de temporizador
- Presione el Minutero button (refer to Figure 2.3 for button location) to set the operating time (e.g., 1-24 hours). The unit will automatically turn off after the set time.
- To cancel the timer, press the Timer button until "00" or "OFF" is displayed.
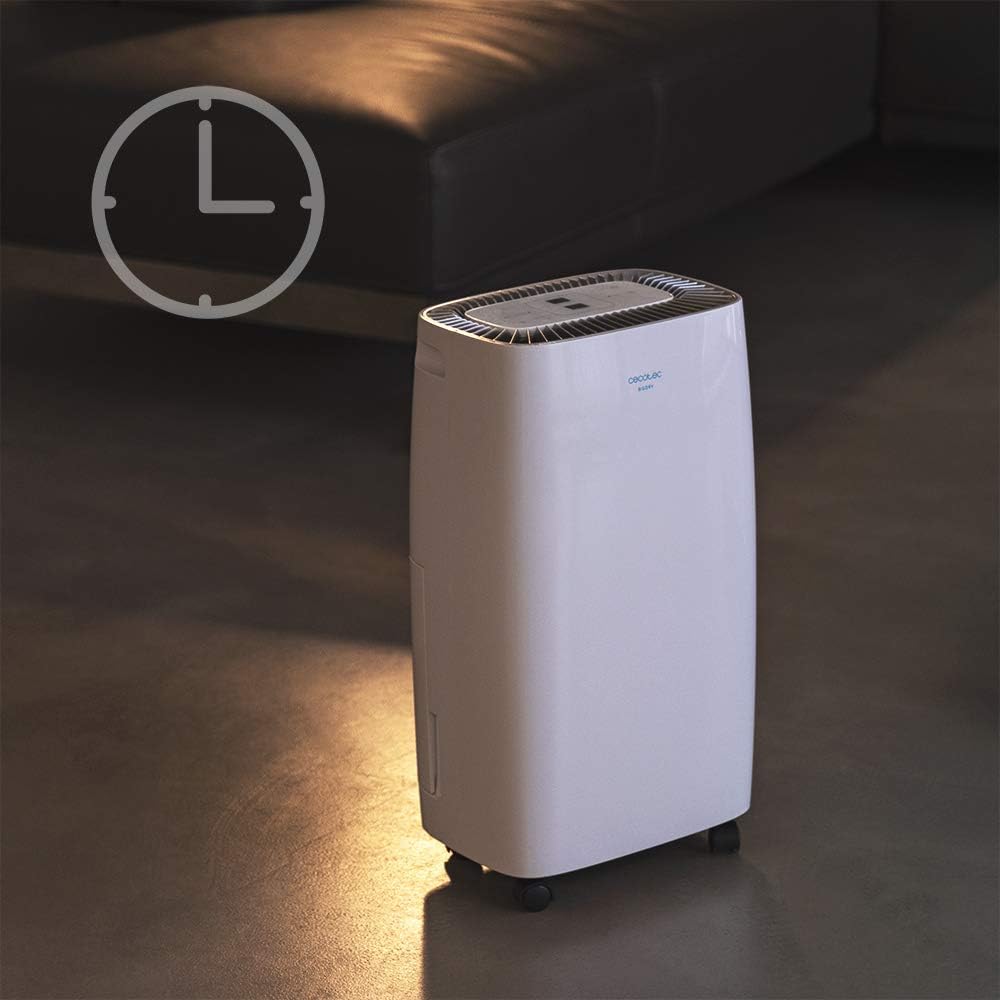
Figura 4.1: Dehumidifier operating with the timer function. This image visually represents the timer feature, showing the unit in a room setting with a clock icon overlay, indicating scheduled operation.
Velocidad del ventilador
- The unit features 2 fan speeds. Refer to the control panel for specific fan speed adjustment options, usually indicated by fan blade icons or "High/Low" indicators.
Automatic Shut-off and Full Tank Indicator
- The dehumidifier will automatically shut off when the water tank is full to prevent overflow.
- A "FULL" indicator light (often red) on the control panel will illuminate, and the unit may beep to alert you.

Figura 4.2: Control panel showing the "FULL" indicator light. This close-up highlights the illuminated red light next to the "FULL" icon, signaling that the water tank needs to be emptied.
5. Mantenimiento
Vaciado del tanque de agua
- When the "FULL" indicator light illuminates, gently pull out the water tank from the side of the unit.
- Lleve con cuidado el tanque a un fregadero o desagüe y vacíe el agua acumulada.
- Enjuague periódicamente el tanque con agua limpia para evitar la aparición de moho o hongos.
- Deslice el tanque vacío nuevamente dentro de la unidad hasta que encaje en su lugar. La unidad reanudará su funcionamiento.
Limpieza del filtro de aire
El filtro de aire debe limpiarse cada dos semanas o con mayor frecuencia según el uso y la calidad del aire.
- Apague y desenchufe el deshumidificador.
- Locate the air filter (usually on the back or side, behind a removable grille).
- Retire el filtro.
- Limpie el filtro con una aspiradora para eliminar el polvo. Si la suciedad es difícil de eliminar, lávelo suavemente con agua tibia y jabón.
- Deje que el filtro se seque completamente al aire antes de volver a colocarlo. No utilice secadora ni calor directo.
- Reinsert the dry filter and close the grille.
Limpieza general
- Limpie el exterior de la unidad con un paño suave yamp Paño. No utilice limpiadores abrasivos ni disolventes.
- Asegúrese de que no entre agua en los componentes eléctricos.
6. Solución de problemas
| Problema | Posible causa | Solución |
|---|---|---|
| La unidad no se enciende. | No hay energía; cable de alimentación suelto; tanque de agua lleno o insertado incorrectamente. | Check power connection; ensure tank is empty and properly seated. |
| El deshumidificador no recoge agua. | Room humidity too low; temperature too low; air filter clogged; unit too small for space. | Check room conditions; clean air filter; ensure unit is appropriately sized for the area. |
| La unidad es ruidosa. | La unidad no está sobre una superficie nivelada; filtro de aire obstruido; problema con el componente interno. | Place on a level surface; clean air filter. If noise persists, contact support. |
| La luz indicadora "FULL" está encendida, pero el tanque no está lleno. | Float switch stuck or sensor malfunction. | Remove and reinsert tank; check float switch for obstructions. |
7. Especificaciones
| Característica | Especificación |
|---|---|
| Marca | Cecotec |
| Nombre del modelo | Big Dry 4000 Expert (Model Number: 05606) |
| Capacidad de deshumidificación | 10 litros por día |
| Capacidad del tanque de agua | 2.5 litros |
| Área de piso recomendada | Up to 40 Square Meters (105 m³/h coverage) |
| Dimensiones del producto (Pr. x An. x Al.) | 20.87" de profundidad x 9.06" de ancho x 12.2" de alto |
| Peso del artículo | 21.7 libras |
| Quétage | 4000 vatios (Note: This value is from product specifications. Actual operational wattage for dehumidifiers is typically lower.) |
| Gas refrigerante | R290 |
| Características especiales | Removable Tank, 24h Timer, LED Display, Auto Power Off, Silent Operation |
8. Garantía y soporte
Para obtener información sobre la garantía, asistencia técnica o consultas de servicio, consulte la tarjeta de garantía incluida con su producto o visite el sitio web oficial de Cecotec. webSitio. Conserve su recibo de compra como comprobante para reclamaciones de garantía.
Cecotec Oficial Websitio: www.cecotec.com
Ask a question about this manual
Ask about setup, troubleshooting, compatibility, parts, safety, or missing instructions. Manuals+ will review the question and use this page’s manual context to help answer it.