
1. Introducción e información de seguridad
Thank you for choosing the ANENG V8 Digital Multimeter. This device is designed for safe and accurate measurement of AC/DC voltage, AC/DC current, resistance, capacitance, frequency, temperature, diode, continuity, and battery testing. Please read this manual thoroughly before use to ensure proper operation and to prevent potential hazards.
1.1 Precauciones de seguridad
- Asegúrese siempre de que el multímetro esté en buen estado de funcionamiento antes de usarlo. Inspeccione los cables de prueba para detectar posibles daños.
- No aplicar voltage o corriente que excede los valores nominales máximos del multímetro.
- Extreme las precauciones cuando trabaje con vol.tages superior a 36 V CC o 25 V CA RMS, ya que pueden suponer un peligro de descarga eléctrica.
- Desconecte siempre la alimentación del circuito y descargue todas las baterías de alto voltaje.tagy capacitores antes de medir resistencia, continuidad, diodos o capacitancia.
- Ensure the rotary switch is in the correct position for the desired measurement before connecting the test leads to the circuit.
- No opere el multímetro en entornos con gases explosivos, vapores o polvo.
- Reemplace las baterías inmediatamente cuando aparezca el indicador de batería baja para garantizar lecturas precisas.
2. Producto terminadoview
2.1 Contenido del paquete
The ANENG V8 Digital Multimeter package typically includes the following items:
- ANENG V8 Digital Multimeter
- Cables de prueba (rojo y negro)
- Sonda de temperatura
- Estuche de transporte
- Manual de usuario

Image: ANENG V8 Digital Multimeter with its standard accessories, including test leads, a temperature probe, and a protective carrying case.
2.2 Controles y pantalla
The multimeter features an 8000-count LCD backlight display for clear readings in various lighting conditions. Key controls include a rotary switch for function selection and buttons for range, data hold, and other features.

Imagen: Detallada view of the multimeter's front panel, highlighting the LCD screen, the central rotary selector, and various control buttons.
3. Configuración
3.1 Instalación de la batería
The ANENG V8 Digital Multimeter is powered by batteries. To install or replace batteries:
- Asegúrese de que el multímetro esté apagado y desconecte todos los cables de prueba.
- Localice la tapa del compartimiento de la batería en la parte posterior del dispositivo.
- Utilice un destornillador para aflojar los tornillos que sujetan la tapa de la batería.
- Retire la cubierta.
- Insert new batteries, observing the correct polarity (+ and -) as indicated inside the compartment. The device typically uses AA batteries.
- Vuelva a colocar la tapa de la batería y fíjela con el/los tornillo(s).
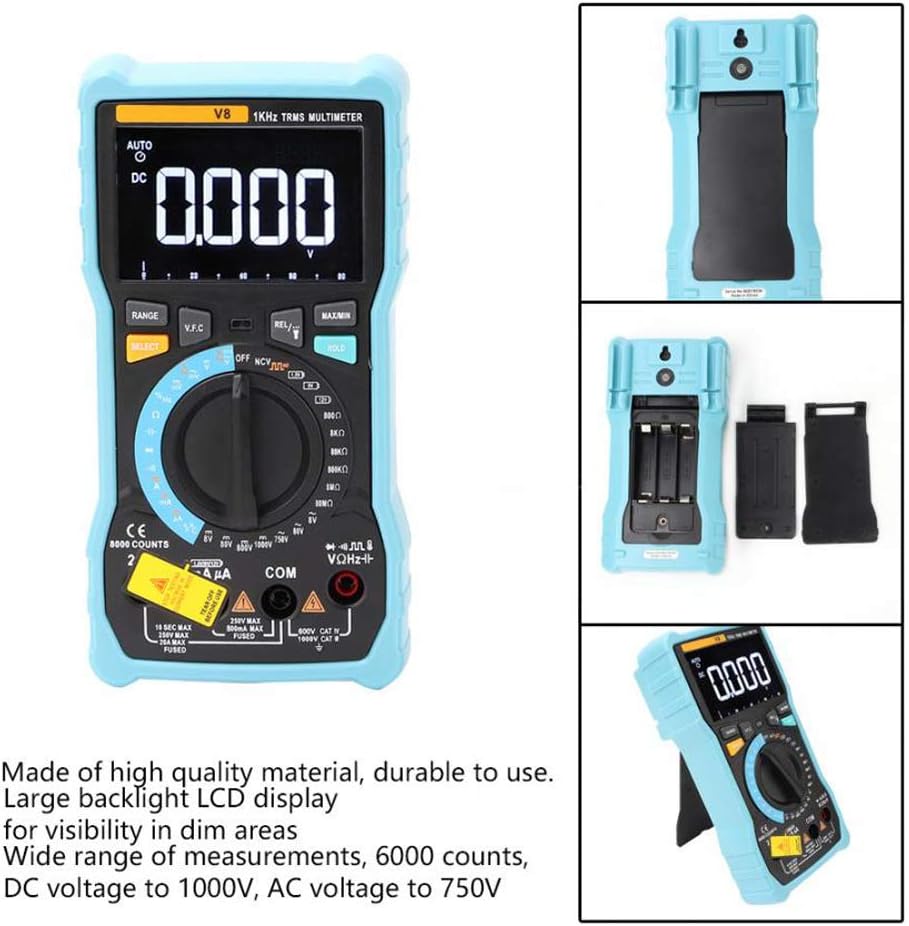
Imagen: La parte trasera view of the multimeter with the battery compartment open, illustrating the correct placement for three AA batteries.
4. Instrucciones de funcionamiento
Before any measurement, ensure the test leads are correctly inserted into the input jacks and the rotary switch is set to the appropriate function.
4.1 Medición del volumen de CC/CAtage
- Set the rotary switch to the 'V–' (DC Voltage) o 'V~' (Volumen CAtage) posición.
- Conecte el cable de prueba rojo al conector 'VΩmA' y el cable de prueba negro al conector 'COM'.
- Conecte los cables de prueba en paralelo al circuito o componente que desea medir.
- Leer el vol.tage valor en la pantalla.
4.2 Medición de corriente CC/CA
- Set the rotary switch to the 'A–' (DC Current) or 'A~' (AC Current) position. For milliampere (mA) o microampere (µA) measurements, select the corresponding range.
- For current up to 800mA, connect the red test lead to the 'VΩmA' jack. For current up to 20A, connect the red test lead to the '20A' jack. Connect the black test lead to the 'COM' jack.
- Disconnect power to the circuit. Open the circuit where you want to measure current. Connect the multimeter in series with the circuit.
- Aplique energía al circuito y lea el valor actual en la pantalla.
4.3 Medición de la resistencia
- Coloque el interruptor giratorio en la posición 'Ω' (Resistencia).
- Conecte el cable de prueba rojo al conector 'VΩmA' y el cable de prueba negro al conector 'COM'.
- Ensure the circuit is de-energized and all capacitors are discharged. Connect the test leads across the component to be measured.
- Lea el valor de resistencia en la pantalla.
4.4 NCV (Volumen sin contacto)tage) Detección
- Coloque el interruptor giratorio en la posición 'NCV'.
- Mueva el extremo superior del multímetro cerca del conductor o toma de corriente.
- El multímetro emitirá un pitido audible y la luz indicadora NCV parpadeará si el voltaje de CA es bajo.tage is detected, indicating the presence of live voltagy sin contacto físico.
4.5 Medición de temperatura
- Set the rotary switch to the '°C/°F' (Temperature) position.
- Connect the temperature probe to the 'VΩmA' and 'COM' jacks, observing polarity if applicable.
- Coloque la punta de la sonda de temperatura sobre o cerca del objeto cuya temperatura desea medir.
- Lea el valor de la temperatura en la pantalla.
4.6 Otras funciones
- Capacidad: Set the rotary switch to the 'F' position. Connect leads across the discharged capacitor.
- Frecuencia/Ciclo de trabajo: Set the rotary switch to the 'Hz/%' position. Connect leads to the signal source.
- Prueba de diodo: Set the rotary switch to the 'Diode' position. Connect leads across the diode.
- Prueba de continuidad: Set the rotary switch to the 'Continuity' position. Connect leads across the circuit. An audible beep indicates continuity.
- Prueba de batería: Set the rotary switch to the 'Battery' position. Connect leads to the battery terminals (1.5V, 9V, or 12V).
- Retención de datos: Pulse el botón "HOLD" para congelar la lectura actual en la pantalla. Pulse de nuevo para liberarla.
- Luz de fondo/Linterna: Press the backlight button to turn on/off the display backlight or flashlight.
- Apagado automático: El multímetro se apagará automáticamente después de un período de inactividad para conservar la vida útil de la batería.
5. Mantenimiento
5.1 Limpieza
Limpiar la carcasa con publicidadamp Paño y detergente suave. No utilice abrasivos ni disolventes. Mantenga los terminales de entrada limpios y sin suciedad ni humedad.
5.2 Reemplazo de fusibles
Si la función de medición de corriente falla, es posible que sea necesario reemplazar el fusible. Consulte las especificaciones para conocer el tipo y la capacidad nominal correctos del fusible. El reemplazo del fusible solo debe ser realizado por personal cualificado.
5.3 Almacenamiento
When not in use for extended periods, remove the batteries to prevent leakage and store the multimeter in a dry, cool place.
6. Solución de problemas
- Sin pantalla: Verifique la instalación y la carga de las baterías. Reemplace las baterías si es necesario.
- Lecturas incorrectas: Ensure the rotary switch is set to the correct function and range. Check test lead connections. Verify battery charge.
- La medición actual no funciona: Check the fuse. Replace if blown (refer to fuse replacement section).
- NCV no detecta: Ensure the NCV function is selected and the multimeter is close enough to the AC voltagy fuente.
7. Especificaciones
| Parámetro | Valor |
|---|---|
| Mostrar | LCD de 8000 cuentas con retroiluminación |
| Vol DCtagmi (V) | 8.000 V / 80.00 V / 800.0 V / 1000 V |
| Vol DCtagmi (mV) | 800mV |
| Vol. CAtagmi (V) | 8.000V / 80.00V / 750V |
| Vol. CAtagmi (mV) | 800mV |
| Corriente continua (A) | 8.000 A / 20.00 A |
| Corriente CC (mA) | 8.000 mA / 80.00 mA / 800.0 mA |
| Corriente continua (µA) | 800 µA / 8000 µA |
| Corriente CA (A) | 8.000 A / 20.00 A |
| Corriente CA (mA) | 8.000 mA / 80.00 mA / 800.0 mA |
| Corriente alterna (µA) | 800 µA / 8000 µA |
| Resistencia | 800.0Ω / 8.000kΩ / 80.00kΩ / 800.0kΩ / 8.000MΩ / 80.00MΩ |
| Capacidad | 9.999 nF / 99.99 nF / 999.9 nF / 9.999 µF / 99.99 µF / 999.9 µF / 9.999 mF / 99.99 mF |
| Frecuencia | 9.999 Hz / 99.99 Hz / 999.9 Hz / 9.999 kHz / 99.99 kHz / 999.9 kHz / 9.999 MHz |
| Ciclo de trabajo | 1% ~ 99% |
| Rango de temperatura | -20 °C ~ 1000 °C (-4 °F ~ 1832 °F) |
| Prueba de batería | 1.5V / 9V / 12V |
| Alcance | Auto / Manual |
| Frecuencia de actualización | 3 veces / segundo |
| Verdadero valor eficaz (RMS) | Sí |
| Retención de datos | Sí |
| Luz de fondo/Linterna | Sí |
| Alerta de batería baja | Sí |
| Apagado automático | Sí |
| Material | ABS/PVC |
| Fuente de poder | Funciona con pilas |
8. Garantía y soporte
This product is covered by a standard manufacturer's warranty against defects in materials and workmanship. Please refer to the warranty card included with your purchase for specific terms and conditions. For technical support or service inquiries, please contact your retailer or the manufacturer's customer service department.
9. Vídeos oficiales del producto
No hay vídeos oficiales de productos del vendedor disponibles para incrustar en este momento.