1. Introducción
Thank you for choosing the DELIPOP 3D LED Digital Alarm Clock. This manual provides detailed instructions for the setup, operation, and maintenance of your new clock. Please read this manual thoroughly before use to ensure proper functionality and to maximize your user experience. Keep this manual for future reference.

Image 1.1: The DELIPOP 3D LED Digital Alarm Clock displaying the time 23:57 with bright white LED digits.
2. Información de seguridad
- Ensure the clock is powered by a 5V 1A USB power source. Using an incorrect power adapter may damage the device.
- The CR2032 button cell battery (not included) is for memory backup only and does not power the clock's display. The clock requires continuous USB power to operate.
- Avoid placing the clock in direct sunlight, high temperatures, or high humidity environments.
- Do not disassemble or attempt to repair the clock yourself. Contact customer support for assistance.
- Mantenga el reloj alejado del agua y otros líquidos.
3. Contenido del paquete
Por favor revise el paquete para ver los siguientes artículos:
- 1 x DELIPOP 3D LED Digital Alarm Clock
- 1 x USB Power Cable (5V)
- 1 x Manual de usuario (este documento)

Image 3.1: The DELIPOP 3D LED Digital Alarm Clock, USB cable, and the included instruction manual.
4. Producto terminadoview
The DELIPOP 3D LED Digital Alarm Clock features a large, clear LED display for easy readability. It is designed for both wall mounting and desktop placement.

Imagen 4.1: Frontal y lateral view of the clock with dimensions (235mm length, 93mm height, 40mm depth) and button labels (PM, AL, SET, UP, DOWN, ALARM, TEMP).
4.1 Componentes
- Pantalla LED: Large 3D LED digits for time display.
- Botones de control: SET, UP, DOWN buttons for configuration.
- Soporte desmontable: Para colocación en escritorio.
- Entrada de energía (CC 5 V): USB port for power connection.
- Compartimento de la batería de memoria: For CR2032 button cell battery (not included) to retain settings during power loss.

Imagen 4.2: Trasera view of the clock indicating the DC 5V power input and the memory battery compartment (CR2032, not included).
5. Configuración
5.1 Conexión de alimentación
- Connect the provided USB cable to the DC 5V input port on the back of the clock.
- Conecte el otro extremo del cable USB a un adaptador de corriente USB de 5 V 1 A (no incluido) o a un puerto USB compatible.
- The clock display will light up.
5.2 Installing Memory Battery (Optional)
Para conservar la configuración de hora y alarma durante un corte de energíatage, install a CR2032 button cell battery (not included) into the memory battery compartment on the back of the clock. This battery does not power the display.
5.3 Colocación
The clock can be placed on a table using its detachable bracket or mounted on a wall.
- Colocación de escritorio: Attach the detachable bracket to the bottom of the clock.
- Montaje en pared: Use the keyhole slots on the back of the clock to hang it on screws or hooks (not included) securely fastened to the wall.

Image 5.1: The DELIPOP 3D LED Digital Alarm Clock displayed mounted on a wall.
6. Instrucciones de funcionamiento
6.1 Funciones de los botones
- CONJUNTO: Enter setting mode, confirm settings.
- UP: Increase value, switch modes.
- ABAJO: Decrease value, switch modes.
6.2 Ajuste de la hora
- Mantenga pulsado el COLOCAR Mantenga pulsado el botón durante 3 segundos para acceder al modo de ajuste de la hora. Los dígitos de la hora parpadearán.
- Utilice el UP or ABAJO Botones para ajustar la hora.
- Prensa COLOCAR De nuevo para confirmar la hora y pasar al ajuste de los minutos. Los dígitos de los minutos parpadearán.
- Utilice el UP or ABAJO Botones para ajustar los minutos.
- Prensa COLOCAR nuevamente para confirmar los minutos y salir del modo de configuración de la hora.
6.3 formato de 12/24 horas
En el modo de visualización de hora normal, presione el UP button to switch between 12-hour and 24-hour formats. When 12-hour format is selected, the "PM" indicator will light up for afternoon hours.
6.4 Configuración de alarma
- Mantenga pulsado el ALARMA botón (o COLOCAR button if ALARM is not a dedicated button, refer to product diagram) for 3 seconds to enter alarm setting mode. The alarm hour digits will flash.
- Utilice el UP or ABAJO Botones para ajustar la hora de la alarma.
- Prensa ALARMA (o COLOCAR) again to confirm the alarm hour and move to alarm minute setting. The alarm minute digits will flash.
- Utilice el UP or ABAJO Botones para ajustar los minutos de la alarma.
- Prensa ALARMA (o COLOCAR) again to confirm the alarm minute and exit alarm setting mode.
- Para activar/desactivar la alarma, presione brevemente el botón ALARMA button (or a specific button indicated in the product diagram, e.g., COLOCAR) during the alarm sound. The "AL" indicator will light up when the alarm is active.
6.5 Función de repetición
When the alarm sounds, press any button (except the alarm off button) to activate the snooze function. The alarm will sound again after a few minutes (default snooze time is typically 5 minutes, refer to product specifics if available). To turn off the alarm completely, press the ALARMA button (or a specific button indicated in the product diagram, e.g., COLOCAR) during the alarm sound.
6.6 Ajuste del brillo
The clock features 3 levels of brightness. In normal time display mode, short press the UP or ABAJO button to cycle through the brightness levels (High, Medium, Low). The clock also has an automatic dimming feature for night time.
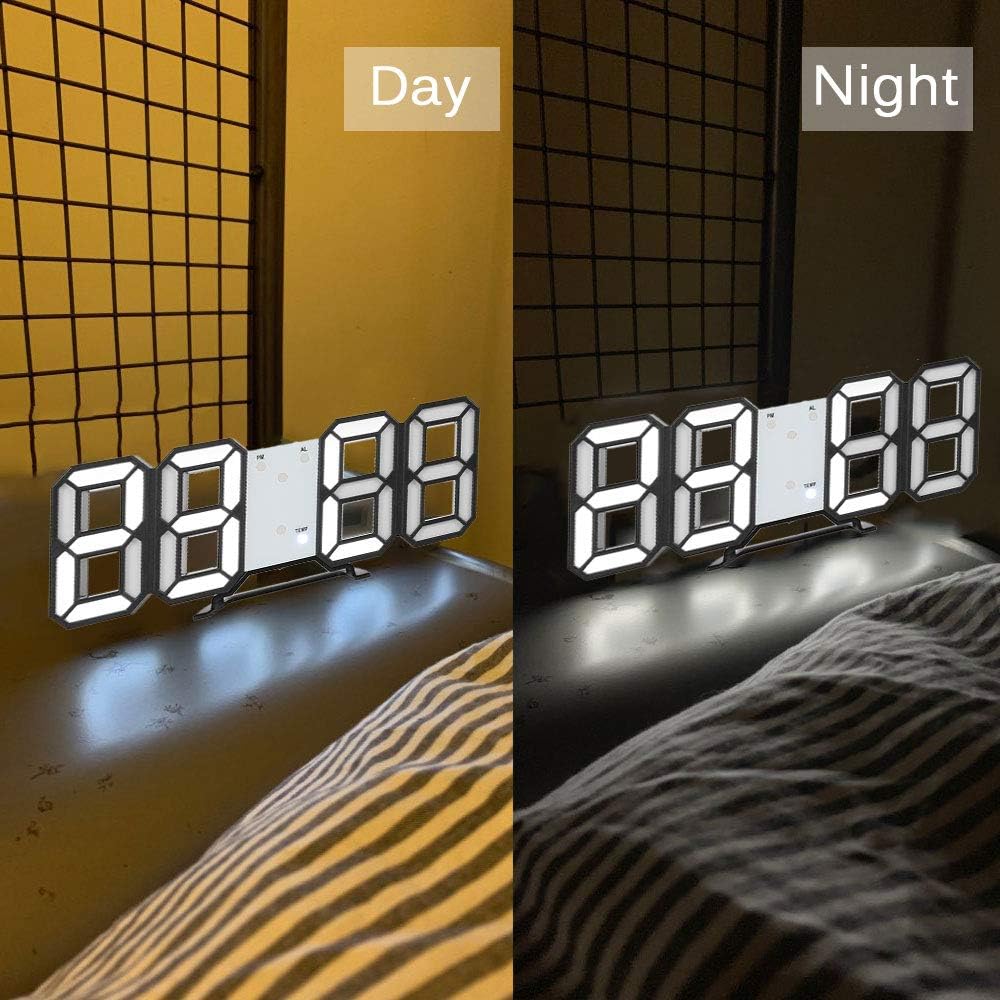
Image 6.1: The DELIPOP 3D LED Digital Alarm Clock showing its display brightness during daytime (brighter) and nighttime (dimmer).
7. Mantenimiento
- Limpie la superficie del reloj con un paño suave y seco. No utilice limpiadores abrasivos ni disolventes.
- Asegúrese de que el cable USB y el adaptador de corriente estén en buenas condiciones.
- If the clock is not used for an extended period, disconnect it from power and remove the memory battery.
8. Solución de problemas
| Problema | Posible causa | Solución |
|---|---|---|
| La pantalla del reloj está apagada. | No hay suministro de energía. | Ensure the USB cable is securely connected to a 5V 1A power source. Check if the power outlet is working. |
| La hora y la configuración se restablecen después de un corte de energía. | Memory battery not installed or depleted. | Install a new CR2032 button cell battery in the memory compartment. |
| La alarma no suena. | Alarma no activada o configurada incorrectamente. | Verify the alarm is set and activated (check for "AL" indicator). Ensure the volume is not muted (if applicable, though this model doesn't specify volume control). |
| La pantalla es demasiado oscura/brillante. | Es necesario ajustar el nivel de brillo. | Presione brevemente el UP or ABAJO Botón para recorrer los niveles de brillo. |
9. Especificaciones
| Marca | DELIPOP |
| Número de modelo | 307NZH57602 |
| Material | Acrilonitrilo butadieno estireno (ABS) |
| Colores de los LED | Blanco |
| Fuente de alimentación | USB 5V 1A (cable included) |
| Batería de memoria | 1 x CR2032 button cell (not included) |
| Tipo de pantalla | LED digitales |
| Formato de hora | 12/24 horas seleccionables |
| Funciones | Time display, Alarm, Snooze, Brightness adjustment |
| Dimensiones del producto (L x An x Al) | 23.5 x 3.81 x 9.3 cm (9.25 x 1.5 x 3.66 pulgadas) |
| Peso del artículo | 245 gramos (8.64 onzas) |
10. Garantía y soporte
DELIPOP products are designed for reliability and performance. For warranty information or technical support, please refer to the contact details provided with your purchase or visit the official DELIPOP website. Please have your model number (307NZH57602) ready when contacting support.