BuTure BR600
Manual del usuario del arrancador portátil para coche BuTure BR600
Modelo: BR600
1. Producto terminadoview
The BuTure BR600 is a powerful and versatile portable car jump starter designed to provide emergency starting power for 12V vehicles. It also functions as a portable power bank with wireless charging capabilities and a multi-mode LED flashlight. This manual provides essential information for safe and effective use of your device.
Características principales:
- Potente arranque: Delivers 2500A peak current to start all gasoline engines and up to 8.0L diesel engines.
- Batería de alta capacidad: 27000mAh lithium battery for multiple jump starts and device charging.
- Carga inalámbrica: Integrated 10W wireless charging pad for compatible smartphones.
- Banco de energía portátil: Equipped with USB 1 (Quick Charge 3.0: 5V 3A / 9V 2A / 12V 1.5A), USB 2 (5V 2.4A), and USB-C (5V 3A) outputs for charging various electronic devices.
- Smart Protection Clamps: Features intelligent protection against short circuits, overheating, over-voltage, over-charge, deep discharge, over-current, and reverse polarity.
- Linterna LED multimodo: Includes Flashlight, Strobe, SOS, and Warning Light modes for emergencies.
- Diseño duradero: Operates effectively in extreme temperatures, including cold winter conditions.
2. Contenido del paquete
Por favor, revise el contenido del paquete al abrirlo. Si falta algún artículo o está dañado, contacte con atención al cliente.

Image: Contents of the BuTure BR600 package.
- 1 x BuTure BR600 Jump Starter
- 1 x cables de puente inteligentes
- 1 cable USB-C
- 1 adaptador para encendedor de cigarrillos EC5
- 1 x Manual de usuario
- Estuche de almacenamiento 1 x
3. Información importante de seguridad
Lea todas las advertencias e instrucciones de seguridad antes de usar este producto. El incumplimiento de estas instrucciones podría provocar descargas eléctricas, incendios o lesiones graves.
- No sumerja el producto en agua ni lo exponga a la lluvia.
- Do not open or disassemble the product. There are no user-serviceable parts inside.
- Mantener fuera del alcance de los niños.
- Utilice únicamente los cables puente inteligentes proporcionados.
- No arranque una batería congelada.
- Asegúrese de que la conexión sea de polaridad correcta (cable rojo)amp a positivo, cl negroamp a negativo).
- No conecte el cl positivo y negativo.amps juntos
- If the product becomes excessively hot during use, discontinue use immediately.
- Guarde el producto en un lugar fresco y seco, alejado de la luz solar directa.
- Wear eye protection and gloves when jump starting a vehicle.
- Consult your vehicle's owner's manual for specific jump-starting procedures.

Image: The BuTure BR600 features multiple protection modes for safe operation, including error detection and intelligent indicators.
4. Charging the BuTure BR600
Before first use, fully charge the jump starter. It is recommended to recharge the device every 3-6 months to maintain battery health, even if not in use.
4.1. Charging via USB-C Input
- Conecte el cable USB-C provisto al puerto de entrada USB-C del arrancador.
- Conecte el otro extremo del cable USB-C a un adaptador de pared USB (no incluido) o a un cargador de automóvil.
- The LED indicator lights will illuminate and flash to show the charging status. All four lights will be solid when fully charged.
4.2. Indicador de nivel de batería
The LED indicator lights on the device show the remaining battery capacity:
- 4 luces: 75% - 100%
- 3 luces: 50% - 75%
- 2 luces: 25% - 50%
- 1 light: 0% - 25% (Recharge immediately)

Image: The BuTure BR600 features a 27000mAh battery designed for long standby times, up to 12 months.
5. Arrancar un vehículo
Ensure the jump starter is at least 50% charged (2 LED lights) before attempting to jump start a vehicle.
- Prepare el vehículo: Turn off the vehicle's ignition and all accessories (headlights, radio, air conditioning, etc.). Engage the parking brake.
- Conectar cables puente:
- Insert the blue plug of the smart jumper cables into the 12V jump start port on the BuTure BR600. Ensure a firm connection.
- Conectar el ROJO positivo (+) clamp al terminal positivo (+) de la batería del vehículo.
- Conectar el NEGRO negativo (-) clamp al terminal negativo (-) de la batería del vehículo.
- El cl inteligenteamp indicator light will show the connection status. Refer to the smart clamp manual for specific light indications.
- Arranque el vehículo: Una vez que el cl inteligenteamp indicator shows a safe connection, start your vehicle's engine. If the vehicle does not start immediately, wait 20-30 seconds before trying again. Do not crank the engine for more than 3 seconds per attempt.
- Retire los cables puente: Tan pronto como arranque el vehículo, desconecte el NEGRO negativo (-) clamp primero, luego el ROJO positivo (+) clamp from the vehicle battery. Finally, unplug the smart jumper cables from the BuTure BR600.
Importante: Si el cl inteligenteamp indicates an error (e.g., reverse polarity), correct the connection before attempting to start the vehicle.

Image: Illustration of connecting the BuTure BR600 to a car battery for jump starting.
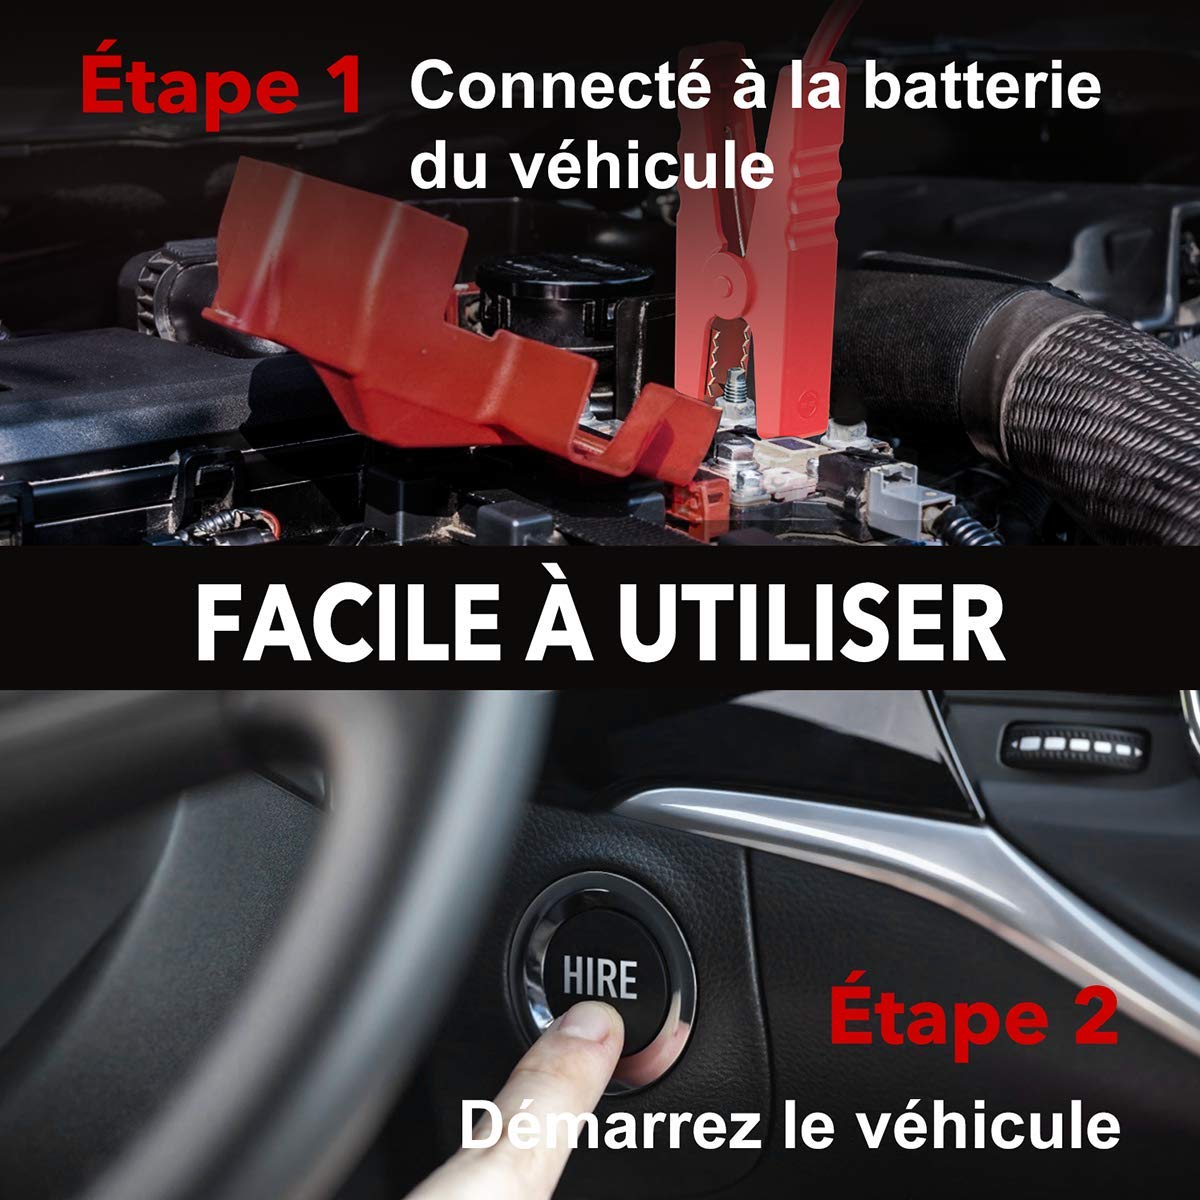
Image: Step-by-step guide showing how to connect the jump starter to the vehicle battery and then start the vehicle.

Image: The BuTure BR600 is designed to perform reliably even in cold winter temperatures down to -20°C.
6. Operación de otras funciones
6.1. Uso como banco de energía (salida USB)
The BuTure BR600 can charge various electronic devices via its USB output ports.
- Connect your device's USB charging cable to either the USB 1 (Quick Charge 3.0) or USB 2 port on the jump starter.
- El arrancador comenzará a cargar automáticamente su dispositivo.
6.2. Carga inalámbrica
For devices compatible with 10W wireless charging:
- Coloque su dispositivo compatible con carga inalámbrica (por ejemplo, teléfono inteligente) en la plataforma de carga inalámbrica ubicada en la superficie superior del arrancador.
- Asegúrese de que el dispositivo esté centrado en la almohadilla para una carga óptima.
- The wireless charging indicator light will illuminate to confirm charging is active.

Image: The BuTure BR600 offers both 10W wireless charging and Quick Charge 3.0 USB output for multiple devices.
6.3. linterna LED
The built-in LED flashlight has multiple modes for different situations.
- Press and hold the power button for 3 seconds to turn on the flashlight (steady light mode).
- Press the power button again to cycle through modes: Strobe → SOS → Warning Light → Off.
- Press and hold the power button again for 3 seconds to turn off the flashlight from any mode.

Image: The BuTure BR600 features an ultra-bright LED flashlight with Flash, SOS, Strobe, and Warning light modes for various emergencies.
7. Mantenimiento
- Limpieza: Utilice un paño suave y seco para limpiar el dispositivo. No utilice limpiadores abrasivos ni disolventes.
- Almacenamiento: Store the jump starter in a cool, dry place between 0°C and 45°C (32°F and 113°F). Avoid direct sunlight and high humidity.
- Recarga: Recharge the device every 3-6 months to prevent battery degradation, even if not in use.
- Duración de la batería: The internal lithium battery is designed for long life, but like all rechargeable batteries, its capacity will decrease over time.
8. Solución de problemas
| Problema | Posible causa | Solución |
|---|---|---|
| El arrancador auxiliar no se enciende. | La batería está completamente descargada. | Charge the jump starter for several hours. |
| El vehículo no arranca. |
|
|
| Cl inteligenteamp El indicador muestra error. | Reverse polarity, short circuit, or other fault. | Desconectar clamps, check connections, and reconnect ensuring correct polarity (Red to +, Black to -). Refer to smart clamp manual for specific error codes. |
| La carga inalámbrica no funciona. |
|
|
9. Especificaciones
| Modelo | BR600 |
| Corriente pico | 2500A |
| Capacidad de la batería | 27000 mAh |
| Vol de iniciotage | 12 V |
| Salida USB 1 (QC3.0) | 5V/3A, 9V/2A, 12V/1.5A |
| Salida USB 2 | 5 V/2.4 A |
| Entrada/salida USB-C | 5 V/3 A |
| Salida de carga inalámbrica | 10 W |
| Temperatura de funcionamiento | -20 °C a 60 °C (-4 °F a 140 °F) |
| Dimensiones (L x An x Al) | 24.5 x 15.4 x 9.6 cm |
| Peso | 1.21 kilogramos |
| Composición de la batería | Lithium Metallic |
10. Garantía y atención al cliente
BuTure products are designed and manufactured to the highest quality standards. This product comes with a standard manufacturer's warranty. For detailed warranty information, product support, or technical assistance, please refer to the warranty card included in your package or visit the official BuTure websitio.
If you encounter any issues or have questions regarding your BuTure BR600, please contact our customer support team. Provide your model number (BR600) and purchase details for faster service.
Ask a question about this manual
Ask about setup, troubleshooting, compatibility, parts, safety, or missing instructions. Manuals+ will review the question and use this page’s manual context to help answer it.