Introducción
This manual provides detailed instructions for the installation and operation of your LIGHTAILING LED Light Kit, specifically designed to illuminate the LEGO Creator Expert Winter Holiday Train (LEGO Set 10254). This kit enhances the visual appeal of your building block model by adding integrated lighting. Please read these instructions carefully before beginning installation to ensure proper setup and functionality.
Información de seguridad
ADVERTENCIA: This product contains small parts and is not suitable for children under 6 years old due to choking hazards. Adult supervision is recommended during installation. Ensure the voltage for the USB charger is less than 5V to prevent damage to the light kit.

Imagen: Trasera view of the LIGHTAILING LED Kit packaging, displaying safety warnings and manufacturer details.
Contenido del paquete
Your LIGHTAILING LED Light Kit package should contain the following items:
- 1 x USB Light Kit (pre-assembled with LED lights and wires)
- 1 x Caja de batería (requiere 3 baterías AA, no incluidas)
- 1 x Installation Guide (paper instructions)

Image: The complete contents of the LIGHTAILING LED Light Kit, laid out to show the light strands, battery box, and printed instructions.
Configuración e instalación
The installation of the LED light kit requires careful handling. It is recommended to follow the provided paper instructions or refer to the official installation video for guidance. The wires are delicate; avoid hard pulling, bending, or shaking them during installation.
- Preparación: Ensure your LEGO Creator Expert Winter Holiday Train (Set 10254) is fully assembled. Gather any necessary tools, such as tweezers (not included, but recommended for delicate wire placement).
- Fuente de energía: Decide whether to use 3 AA batteries (not included) in the battery box or a USB power source (USB charger not included). Ensure the USB charger voltage está por debajo de 5V.
- Colocación del cable: Carefully integrate the LED light wires into your LEGO model. The installation guide will show specific routing for each light. Some minor disassembly of LEGO bricks may be required to properly hide and secure the wires.
- Componentes de conexión: Connect the LED light strands to the battery box or USB power cable as indicated in the instructions.
- Pruebas: Before fully securing all components, connect the power source and test the lights to ensure they are functioning correctly.
- Montaje final: Once all lights are in place and tested, reassemble any disassembled LEGO parts, ensuring wires are not pinched or stressed.
Guía de video de instalación
Video: Official LIGHTAILING installation guide for the LEGO Creator Expert Winter Holiday Train LED light kit. This video demonstrates the step-by-step process of integrating the lights into the model.
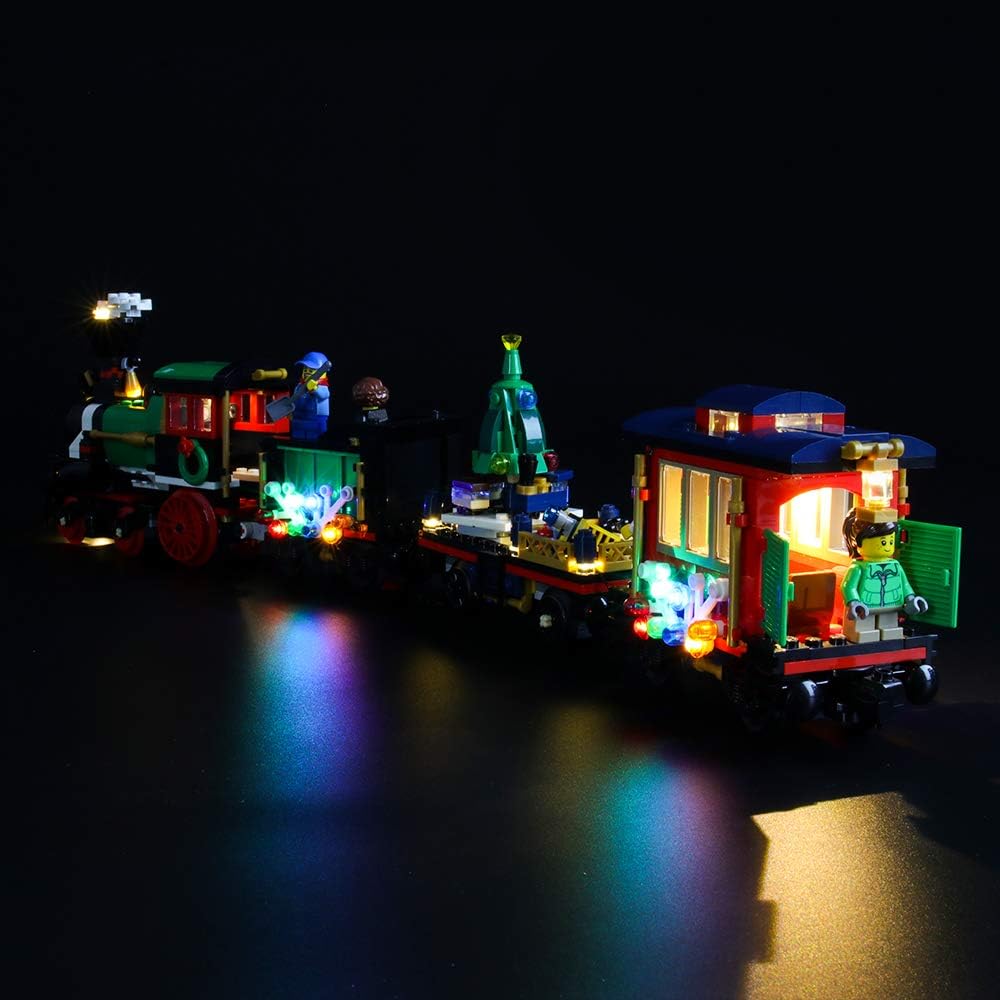
Visual Examples of Illuminated Model


Instrucciones de funcionamiento
Once the LIGHTAILING LED Light Kit is fully installed and connected to a power source, the lights will activate. There are no additional controls for light patterns or brightness; the lights are designed to be continuously on when powered.
- Uso de la caja de batería: Insert 3 AA batteries (not included) into the battery box. Ensure correct polarity. Connect the light kit's power connector to the battery box. The lights will turn on. To turn off, disconnect the power connector or remove the batteries.
- Using a USB Power Source: Connect the light kit's USB cable to a compatible USB power adapter (less than 5V) or a USB port on a computer/power bank. The lights will turn on. To turn off, disconnect the USB cable from the power source.
Mantenimiento
To ensure the longevity and optimal performance of your LIGHTAILING LED Light Kit, consider the following maintenance tips:
- Limpieza: Gently dust the LED lights and wires with a soft, dry cloth. Avoid using liquids or abrasive cleaners.
- Cuidado del cable: Periodically check wires for any signs of wear or damage. Ensure they are not pinched by LEGO bricks or other objects.
- Almacenamiento: If storing the model for an extended period, disconnect the power source (remove batteries or unplug USB) to prevent battery drain or potential damage.
- Reemplazo de batería: Replace all 3 AA batteries simultaneously when lights dim or cease to function, ensuring fresh batteries for consistent brightness.
Solución de problemas
If you encounter issues with your LIGHTAILING LED Light Kit, please refer to the following common troubleshooting steps:
| Problema | Posible causa | Solución |
|---|---|---|
| Las luces no se encienden. |
|
|
| Algunas luces están tenues o parpadean. |
|
|
| Wires are difficult to hide. |
|
|
Presupuesto
| Característica | Detalle |
|---|---|
| Marca | LIGHTAIL |
| Número de modelo | 10254 (for LEGO Creator Expert Winter Holiday Train) |
| Material | Plástico |
| Tipo de fuente de luz | Diodo emisor de luz (LED) |
| Fuente de poder | Corded Electric (USB) or Battery (3 AA batteries required, not included) |
| Volumentage | 5 Volts (max for USB) |
| Peso del artículo | 5.6 onzas (160 gramos) |
| Dimensiones del producto | 6.5" de largo x 6.5" de ancho x 1.57" de alto (embalaje) |
| Código Postal | 781621988396 |
Garantía y soporte
LIGHTAILING is committed to providing quality products and services. If you encounter any problems or have questions regarding your LED light kit, please do not hesitate to contact customer support.
- Soporte por correo electrónico: soporte@lightailing.com
- Websitio: www.lightailing.com
For additional information or to explore other lighting kits, visit the official LIGHTAILING store.


