1. Introducción
This manual provides detailed instructions for the proper installation, operation, and maintenance of your Gravity G3-12D4 12-inch car audio subwoofer and Gravity WZ3000.1D Class D amplifier, along with the included 4-gauge amplifier installation kit. Please read this manual thoroughly before beginning installation to ensure correct setup and optimal performance.
2. Información de seguridad
Observe siempre las siguientes precauciones de seguridad durante la instalación y el funcionamiento:
- Disconnect the vehicle's negative battery terminal before any wiring to prevent electrical shorts.
- Asegúrese de que todo el cableado esté correctamente colocado y asegurado para evitar daños causados por bordes afilados o piezas móviles.
- Use appropriate gauge wiring as specified in this manual to handle current loads and prevent overheating.
- Instale fusibles en la batería y cerca de la amplifier as instructed to protect against power surges.
- Avoid mounting components in locations that obstruct vehicle operation or safety features.
- No exponga los componentes a humedad excesiva ni a temperaturas extremas.
- Busque ayuda profesional si no está seguro acerca de alguno de los pasos de instalación.
3. Contenido del paquete
Verifique que todos los artículos estén presentes en su paquete:
- Gravity G3-12D4 12-inch Car Audio Subwoofer
- Gravity WZ3000.1D Class D Ampmás vivaz
- 4 Calibre AmpKit de instalación del ificador, que incluye:
- 17 ft. 4 Gauge Power Cable
- 3 ft. 4 Gauge Ground Cable
- Inline AGU Fuse Holder with 80A + 100A Fuses
- 17 ft. Double Shielded RCA Cable
- 17 ft. 18 Gauge Turn-On Cable
- Cable de altavoz de calibre 16 de 20 pies
- All necessary accessories and terminals
- Perilla de control remoto de graves
4. Características del producto
Gravity G3-12D4 Subwoofer
- Configuración de bobina móvil dual de 4 ohmios
- Cono de papel prensado de calidad de competición
- Entorno de espuma de alta resistencia
- Sistema avanzado de enfriamiento por flujo de aire
Gravity WZ3000.1D Ampmás vivaz
- Class D MOSFET Power Ampmás vivaz
- Stable at 1 Ohm, 2 Ohm, and 4 Ohm loads
- High and Low Level Inputs
- Variable Low Pass Crossover (LPF)
- Refuerzo de graves variable
- Filtro subsónico
4 Calibre AmpKit de instalación del elevador
- High Quality Thick 4 Gauge Power and Ground Cables
- Inline AGU Fuse Holder with multiple fuses for protection
- True Sound Double Shielded RCA Cable for clear signal transmission
- Complete set of accessories and terminals for a professional installation
5. Configuración e instalación
Proper installation is crucial for performance and safety. If you are not confident in your ability to install this system, please consult a professional installer.
5.1. Montaje del subwoofer
The G3-12D4 subwoofer requires a suitable enclosure (not included) for optimal performance. Ensure the enclosure is properly sealed and sized according to subwoofer specifications. Mount the subwoofer securely to the enclosure using appropriate screws, ensuring a tight seal around the mounting flange.

Imagen: Frente view of the Gravity G3-12D4 12-inch subwoofer, showing the black cone with a red Gravity logo and red stitching on the foam surround.

Imagen: Trasera view of the Gravity G3-12D4 12-inch subwoofer, displaying the magnet structure and speaker terminals.
5.2. Montaje del Ampmás vivaz
Select a mounting location for the WZ3000.1D amplifier that is dry, well-ventilated, and protected from physical damage. Common locations include under a seat, in the trunk, or mounted to a custom amplifier rack. Ensure there is sufficient airflow around the ampLificador para enfriar. Asegure el amplifier firmly using screws.

Imagen: Lateral view of the Gravity WZ3000.1D amplifier, showing the heat sink fins for cooling.
5.3. Cableado del sistema
Follow these steps carefully for wiring the amplifier and subwoofer:
- Power Cable (Red 4 Gauge): Run the 17 ft. 4 gauge power cable from the vehicle's positive battery terminal to the amplifier location. Install the inline AGU fuse holder within 18 inches (45 cm) of the battery. Do not insert the fuse until all wiring is complete.
- Ground Cable (Black 4 Gauge): Connect the 3 ft. 4 gauge ground cable from the amplifier's ground terminal to a clean, unpainted metal surface on the vehicle chassis. Ensure a solid, low-resistance connection. The ground point should be as short as possible.
- Remote Turn-On Cable (Blue 18 Gauge): Connect the 17 ft. 18 gauge turn-on cable from the amplifier's REM terminal to the remote turn-on output of your head unit. This cable signals the ampLificador para encender y apagar con la unidad principal.
- RCA Signal Cables: Connect the 17 ft. double shielded RCA cable from the RCA outputs of your head unit to the RCA INPUTs on the WZ3000.1D ampmás duradero.
- Speaker Wiring (16 Gauge): Connect the 20 ft. 16 gauge speaker wire from the amplifier's speaker output terminals to the G3-12D4 subwoofer. Ensure correct polarity (+ to + and - to -). For a single G3-12D4 (dual 4-ohm voice coils), you can wire the voice coils in parallel for a 2-ohm load or in series for an 8-ohm load. The WZ3000.1D amplifier is stable down to 1 ohm, so a 2-ohm parallel configuration is recommended for maximum power output.
- Control remoto de graves: Connect the remote bass control knob to the dedicated REMOTE port on the amplifier. Mount the knob in an accessible location for easy adjustment.
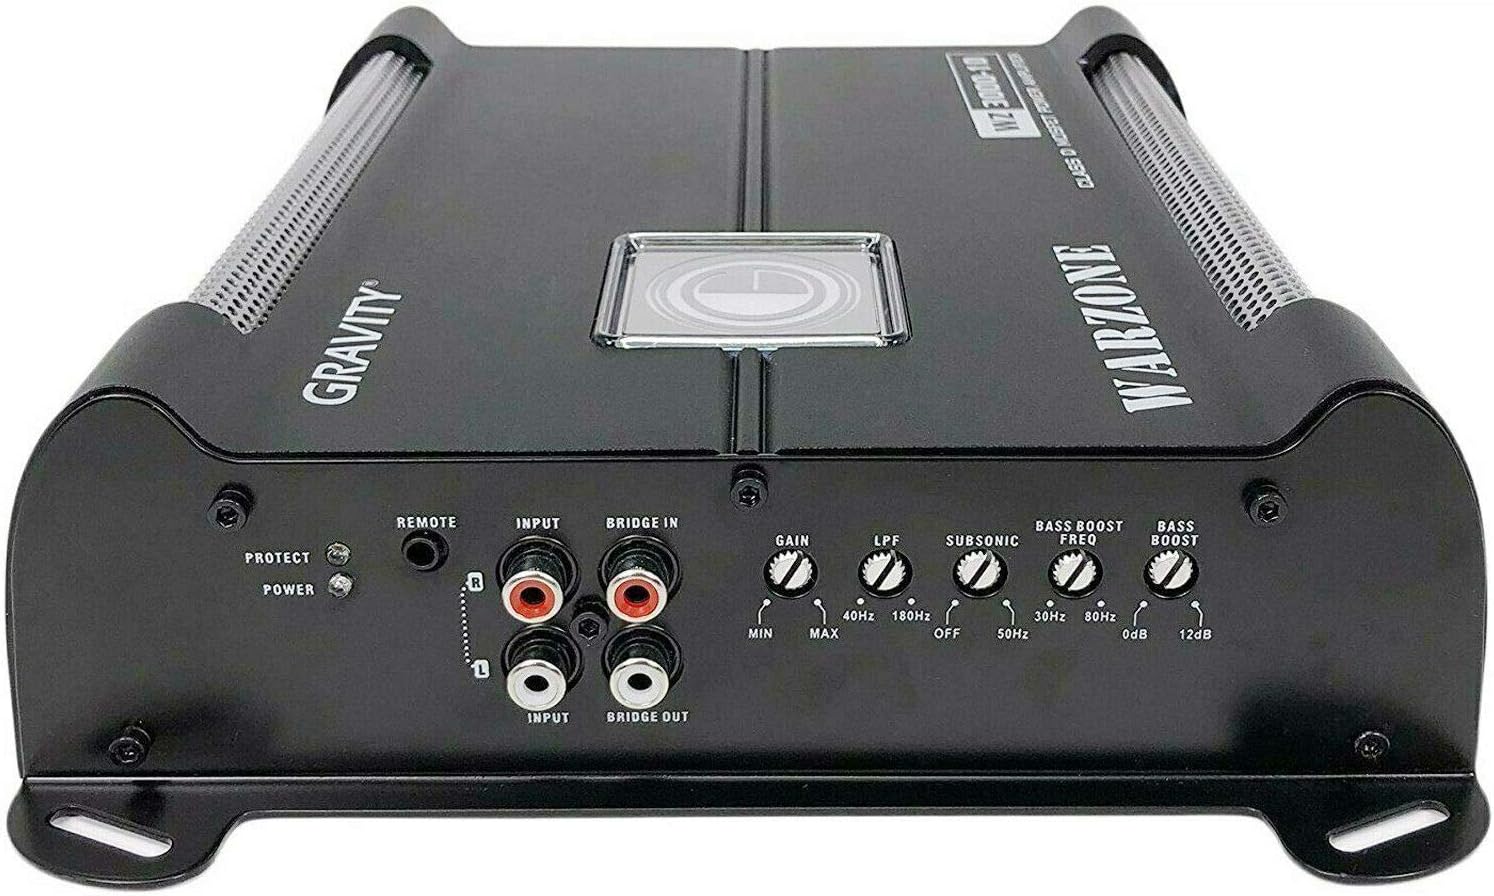
Image: Front panel of the Gravity WZ3000.1D amplifier, displaying RCA inputs, remote control port, and various adjustment knobs.

Image: Rear panel of the Gravity WZ3000.1D amplifier, showing the power input terminals (+12V, GND, REM) and speaker output terminals.

Image: The remote bass control knob, used for adjusting subwoofer output level from the driver's seat.
5.4. Conexión final
Once all wiring is securely connected and checked for shorts, insert the appropriate fuse (80A or 100A, depending on your system's power draw) into the inline AGU fuse holder near the battery. Reconnect the vehicle's negative battery terminal.
6. Instrucciones de funcionamiento
After installation, power on your head unit. The amplifier should turn on automatically (indicated by a power LED). Adjust the amplifier settings as follows:
- GANANCIA (Nivel de entrada): Start with the GAIN control at minimum. Play a familiar track with strong bass at about 75% of your head unit's maximum volume. Slowly increase the GAIN until you hear distortion, then back off slightly. This sets the ampSensibilidad de entrada del amplificador para que coincida con la salida de su unidad principal.
- LPF (filtro de paso bajo): This control filters out high frequencies, allowing only low frequencies to pass to the subwoofer. Set the LPF between 40 Hz and 180 Hz. A common starting point is 80 Hz, but adjust to blend smoothly with your main speakers.
- Filtro SUBSONIC: This filter removes extremely low frequencies below the audible range that can cause damage to the subwoofer. Set it between 0 Hz and 50 Hz. A setting around 25-30 Hz is often suitable for ported enclosures, while sealed enclosures may not require it as much.
- FRECUENCIA DE REFUERZO DE GRAVES: This selects the frequency at which the bass boost will be applied. Adjust this to enhance a specific bass frequency range.
- REFUERZO DE GRAVES: This control increases the output level at the selected bass boost frequency (0-12 dB). Use sparingly to avoid distortion and potential speaker damage.
- Control remoto de graves: This knob allows you to adjust the subwoofer's output level conveniently from your listening position without affecting other ampConfiguración del elevador.
7. Mantenimiento
To ensure longevity and optimal performance of your car audio system:
- Revise periódicamente todas las conexiones del cableado para verificar su estanqueidad y ausencia de corrosión.
- Mantener el amplifier and subwoofer free from dust and debris. Use a soft, dry cloth for cleaning.
- Asegúrese de que ampLas aletas de enfriamiento del elevador no están obstruidas para evitar el sobrecalentamiento.
- Avoid exposing the subwoofer cone to direct sunlight for extended periods, as UV rays can degrade materials.
8. Solución de problemas
Si encuentra problemas, consulte los siguientes problemas y soluciones comunes:
| Problema | Posible causa | Solución |
|---|---|---|
| Sin energía / Amplifier no se enciende | Fusible fundido Mala conexión eléctrica o a tierra Sin señal de encendido remoto | Check and replace fuse in fuse holder Verifique que todas las conexiones de alimentación y tierra estén seguras Verifique la conexión del cable remoto a la unidad principal y ampmás vivaz |
| No hay sonido del subwoofer | Cables RCA desconectados o defectuosos Cables de altavoz desconectados o en cortocircuito AmpLa ganancia del energizador es demasiado baja El volumen de la unidad principal es demasiado bajo | Verifique las conexiones RCA Verifique las conexiones de los cables de los altavoces y verifique si hay cortocircuitos Ajustar ampGanancia del elevador Aumentar el volumen de la unidad principal |
| Sonido distorsionado | La ganancia está establecida demasiado alta Altavoz dañado o ampmás vivaz Incorrect LPF or Bass Boost settings | Reducir ampGanancia del elevador Inspect speaker and amplifier for damage Adjust LPF and Bass Boost settings |
| AmpSobrecalentamiento del ificador | Ventilación insuficiente Carga de impedancia inadecuada La ganancia está establecida demasiado alta | Asegúrese de que haya un flujo de aire adecuado alrededor ampmás vivaz Verificar que la impedancia de los altavoces coincida ampcarga estable del elevador Reducir ampGanancia del elevador |
9. Especificaciones
Gravity G3-12D4 Subwoofer
- Speaker Size: 12 Inches
- Voice Coil Configuration: Dual 4 Ohm
- Peak Power: 2000 Watts (each)
- RMS Power: 1000 Watts (each)
- Respuesta de frecuencia: 30 - 500 Hz
- Sensibilidad: 87 dB
Gravity WZ3000.1D Ampmás vivaz
- Max Power: 3000W @ 1 Ohm
- Clase: D
- Stable Impedance: 1 Ohm, 2 Ohm, 4 Ohm
- Signal-to-Noise Ratio (S/N): 70 dB
- Respuesta de frecuencia: 8 Hz ~ 180 Hz
- Distorsión armónica total (THD): 0.2 %
- Bass Boost Level: 0 ~ 12 dB
- Low Pass Filter (LPF): 40 Hz ~ 180 Hz
- Subsonic Filter: 0 ~ 50 Hz
- Dimensions (L×W×H): 223.5mm (8.8 in) × 211mm (8.3 in) × 64.5 mm (2.5 in)
4 Calibre AmpKit de instalación del elevador
- Power Cable: 17 ft. 4 Gauge
- Ground Cable: 3 ft. 4 Gauge
- Fuse Holder: Inline AGU with 80A + 100A Fuses
- RCA Cable: 17 ft. Double Shielded
- Turn-On Cable: 17 ft. 18 Gauge
- Speaker Wire: 20 ft. 16 Gauge
10. Garantía y soporte
Gravity products are designed for reliability and performance. For specific warranty terms and conditions, please refer to the warranty card included with your product or contact Gravity customer support. Keep your purchase receipt as proof of purchase for any warranty claims.
For technical support or inquiries, please visit the official Gravity websitio o comuníquese con su departamento de servicio al cliente.