
1. Introducción
Thank you for choosing the ONE Light 10105TR/W Trimless GU10 50W Recessed Spotlight. This manual provides essential information for the safe installation, operation, and maintenance of your new lighting fixture. Please read these instructions carefully before installation and retain them for future reference. This product complies with EN60598-1 and other specific standards.
2. Instrucciones de seguridad
- Always disconnect the power supply at the main circuit breaker before installation, maintenance, or bulb replacement.
- La instalación debe ser realizada por un electricista calificado de acuerdo con todos los códigos y regulaciones eléctricas locales.
- Este producto está diseñado para Sólo para uso en interiores. No lo instale en un lugar húmedo o seco.amp Ubicaciones.
- Ensure the ceiling material can support the weight of the fixture.
- No exceda el máximo de agua.tage de 50W para la bombilla GU10.
- Avoid touching the bulb directly with bare hands, as oils can reduce bulb life.
- Mantenga los materiales inflamables lejos de la luminaria.
3. Contenido del paquete
Verifique que todos los componentes estén presentes antes de comenzar la instalación:
- 1x Recessed Spotlight Housing (White Aluminum)
- Herrajes de montaje
- Cable eléctrico
- Almohadilla adhesiva
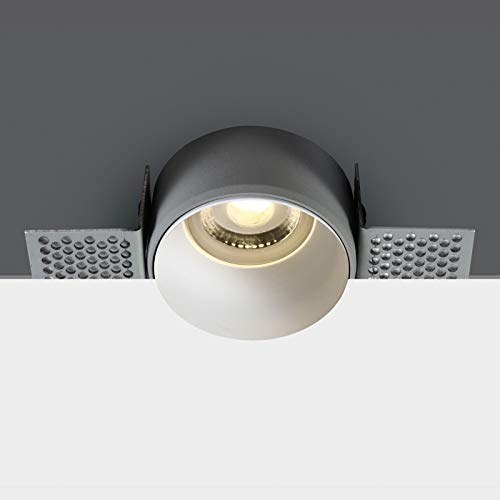
Image 1: Components of the ONE Light Trimless Recessed Spotlight, showing the mounting bracket and the light housing.
4. Configuración e instalación
This trimless recessed spotlight requires careful installation to achieve a seamless finish. Professional installation is recommended.
4.1 Dimensions and Preparation
Before cutting, ensure the chosen location avoids joists, pipes, or electrical wires. Refer to the dimensional diagram for precise cutout requirements.

Image 2: Dimensional diagram of the ONE Light Trimless Recessed Spotlight, indicating a 60mm diameter and 40mm height.
4.2 pasos de instalación
- Apague la energía: Asegúrese de que el suministro de energía principal al área de instalación esté apagado en el disyuntor.
- Preparar la abertura del techo: Using the provided dimensions (60mm diameter), cut a precise hole in the ceiling. For trimless installation, additional plastering work around the fixture may be required after mounting the housing.
- Conexiones de cable: Connect the electrical cord from the spotlight housing to your main electrical wiring. Ensure all connections are secure and insulated according to local electrical codes.
- Carcasa de montaje: Insert the spotlight housing into the ceiling opening. Use the provided mounting hardware to secure the housing firmly in place. For a trimless finish, the housing should be flush with the ceiling surface, ready for plastering.
- Instalar bombilla GU10: Once the housing is securely installed and any finishing work is complete, insert a GU10 bulb (max 50W) into the lamp holder. Twist to lock it in place.
- Montaje final: Insert the inner light component into the outer housing.
- Restaurar energía: Una vez completada la instalación y todas las conexiones estén seguras, restablezca la energía en el disyuntor.
5. Instrucciones de funcionamiento
The ONE Light 10105TR/W spotlight operates via a standard wall switch connected to its electrical circuit. This fixture is no regulable.
5.1 Reemplazo de bombillas
To replace the GU10 bulb:
- Apague la energía: Always disconnect power at the circuit breaker before replacing the bulb.
- Dejar enfriar: Deje que la bombilla vieja se enfríe completamente antes de tocarla.
- Quitar la bombilla: Gently push the bulb upwards and twist it counter-clockwise to release it from the GU10 base.
- Insertar bombilla nueva: Align the pins of the new GU10 bulb with the slots in the lamp holder. Push upwards and twist clockwise to secure it. Ensure the new bulb is a GU10 type and does not exceed 50W.
- Restaurar energía: Restablezca la energía en el disyuntor.
6. Mantenimiento
The ONE Light 10105TR/W spotlight requires minimal maintenance.
- Limpieza: Ensure the power is off and the fixture is cool. Wipe the exterior with a soft, dry cloth. Do not use abrasive cleaners or solvents, as they may damage the finish.
- No hay piezas que el usuario pueda reparar: Other than bulb replacement, there are no user-serviceable parts inside the fixture. Do not attempt to disassemble the unit.
7. Solución de problemas
Si tiene problemas con su foco, consulte los siguientes problemas y soluciones comunes:
- La luz no se enciende:
- Check if the power supply to the fixture is on at the circuit breaker and wall switch.
- Asegúrese de que la bombilla GU10 esté correctamente instalada y no esté defectuosa. Intente sustituirla por una bombilla que funcione correctamente.
- Verify electrical connections are secure (consult a qualified electrician if unsure).
- La luz parpadea:
- Ensure the GU10 bulb is fully seated and twisted into the base.
- The bulb may be faulty or nearing the end of its life. Replace the bulb.
- Check for loose wiring connections (consult a qualified electrician).
8. Especificaciones
| Característica | Especificación |
|---|---|
| Marca | ONE Light |
| Número de modelo | 10105TR/W (Internal: 178a2842-1e75-4e3c-87ee-d3a8b094c1aa) |
| Material | Aluminio |
| Color | Blanco |
| Dimensiones (alto) | 40 milímetros |
| Base de la bombilla | GU10 |
| Wat máximotage | 50 vatios |
| Volumentage | 120 voltios |
| Fuente de luz | L reemplazableamp (Halogen/LED compatible) |
| Regulable | No |
| Tipo de instalación | Recessed / Flush Mount |
| Entorno de uso | Solo en interiores |
| Eficiencia energética | Compatible with bulbs A++ to E |
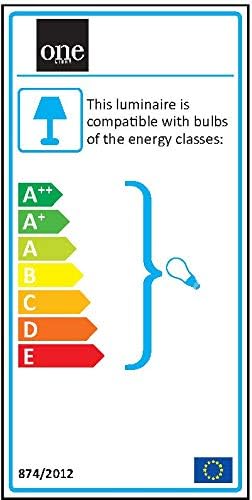
Image 3: EU Energy Label for the luminaire, indicating compatibility with bulbs of various energy classes from A++ to E.
9. Garantía y soporte
This product is covered by a standard manufacturer's warranty. For specific warranty terms and conditions, please refer to the documentation provided at the point of purchase or contact your retailer. For technical support or inquiries, please reach out to your seller or the ONE Light customer service department.