1. Introducción
This manual provides essential information for the safe and effective installation, operation, and maintenance of your Recoil S2P-38 Dual 3/8" (M10) Studs Power Distribution Block. Please read these instructions thoroughly before use and retain them for future reference.
2. Producto terminadoview
The Recoil S2P-38 Busbar is designed to provide a centralized point for power distribution in various electrical systems, including marine, automotive, and RV applications. It features dual 3/8" (M10) stainless steel studs for secure connections and a reinforced polycarbonate cover for protection against accidental short circuits. The nickel-plated brass plate ensures low resistance and maximum conductivity.
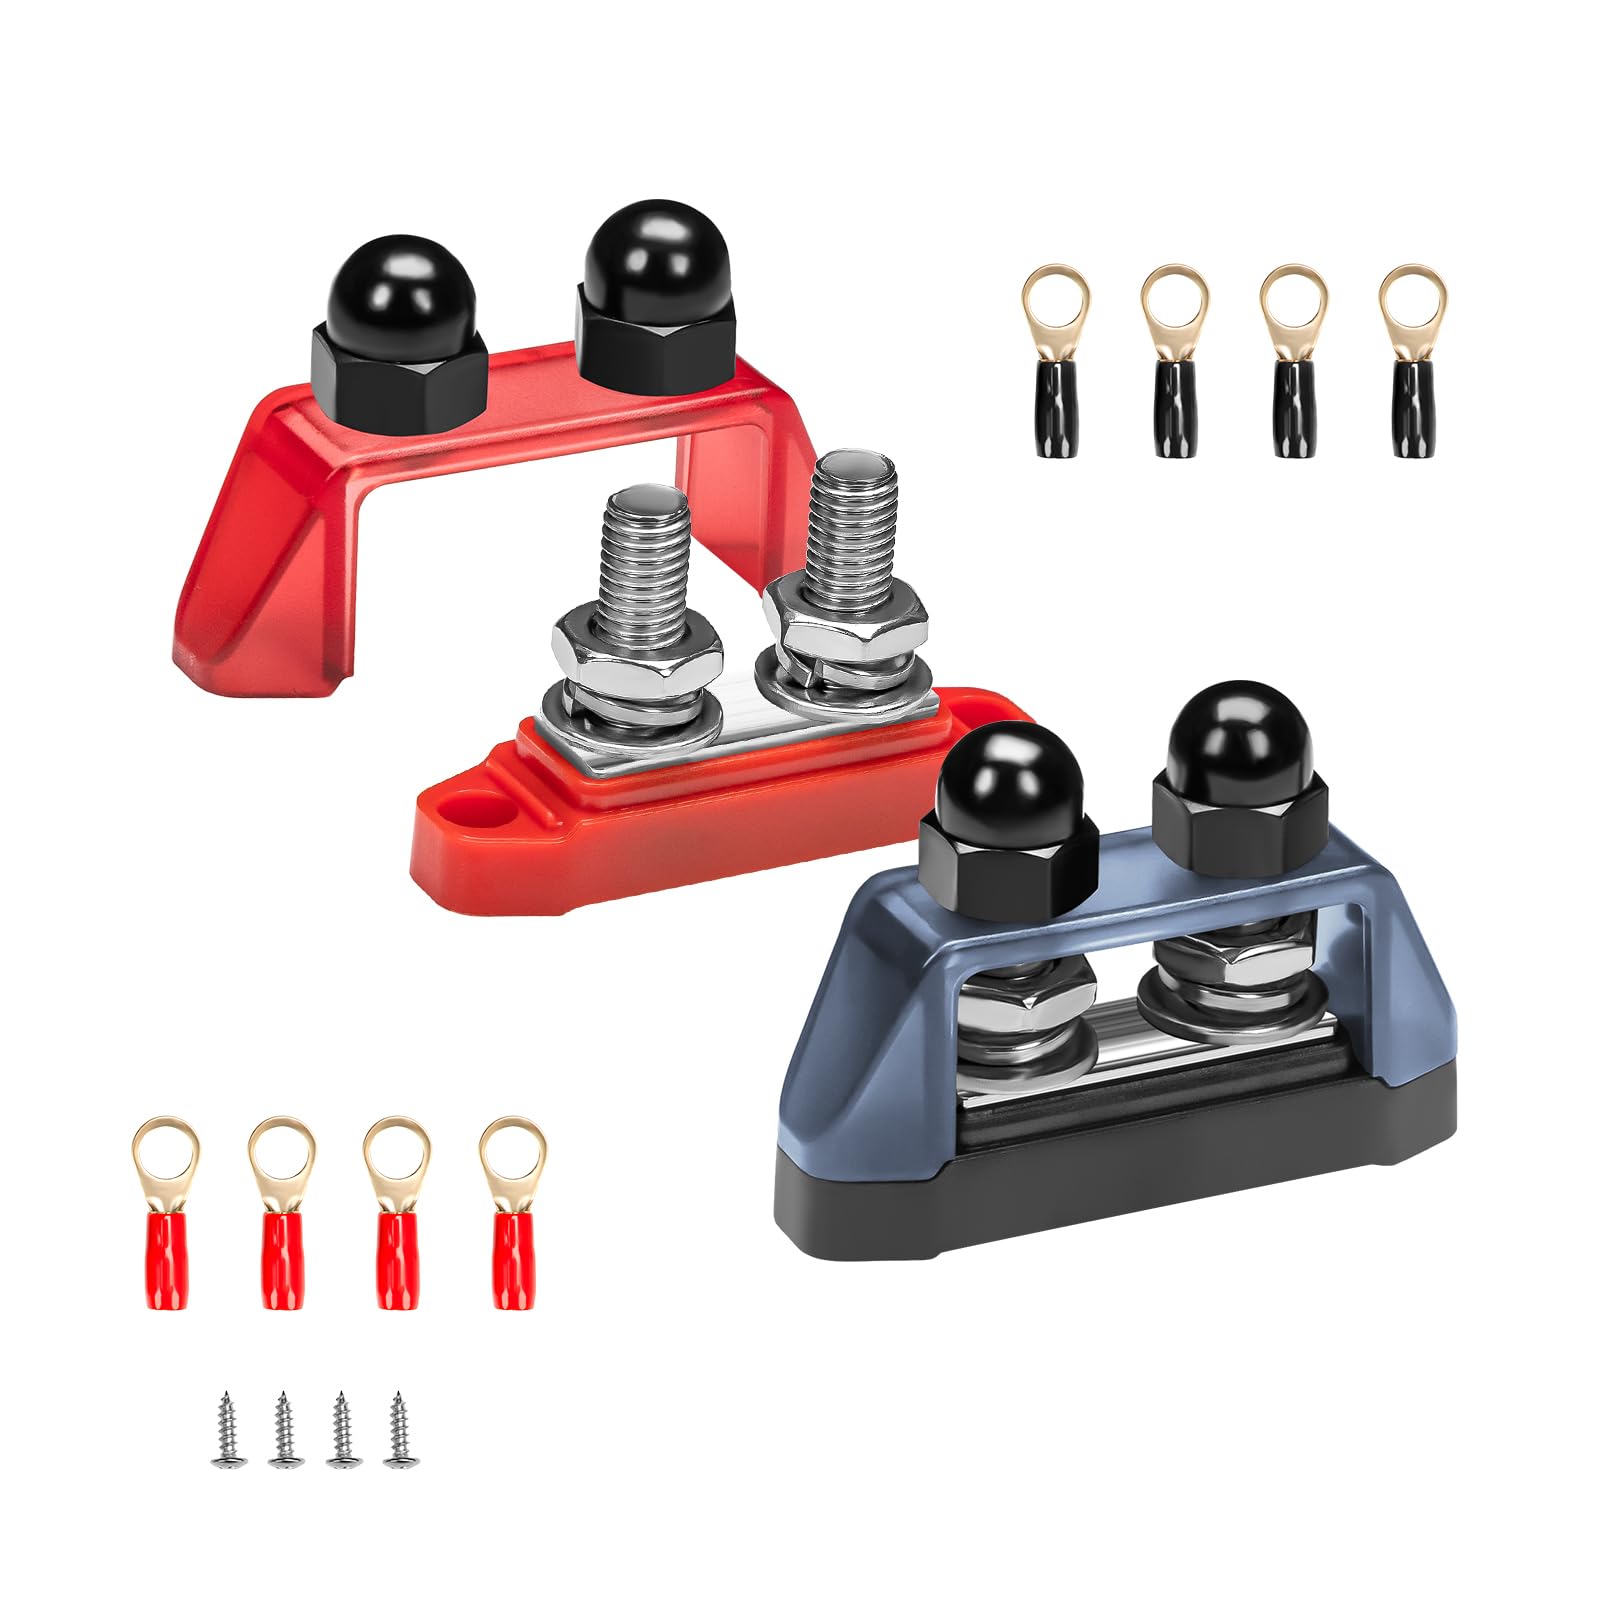
Image: Recoil S2P-38 Busbar with connected wires, illustrating its function as a power distribution point.
3. Especificaciones
| Característica | Detalle |
|---|---|
| Número de modelo | S2P-38 |
| Tamaño de Stud | Dual 3/8" (M10) Stainless Steel Studs |
| Vol máximotage | 48 V CC |
| Max continuo Ampanhelo | 250A DC |
| Material base | Policarbonato (PC) |
| Conductor Plate Material | Latón niquelado |
| Tipo de montaje | Montaje en panel |
| Peso del artículo | 242 gramos |
| Dimensiones del paquete | 14.2 x 11.6 x 5.4 cm |

Image: Detailed dimensions of the Recoil S2P-38 Busbar, showing measurements for installation planning.
4. Contenido del paquete
The Recoil S2P-38 Busbar package includes the following items:
- 2 x Busbars (Red & Black)
- 8 x 8AWG Ring Terminals
- 4 x Stainless-Steel Screws

Image: Contents of the Recoil S2P-38 package, including two busbars (red and black), ring terminals, and mounting screws.
5. Información de seguridad
WARNING: Electrical systems can be dangerous. Improper installation or use can result in serious injury or damage. Always consult with a qualified professional if you are unsure about any part of the installation process.
- Always disconnect the power source (e.g., battery) before installing or servicing the busbar.
- Use equipo de protección personal (EPP) adecuado, incluidas gafas de seguridad y guantes aislantes.
- Asegúrese de que todas las conexiones estén firmes y seguras para evitar arcos eléctricos y sobrecalentamiento.
- No exceda el volumen máximotage (48V DC) or continuous amperage (250A DC) ratings.
- Install the busbar in a dry, protected location away from flammable materials.
- The polycarbonate cover must be securely attached after installation to prevent accidental short circuits.
6. Configuración e instalación
Follow these steps for proper installation of your Recoil S2P-38 Busbar:
- Elija una ubicación de montaje: Select a flat, stable surface for mounting the busbar. Ensure it is easily accessible for wiring but protected from physical damage and moisture.
- Marcar los puntos de montaje: Use the busbar as a template to mark the locations for the four stainless-steel mounting screws.
- Perforar agujeros piloto: Perfore los orificios piloto adecuados para los tornillos de montaje.
- Secure the Busbar: Attach the busbar to the chosen surface using the provided stainless-steel screws. Ensure it is firmly secured.
- Prepare los cables: Strip the insulation from your power cables and crimp the provided 8AWG ring terminals onto the ends. Ensure a strong, secure crimp.
- Conectar cables:
- Loosen the nuts on the 3/8" (M10) studs.
- Place the ring terminals onto the studs. For multiple connections, stack terminals neatly.
- Tighten the nuts securely. Do not overtighten, but ensure there is no play in the connection.
- Instalar la cubierta protectora: Place the reinforced polycarbonate cover over the studs and secure it with the nylon nuts. This cover protects against accidental contact and short circuits.
- Verificar conexiones: Double-check all connections for tightness and proper polarity before restoring power.

Imagen: Primer plano view of the nickel-plated brass plate and stainless steel studs, highlighting the robust construction for secure electrical connections.
Referencia de video de instalación:
Video: This video demonstrates the installation of a similar dual 3/8" stud busbar, providing visual guidance for connecting wires and securing the unit. (Source: Joinfworld)
Video: This video illustrates the installation process for a dual stud power distribution block, showing how to connect cables and secure the protective cover. (Source: RED WOLF)
7. Instrucciones de funcionamiento
The Recoil S2P-38 Busbar is a passive power distribution component. Its operation involves maintaining secure electrical connections for multiple circuits from a single power source.
- Ensure all connected devices draw current within the busbar's maximum continuous amperage rating (250A DC).
- Inspeccione periódicamente las conexiones para detectar cualquier signo de aflojamiento o corrosión.
- The protective cover should always remain in place during operation to prevent accidental contact with live terminals.
8. Mantenimiento
Regular maintenance ensures the longevity and safe operation of your busbar:
- Inspección periódica: Annually, or more frequently in harsh environments, inspect the busbar for any signs of corrosion, discoloration, or physical damage.
- Comprobar conexiones: Verify that all nuts on the studs are tight. Loose connections can lead to resistance, heat buildup, and potential failure.
- Limpieza: If necessary, disconnect power and gently clean the busbar and terminals with a dry, non-abrasive cloth. Do not use harsh chemicals or solvents.
- Integridad de la cubierta: Ensure the polycarbonate cover is intact and securely fastened. Replace if damaged.
9. Solución de problemas
If you encounter issues with your power distribution system, consider the following:
- No hay energía en el dispositivo:
- Check the main power source (battery) for charge.
- Inspect all connections at the busbar and device for tightness.
- Verify that the wire gauge is appropriate for the current draw.
- Check any inline fuses or circuit breakers in the circuit.
- Overheating Connections:
- Desconecte la energía inmediatamente.
- This usually indicates a loose connection or an overloaded circuit. Tighten all connections.
- Ensure the total current draw does not exceed the busbar's 250A DC rating.
- Verify that the wire gauge is sufficient for the current being carried.
- Corrosión:
- Desconecte la energía.
- Clean any corrosion with a wire brush and a baking soda solution (for battery terminals) or a specialized electrical contact cleaner.
- Ensure the busbar is installed in a dry environment.
10. Garantía y soporte
For warranty information or technical support, please refer to the RECOIL official webSitio web o contacte a su vendedor. Conserve su recibo de compra como comprobante.
Fabricante: RETROCESO
Websitio: Tienda RECOIL en Amazon