1. Información importante de seguridad
Before operating the Zipro Nix Rower, please read and understand all instructions in this manual. Keep this manual for future reference.
- Consulte a un médico antes de comenzar cualquier programa de ejercicios.
- Asegúrese de que todas las piezas estén correctamente ensambladas y apretadas antes de cada uso.
- Place the rower on a flat, stable surface. Ensure adequate clear space around the equipment (at least 0.6 meters).
- Mantenga a los niños y las mascotas alejados del equipo durante el funcionamiento.
- No exceda la capacidad máxima de peso del usuario de 120 kg (264 lbs).
- Use ropa y calzado deportivo adecuados.
- Si experimenta dolor, mareos o dificultad para respirar, deje de hacer ejercicio inmediatamente y consulte a un médico.
- Regularly inspect the rower for wear and tear, especially cables, straps, and moving parts. Do not use if damaged.
2. Contenido del paquete
Carefully unpack the carton and verify all parts are present and undamaged. If any parts are missing or damaged, contact customer support immediately.
- Main Rower Frame (pre-assembled components)
- Seat and Rail Assembly
- Reposapiés
- Manillar
- Consola de computadora
- Kit de hardware (pernos, arandelas, tuercas, herramientas)
- Manual de usuario
3. Montaje y configuración
Follow these steps to assemble your Zipro Nix Rower. It is recommended to have two people for assembly.
- Desempaquetar componentes: Lay out all parts on a clean, flat surface. Refer to the parts diagram in the included manual for identification.
- Coloque los estabilizadores: Fije los estabilizadores delantero y trasero al chasis principal con los pernos y arandelas incluidos. Asegúrese de que estén bien fijados para mayor estabilidad.
- Instalar el riel del asiento: Attach the seat rail to the main unit. Ensure the seat carriage slides smoothly along the rail.
- Mount Footrests: Secure the footrests to the main frame. Ensure the adjustable straps are correctly positioned.
- Conectar el manillar: Attach the handlebar to the pulling mechanism. Verify the strap or chain is securely connected.
- Install Computer Console: Mount the computer console onto its designated bracket. Connect any necessary sensor cables from the main unit to the console. Insert batteries if required.
- Comprobación final: Double-check all bolts and connections to ensure they are secure. Test the seat movement and handlebar pull for smooth operation.

Figura 3.1: The Zipro Nix Rower with its approximate dimensions: Length 183 cm, Width 46 cm, Height 48 cm. These dimensions are important for planning the placement of the rower in your home.
4. Instrucciones de funcionamiento
4.1. Ajuste de la resistencia
The Zipro Nix Rower features an 8-level magnetic resistance system. To adjust the resistance, locate the rotary knob on the main unit, typically near the footrests. Turn the knob clockwise to increase resistance (levels 1-8) and counter-clockwise to decrease it. Start with a lower resistance level and gradually increase as your fitness improves.

Figura 4.1: De cerca view of the adjustable footrests and the 8-level resistance control knob on the Zipro Nix Rower.
4.2. Using the Computer Console
The easy-to-use LCD computer console displays various workout data to help you monitor your progress.
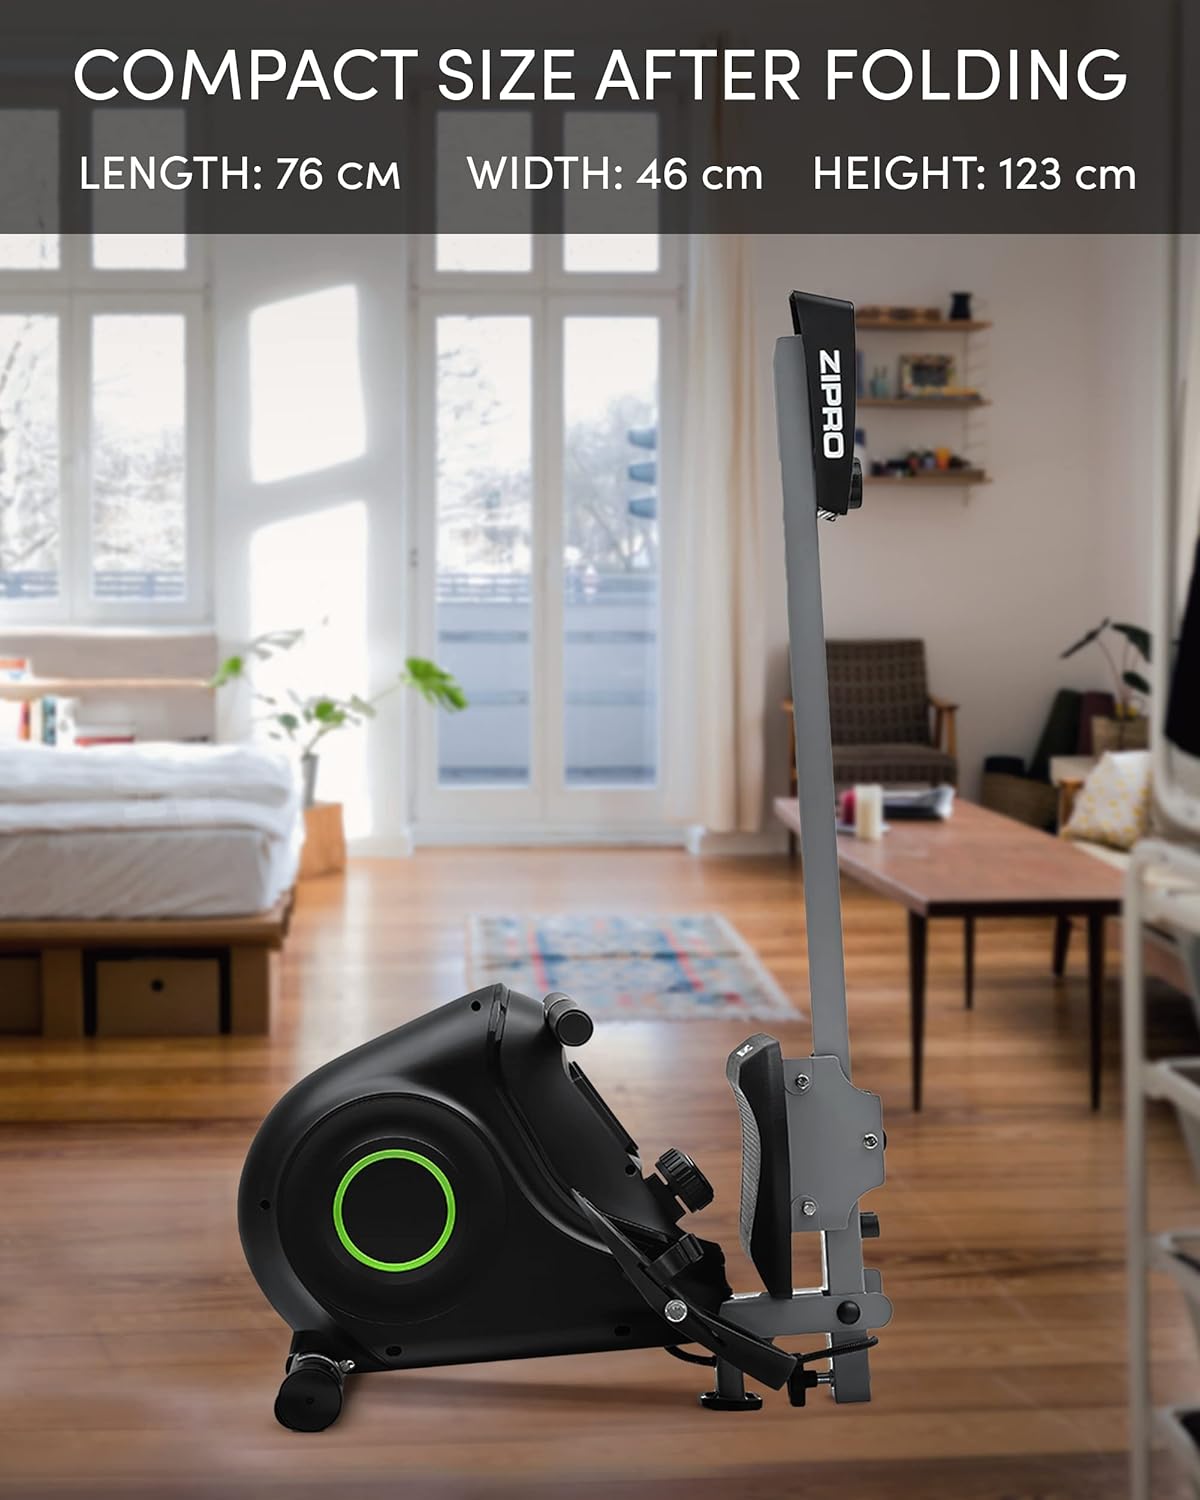
Figura 4.2: The LCD computer display of the Zipro Nix Rower, showing icons for Time, Calories, Speed, and Pulse, along with numerical readouts.
- Encendido/apagado: The console typically powers on automatically when you begin rowing or press any button. It will power off after a period of inactivity.
- Funciones: The display cycles through or allows selection of the following metrics:
- TIEMPO: Duración de tu entrenamiento.
- COUNT (Strokes): Número total de golpes realizados.
- CALORIAS: Calorías estimadas quemadas durante el entrenamiento.
- VELOCIDAD: Velocidad actual de remo.
- LEGUMBRES: Heart rate (if a compatible heart rate monitor is used and connected).
- Reset: Press and hold the button (usually marked 'MODE' or 'RESET') to clear all current workout data.
4.3. Técnica adecuada de remo
To maximize effectiveness and prevent injury, maintain proper form:
- Atrapar: Start with knees bent, arms extended forward, and back straight.
- Conducir: Push off with your legs, then lean back slightly, and finally pull the handlebar towards your abdomen.
- Finalizar: Legs are extended, body leans back slightly, and handlebar is at your abdomen.
- Recuperación: Extiende los brazos hacia adelante, luego inclínate hacia adelante y finalmente dobla las rodillas para volver a la posición de captura.

Figura 4.3: The ergonomically designed seat of the Zipro Nix Rower, providing comfort during extended workouts.
5. Mantenimiento y almacenamiento
5.1. Limpieza
Limpie la máquina de remo después de cada uso con un paño húmedo.amp cloth to remove sweat and dust. Do not use abrasive cleaners or solvents, as they may damage the finish or electronic components.
5.2. Lubricación
The magnetic resistance system is largely maintenance-free. However, periodically check the seat rail for any debris and wipe it clean. If the seat movement becomes less smooth, a small amount of silicone-based lubricant can be applied to the rail, but avoid oil-based lubricants.
5.3. Almacenamiento
The Zipro Nix Rower is designed to be foldable for compact storage, saving space when not in use.
- Plegable: Follow the instructions in your assembly manual for folding the rower into its vertical position. This typically involves releasing a locking pin or knob and folding the rail upwards.
- Transporte: Utilize the integrated transport wheels located on the rear stabilizer to easily move the rower. Tilt the rower onto its wheels and push it to your desired storage location.

Figura 5.1: The Zipro Nix Rower in its compact, folded position, ideal for space-saving storage.

Figura 5.2: De cerca view of the transport wheels on the Zipro Nix Rower, facilitating easy relocation of the unit.
6. Solución de problemas
If you encounter issues with your Zipro Nix Rower, refer to the following common problems and solutions:
| Problema | Posible causa | Solución |
|---|---|---|
| No display on computer console | Batteries are dead or incorrectly installed. Loose sensor cable connection. | Replace batteries. Check battery orientation. Ensure sensor cable is securely plugged into the console. |
| La resistencia se siente inconsistente o demasiado baja/alta | Resistance knob not set correctly. Internal magnetic mechanism issue. | Adjust the resistance knob to a different level. If problem persists, contact customer support. |
| El asiento no se desliza suavemente | Debris on the rail. Rail or wheels need lubrication. | Clean the seat rail and wheels. Apply a small amount of silicone-based lubricant to the rail. |
| Ruidos inusuales durante el funcionamiento | Loose bolts or components. Internal friction. | Check and tighten all visible bolts. If noise persists, discontinue use and contact customer support. |
7. Especificaciones
Detailed technical specifications for the Zipro Nix Rower:
| Característica | Especificación |
|---|---|
| Número de modelo | 6299217 |
| Marca | ZIPRO |
| Mecanismo de resistencia | Magnético |
| Niveles de resistencia | 8 |
| Tipo de pantalla | Pantalla LCD |
| Métricas mostradas | Time, Strokes (Count), Calories, Speed, Pulse |
| Material del marco | Acero carbono |
| Peso máximo del usuario | 120 kilogramos (264 libras) |
| Dimensiones del producto (L x An x Al) | 183 x 46 x 48 cm (72 x 18.1 x 18.9 pulgadas) |
| Dimensiones plegadas (L x An x Al) | Aprox. 76 x 46 x 123 cm (30 x 18.1 x 48.4 pulgadas) |
| Peso del artículo | 27 kilogramos (59.5 libras) |
| Fuente de alimentación (consola) | Funciona con pilas |
| Características especiales | Adjustable foot strap, Foldable design, Transport wheels |
8. Garantía y soporte
For warranty information, please refer to the warranty card included with your product or visit the official ZIPRO website. If you require technical assistance, replacement parts, or have any questions not covered in this manual, please contact ZIPRO customer support through their official channels.
Tenga a mano el número de modelo (6299217) y el comprobante de compra cuando se comunique con el soporte técnico.