
MONTAJE MU0034
Manual de instrucciones del soporte de escritorio para monitor único MOUNTUP MU0034
Marca: MOUNTUP | Modelo: MU0034
1. Introducción
This manual provides detailed instructions for the installation, operation, and maintenance of your MOUNTUP MU0034 Single Monitor Desk Mount. Please read this manual thoroughly before installation to ensure correct setup and safe operation. This monitor mount is designed to enhance your workspace ergonomics by providing adjustable positioning for a single monitor.
2. Información de seguridad
- Asegúrese de que todos los componentes estén presentes y sin daños antes de la instalación. No lo utilice si alguna pieza falta o está defectuosa.
- This product is intended for monitors weighing up to 17.6 lbs (8 kg) and screen sizes from 17 to 32 inches. Do not exceed the maximum weight capacity.
- Compatible VESA patterns are 75x75mm and 100x100mm. Verify your monitor's VESA pattern before proceeding.
- Ensure the desk surface is stable and strong enough to support the combined weight of the mount and monitor.
- Apriete todos los tornillos firmemente, pero no los apriete demasiado para evitar dañar las roscas o los componentes.
- Mantenga a los niños y a las mascotas alejados durante la instalación.
- Si tiene alguna duda sobre el proceso de instalación, consulte con un profesional cualificado.
3. Contenido del paquete
Por favor verifique que todas las piezas estén incluidas en su paquete:
- Conjunto del brazo del monitor
- Escritorio Clamp Base
- Componentes de la base del ojal
- Placa VESA
- Kit de hardware (tornillos, arandelas, llaves Allen)
- Manual de instrucciones
4. Especificaciones
| Característica | Especificación |
|---|---|
| Número de modelo | MU0034 |
| Material | Aluminio pulido |
| Compatibilidad de tamaño de pantalla | 17" to 32" (flat or curved) |
| Capacidad de peso | Hasta 17.6 libras (8 kg) |
| Compatibilidad VESA | 75 x 75 mm, 100 x 100 mm |
| Ajuste de altura | Up to 11" (16.3" total height adjustment range) |
| Rango de inclinación | De +45° a -45° |
| Rango giratorio | 360° (arm), 180° (monitor plate) |
| Rotación | 360° (landscape to portrait) |
| Max Desk Thickness (C-clamp) | 3.35" |
| Diámetro del orificio del ojal | 0.39" - 3.1" |
5. Configuración e instalación
The MOUNTUP MU0034 offers two installation options: C-clamp mounting and Grommet mounting. Choose the method suitable for your desk.
5.1. C-Clamp Montaje
This method is for desks without existing grommet holes, or if you prefer clamping to the edge of your desk. Ensure your desk thickness is no more than 3.35 inches.
- Coloque el C-clamp: Ensamblar el C-clamp components to the base of the monitor arm. Position the base on the edge of your desk and tighten the clamp screw until it is secure.
- Conecte la placa VESA al monitor: Secure the VESA plate to the back of your monitor using the appropriate screws from the hardware kit. Ensure the screws are tightened securely.
- Slide Monitor onto Arm: Carefully slide the monitor (with the attached VESA plate) onto the monitor arm's VESA head. Ensure it clicks into place or is secured with the provided locking mechanism.
- Ajustar la tensión: Refer to Section 6.1 for adjusting the gas spring tension to match your monitor's weight.

Figure 1: Illustration of C-clamp and Grommet mounting options. The C-clamp is shown securing the mount to the desk edge, while the grommet mount uses a desk hole.
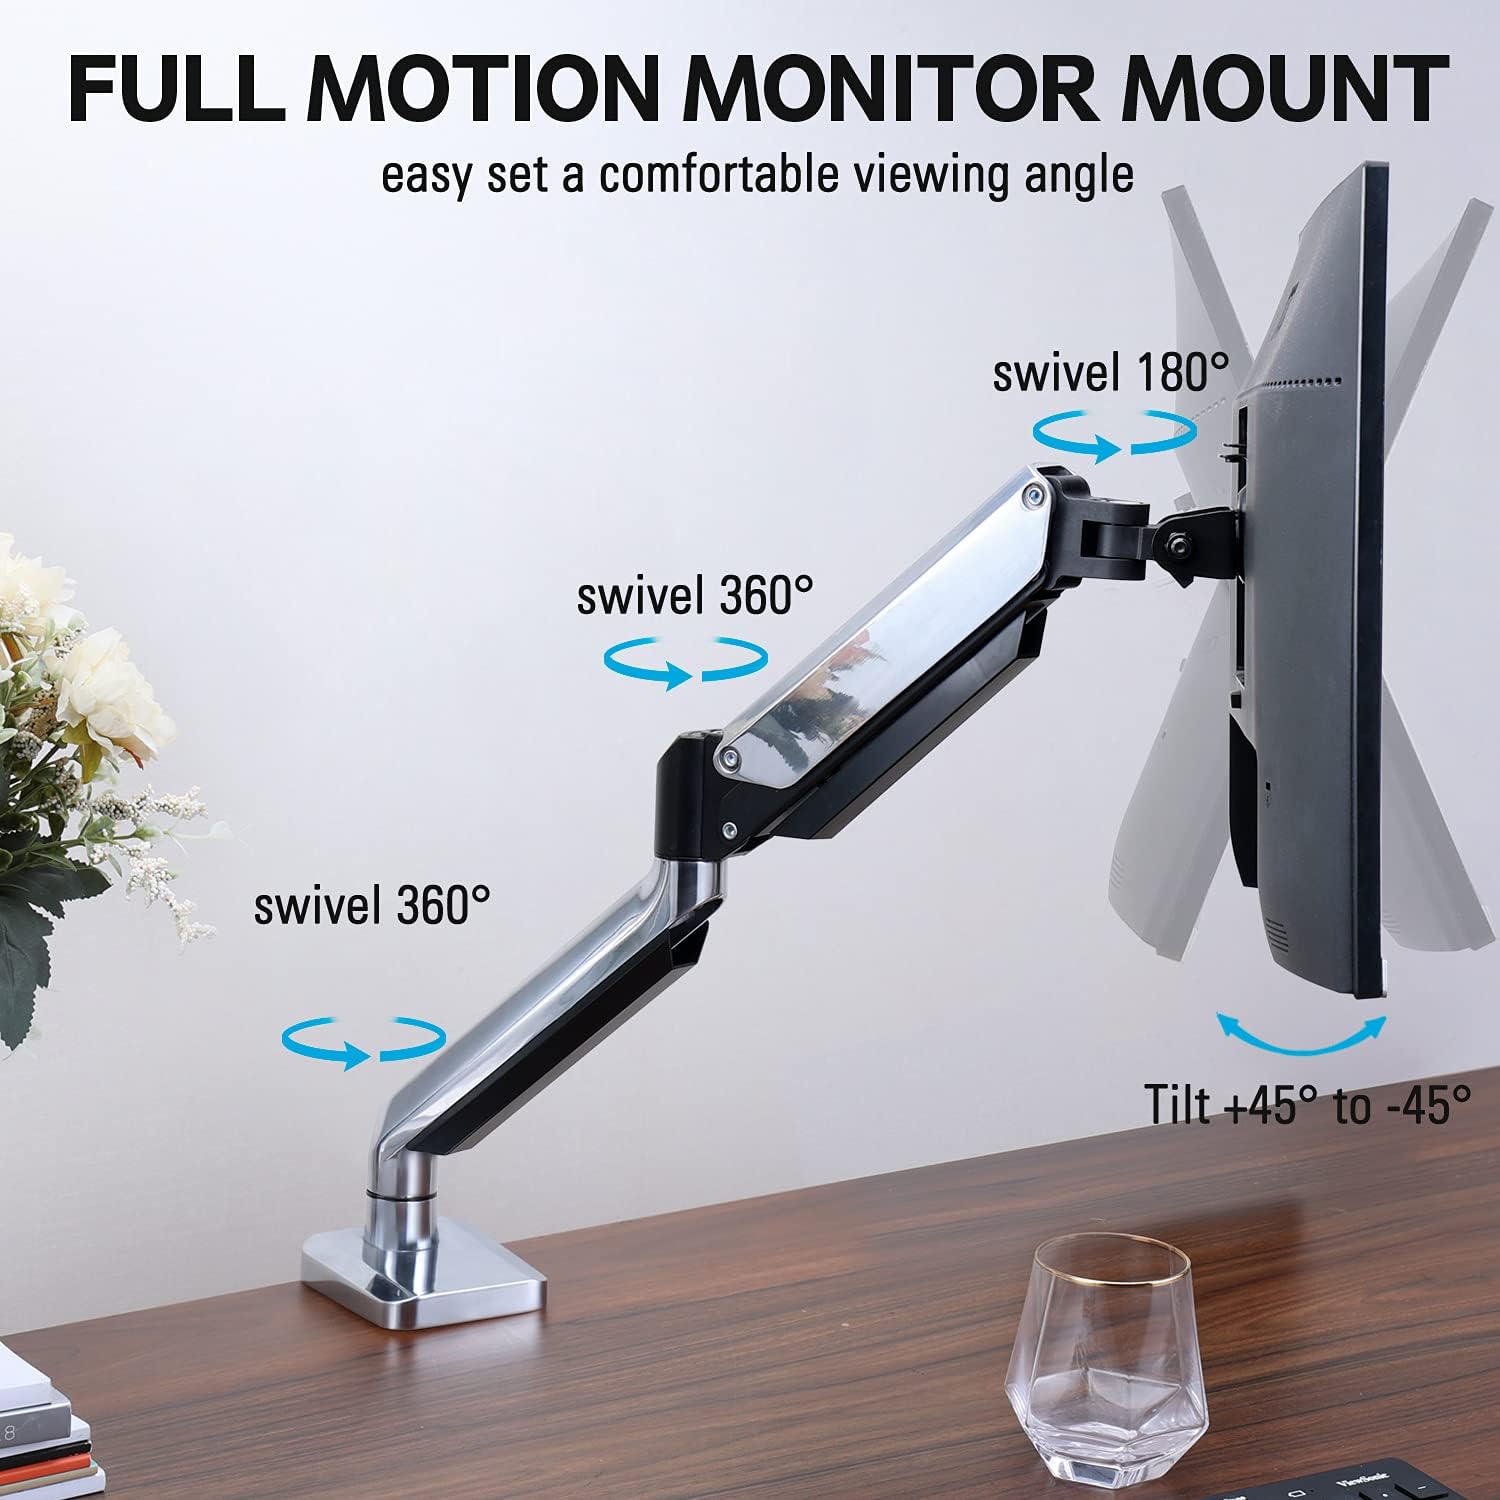
Figure 2: The removable VESA plate being attached to the back of a monitor, then sliding onto the monitor arm for easier installation.
5.2. Montaje con ojal
This method utilizes an existing hole in your desk. Ensure your desk thickness is no more than 3.35 inches and the grommet hole diameter is between 0.39 and 3.1 inches.
- Assemble Grommet Base: Insert the grommet base components through the desk hole and secure them from underneath the desk using the provided plate and nut.
- Conecte la placa VESA al monitor: Secure the VESA plate to the back of your monitor using the appropriate screws from the hardware kit. Ensure the screws are tightened securely.
- Slide Monitor onto Arm: Carefully slide the monitor (with the attached VESA plate) onto the monitor arm's VESA head. Ensure it clicks into place or is secured with the provided locking mechanism.
- Ajustar la tensión: Refer to Section 6.1 for adjusting the gas spring tension to match your monitor's weight.
6. Operación y ajustes
The MOUNTUP MU0034 monitor arm offers various adjustments for optimal viewing comodidad.
6.1. Ajuste de la tensión del resorte de gas
The gas spring tension needs to be adjusted to match the weight of your monitor. This ensures the monitor stays in position once adjusted.
- If the monitor drifts down, turn the adjustment screw (usually located on the arm joint) clockwise ("+") to increase tension.
- If the monitor floats up, turn the adjustment screw counter-clockwise ("-") to decrease tension.
- Adjust gradually until the monitor remains stable at any height.
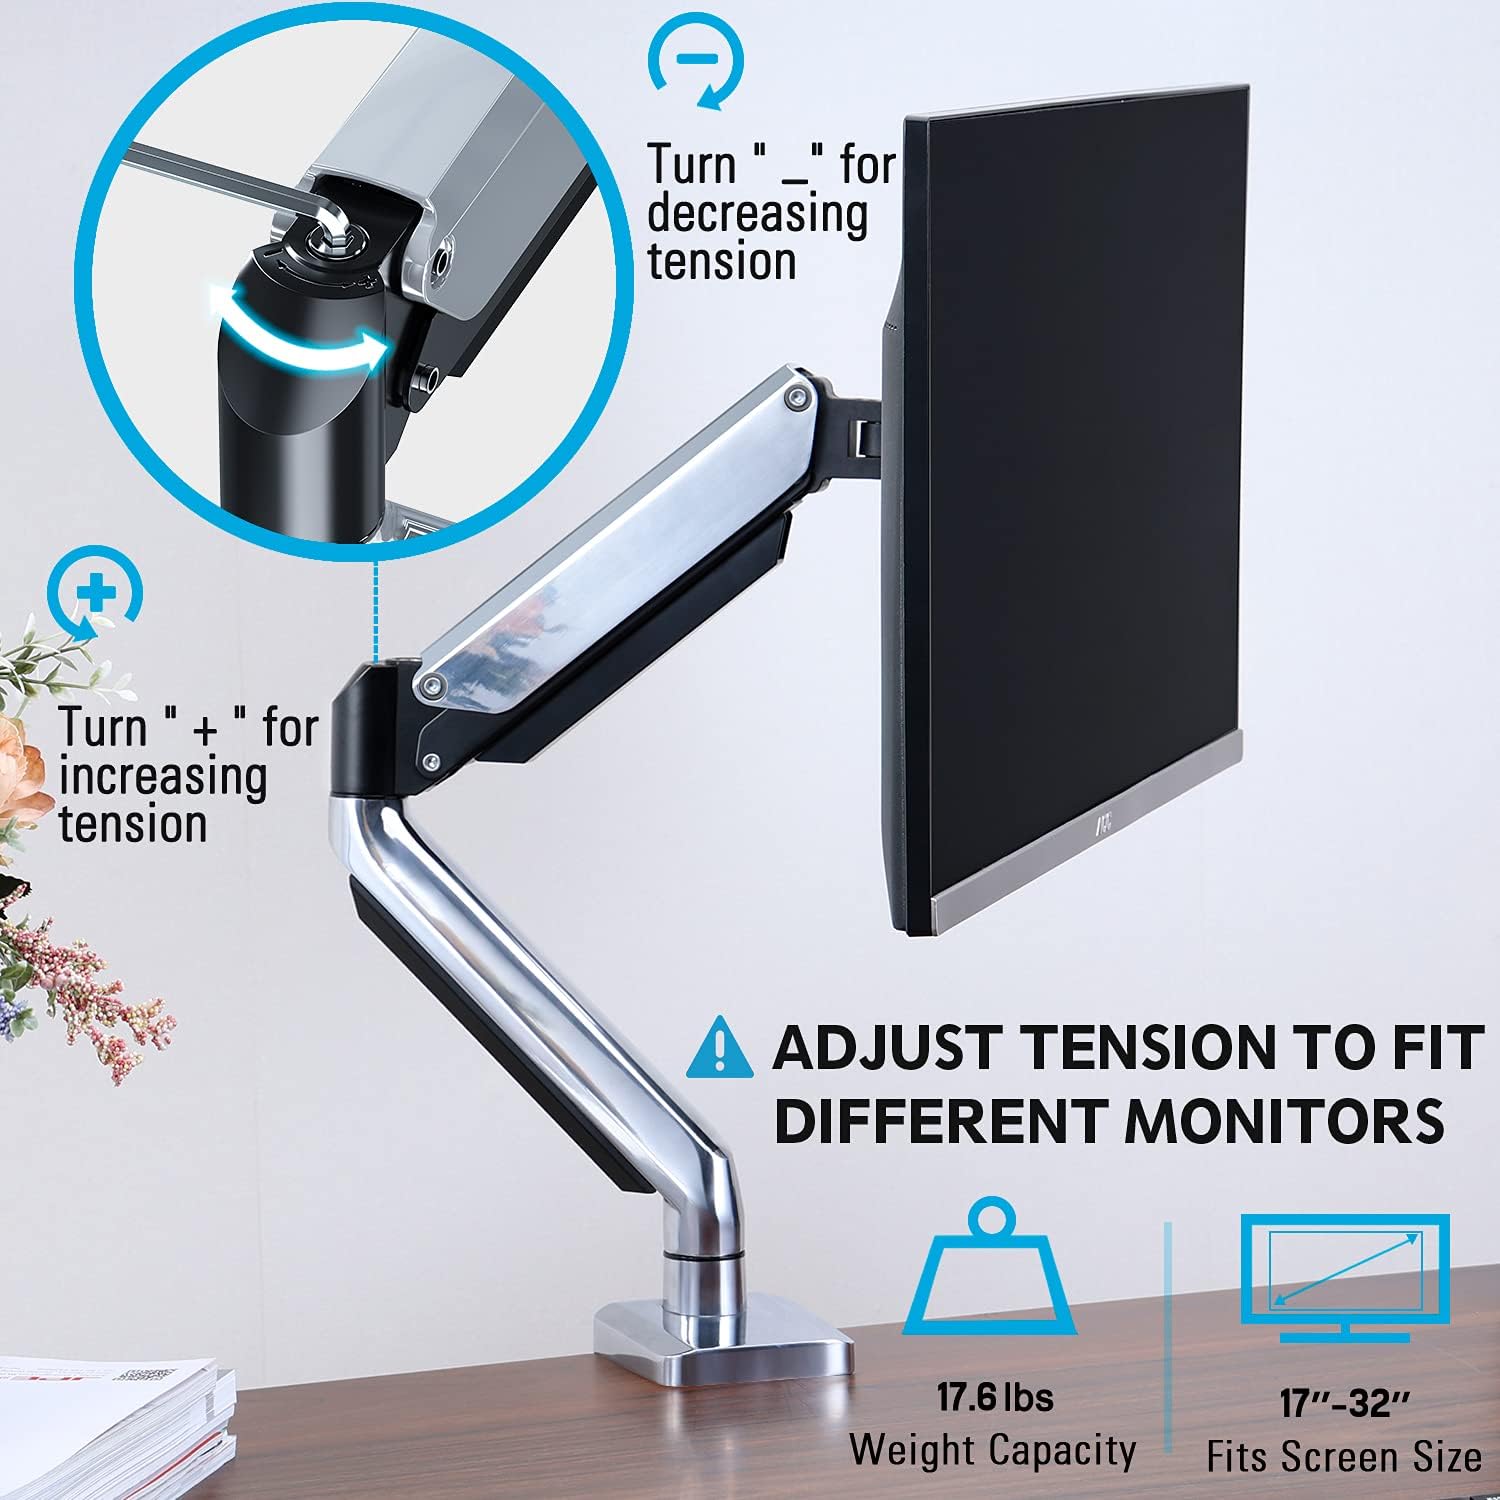
Figure 3: Instructions for adjusting the gas spring tension using an Allen key. Turning clockwise increases tension, counter-clockwise decreases it.
6.2. Ajuste de altura
Once the gas spring tension is correctly set, you can easily raise or lower your monitor to your desired ergonomic height. The arm allows for up to 11 inches of vertical adjustment.

Figure 4: Diagram illustrating the maximum height adjustment of 11 inches and maximum extension of 17.5 inches.
6.3. Inclinación, giro y rotación
The monitor arm provides full motion capabilities:
- Inclinación: Adjust the monitor screen +45° to -45° to reduce glare or find a comfortable viewángulo de ing.
- Girar: The arm can swivel 360° at the base and 360° at the middle joint. The monitor plate itself can swivel 180°. This allows for easy screen sharing or repositioning.
- Rotación: Gire el monitor 360° para cambiar entre orientación horizontal y vertical.

Figure 5: Visual representation of the monitor arm's full motion capabilities, including 360° swivel, 180° swivel at the monitor plate, and +45° to -45° tilt.

Figure 6: An image demonstrating the monitor's ability to rotate 360 degrees, allowing for both landscape and portrait viewmodos de ing.
7. Gestión de cables
The MOUNTUP MU0034 features integrated cable management to keep your workspace tidy.
- Pase los cables del monitor (alimentación, video, etc.) por la parte inferior del brazo.
- Use the provided cable clips or covers to secure the cables within the arm channels.
- Asegúrese de que los cables tengan suficiente holgura para permitir un rango completo de movimiento sin tensión.

Figure 7: Illustration of how cables are routed and organized through the integrated channels on the monitor arm, keeping the desk clear.
8. Mantenimiento
- Revise periódicamente todos los tornillos y conexiones para asegurarse de que permanezcan apretados.
- Limpie el soporte con un paño suave.amp Paño. Evite limpiadores abrasivos o disolventes.
- No lubrique el mecanismo del resorte de gas.
9. Solución de problemas
| Problema | Posible causa | Solución |
|---|---|---|
| Monitor sags or won't stay up | La tensión del resorte de gas es demasiado baja para el peso del monitor. | Increase gas spring tension by turning the adjustment screw clockwise ("+"). |
| Monitor floats up or is hard to push down | La tensión del resorte de gas es demasiado alta para el peso del monitor. | Decrease gas spring tension by turning the adjustment screw counter-clockwise ("-"). |
| El monitor se tambalea | Mount not securely fastened to desk or VESA plate not tight. | Compruebe y apriete todos los tornillos.amp/grommet screws and VESA plate screws. |
| Difficulty rotating/tilting monitor | Las articulaciones están demasiado apretadas. | Loosen the corresponding joint screws slightly (do not remove). |
10. Garantía y soporte
The MOUNTUP MU0034 Single Monitor Desk Mount is backed by a 3-year support period. For technical assistance, missing parts, or warranty claims, please contact MOUNTUP customer support through their official channels or the retailer where the product was purchased.
Conserve su comprobante de compra para fines de garantía.
Ask a question about this manual
Ask about setup, troubleshooting, compatibility, parts, safety, or missing instructions. Manuals+ will review the question and use this page’s manual context to help answer it.