
1. Introducción
This manual provides essential instructions for the safe and efficient operation, installation, maintenance, and troubleshooting of your Euhomy Commercial Ice Maker. Please read this manual thoroughly before using the appliance and retain it for future reference.
The Euhomy Commercial Ice Maker is designed to produce up to 84 pounds of ice per 24 hours, with an ice storage capacity of 8.8 pounds. It is suitable for various settings including homes, small businesses, bars, and parties.
2. Instrucciones de seguridad
- Ensure the ice maker is connected to a grounded power outlet with the correct voltage (115 voltios).
- No utilice el aparato si el cable o el enchufe están dañados. Si están dañados, póngase en contacto con personal de servicio técnico cualificado.
- Mantenga las aberturas de ventilación libres de obstrucciones.
- No almacene sustancias explosivas como latas de aerosol con propulsor inflamable en este aparato.
- Este aparato no está diseñado para ser utilizado por personas (incluidos niños) con capacidades físicas, sensoriales o mentales reducidas, o con falta de experiencia y conocimientos, a menos que hayan recibido supervisión o instrucciones sobre el uso del aparato por parte de una persona responsable de su seguridad.
- Desenchufe siempre la fábrica de hielo antes de limpiarla o realizar cualquier mantenimiento.
- No sumerja el aparato, el cable o el enchufe en agua u otros líquidos.
- Utilice únicamente agua potable para la producción de hielo.
3. Configuración e instalación
Before first use, ensure the ice maker is placed on a stable, level surface away from direct sunlight and heat sources. Allow at least 4 inches of space around the unit for proper ventilation.
3.1 Conexión de suministro de agua
Your Euhomy ice maker supports two methods for water supply: manual addition or direct connection to a water inlet pipe.

Figura 3.1: Illustration of the two water supply methods for the ice maker. Water can be added manually from the top or connected via a water inlet pipe at the rear.
For direct water inlet pipe connection, follow these steps:

Figura 3.2: Detailed steps for connecting the water inlet pipe. This involves removing a plug, inserting the pipe, and securing it with a blue ring.
- Remove Blue Ring and Plug: Locate the water inlet port at the back of the machine. Carefully remove the blue retaining ring and the plug.
- Insertar tubería: Insert the water inlet pipe firmly into the port.
- Secure Blue Ring: Push the blue retaining ring back into place to secure the pipe connection.
3.2 Dimensiones del producto
Ensure adequate space for the ice maker. The dimensions are approximately 13.4 inches (D) x 13.6 inches (W) x 24 inches (H).

Figura 3.3: Encimaview of the ice maker's dimensions and included accessories like the ice scoop and water hoses.
3.3 pies ajustables
The ice maker is equipped with adjustable feet to ensure stability on uneven surfaces.

Figura 3.4: Adjustable foot for leveling the appliance.
4. Instrucciones de funcionamiento
4.1 Panel de control terminadoview
La máquina para fabricar hielo cuenta con un panel de control LCD intuitivo para una fácil operación.

Figura 4.1: LCD Control Panel with indicators and buttons.
- LUZ: Activates the internal light.
- MINUTERO: Establece un temporizador para la operación.
- LIMPIO: Initiates the self-cleaning program.
- ENCENDIDO/APAGADO: Enciende o apaga la unidad.
- Botones +/-: Used for adjusting settings, such as ice thickness or timer duration.
Indicator Symbols:
- Flashing Snowflake: Indicates the de-icing process is active.
- Rotating Fan: Indicates the self-cleaning program is running.
- Full Ice Bucket: Indicates the ice storage bin is full, and the machine has stopped ice production.
To switch between water tank supply and faucet connection, press the ON/OFF button for 5 seconds.
4.2 Producción de hielo
The ice maker produces 32 ice cubes per cycle and has an automatic overflow feature to prevent overfilling.

Figura 4.2: Ice production capacity and automatic overflow mechanism.
The machine is designed for high efficiency and low noise operation.

Figura 4.3: Ice maker in a kitchen environment, demonstrating its quiet operation.
4.3 Ice Cube Characteristics
The ice maker produces cube-type ice that is easy to break and crystal clear. An average cycle produces 32 ice cubes in approximately 13 minutes.
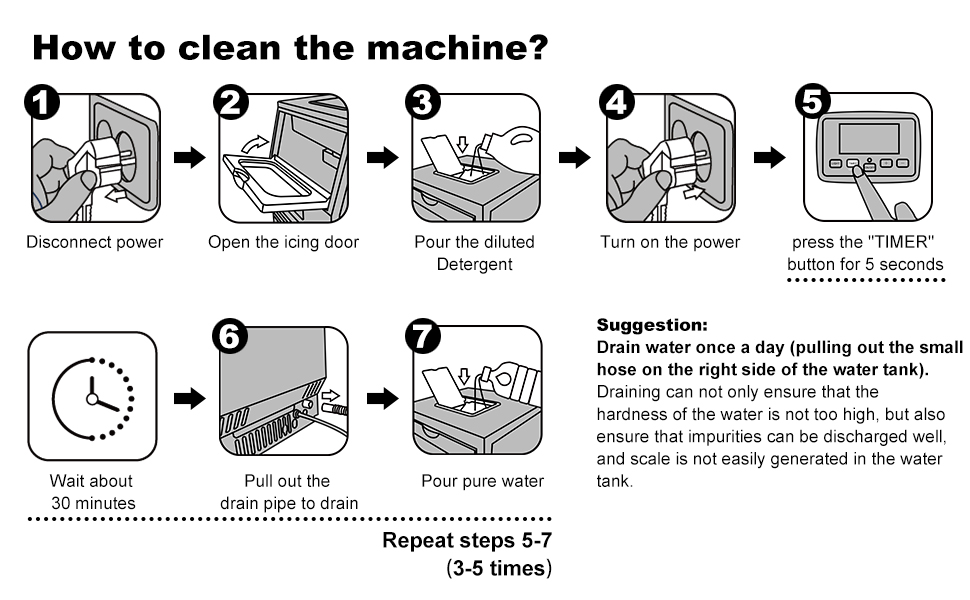
Figura 4.4: Features of the ice cubes and production process.
4.4 Curved Flip Cover Design
The ice maker features a curved flip cover for easy access to the ice bin.

Figura 4.5: Curved flip cover for convenient access.
4.5 Nano Blue Light
The interior of the ice maker is equipped with a Nano Blue Light.

Figura 4.6: Interior with Nano Blue Light.
5. Mantenimiento
La limpieza y el mantenimiento regulares son cruciales para la longevidad y el rendimiento óptimo de su máquina de hielo.
5.1 Procedimiento de limpieza

Figura 5.1: Step-by-step guide for cleaning the ice maker.
- Desconectar la energía: Desconecte la máquina de hielo de la toma de corriente.
- Open Icing Door: Open the front door to access the ice-making components.
- Pour Diluted Detergent: Pour a diluted cleaning solution (e.g., food-grade citric acid solution) into the water tank.
- Encienda la energía: Plug the ice maker back in.
- Iniciar limpieza: Press the "TIMER" button for 5 seconds to start the self-cleaning cycle.
- Esperar: Allow the cleaning cycle to run for approximately 30 minutes.
- Desagüe: Pull out the drain pipe located on the right side of the water tank to drain the cleaning solution.
Sugerencia: Drain water once a day by pulling out the small hose on the right side of the water tank. Regular draining helps prevent the buildup of impurities and scale, ensuring optimal ice quality and machine performance. After draining, pour pure water into the tank and repeat steps 5-7 (3-5 times) to thoroughly rinse the system.
6. Solución de problemas
Si tiene problemas con su máquina de hielo, consulte los siguientes pasos comunes de solución de problemas:
| Problema | Posible causa | Solución |
|---|---|---|
| La máquina de hielo no produce hielo | No water supply; Water pump malfunction; Refrigerant leak; Ambient temperature too high. | Check water connection/fill water tank; Contact customer support; Ensure proper ventilation. |
| Los cubitos de hielo son demasiado pequeños o blandos | Water temperature too high; Ambient temperature too high; Insufficient water flow. | Use colder water; Ensure proper ventilation; Check water supply. |
| La máquina es ruidosa | Unit not level; Fan obstruction; Normal operating sounds. | Adjust leveling feet; Clear obstructions from fan; Some noise is normal during operation. |
| "Ice Full" indicator is on, but bin is not full | Sensor de hielo obstruido o sucio. | Limpie el sensor de hielo. |
| Fuga de agua | Loose water connections; Damaged drain pipe. | Tighten all water connections; Inspect and replace drain pipe if damaged. |
Si el problema persiste después de intentar estas soluciones, comuníquese con el servicio de atención al cliente de Euhomy.
7. Especificaciones
| Característica | Especificación |
|---|---|
| Marca | EUHOMY |
| Nombre del modelo | Fabricador de hielo comercial |
| Dimensiones del producto (Pr. x An. x Al.) | 13.4" x 13.6" x 24" |
| Capacidad de producción de hielo | 84 lbs / 24 Hours |
| Capacidad de almacenamiento de hielo | 8.8 libras |
| Volumentage | 115 voltios |
| Refrigerante | R134a |
| Tipo de material | Acero inoxidable |
| ASIN | B0912YPBL1 |
8. Garantía y soporte
For warranty information and customer support, please refer to the documentation included with your product or visit the official Euhomy brand store.

Figura 8.1: Customer Support Icon.
Visita el Tienda EUHOMY Para más información.